



Time Manager
Introduction
Time Manager is an array time group control system designed by aBMC for array servers. Administrators can check device time, time zone, sync mode, NTP time source and clock offset, and set the time on single or multiple devices via NTP or manually.
Development Vision
- Establish a unified time baseline for the BMC and array sub-boards to reduce the impact of time deviation on log sorting, alarm correlation, task scheduling and fault location.
- Reduce the operation and maintenance costs and error probability of configuring devices one by one through unified NTP, time zone and batch configuration portals.
Feature Usage
View device time
Open the time management page
- Select Devices in the main navigation on the left.
- Select Time in the device menu.
- Wait for the device time list to finish loading, and check the time status field displayed on the page.
- If the time information of a certain device is displayed as
-, it means that the time status of the device cannot be obtained currently. - When you need to modify the device time, use the settings icon in the Actions column of the corresponding device.
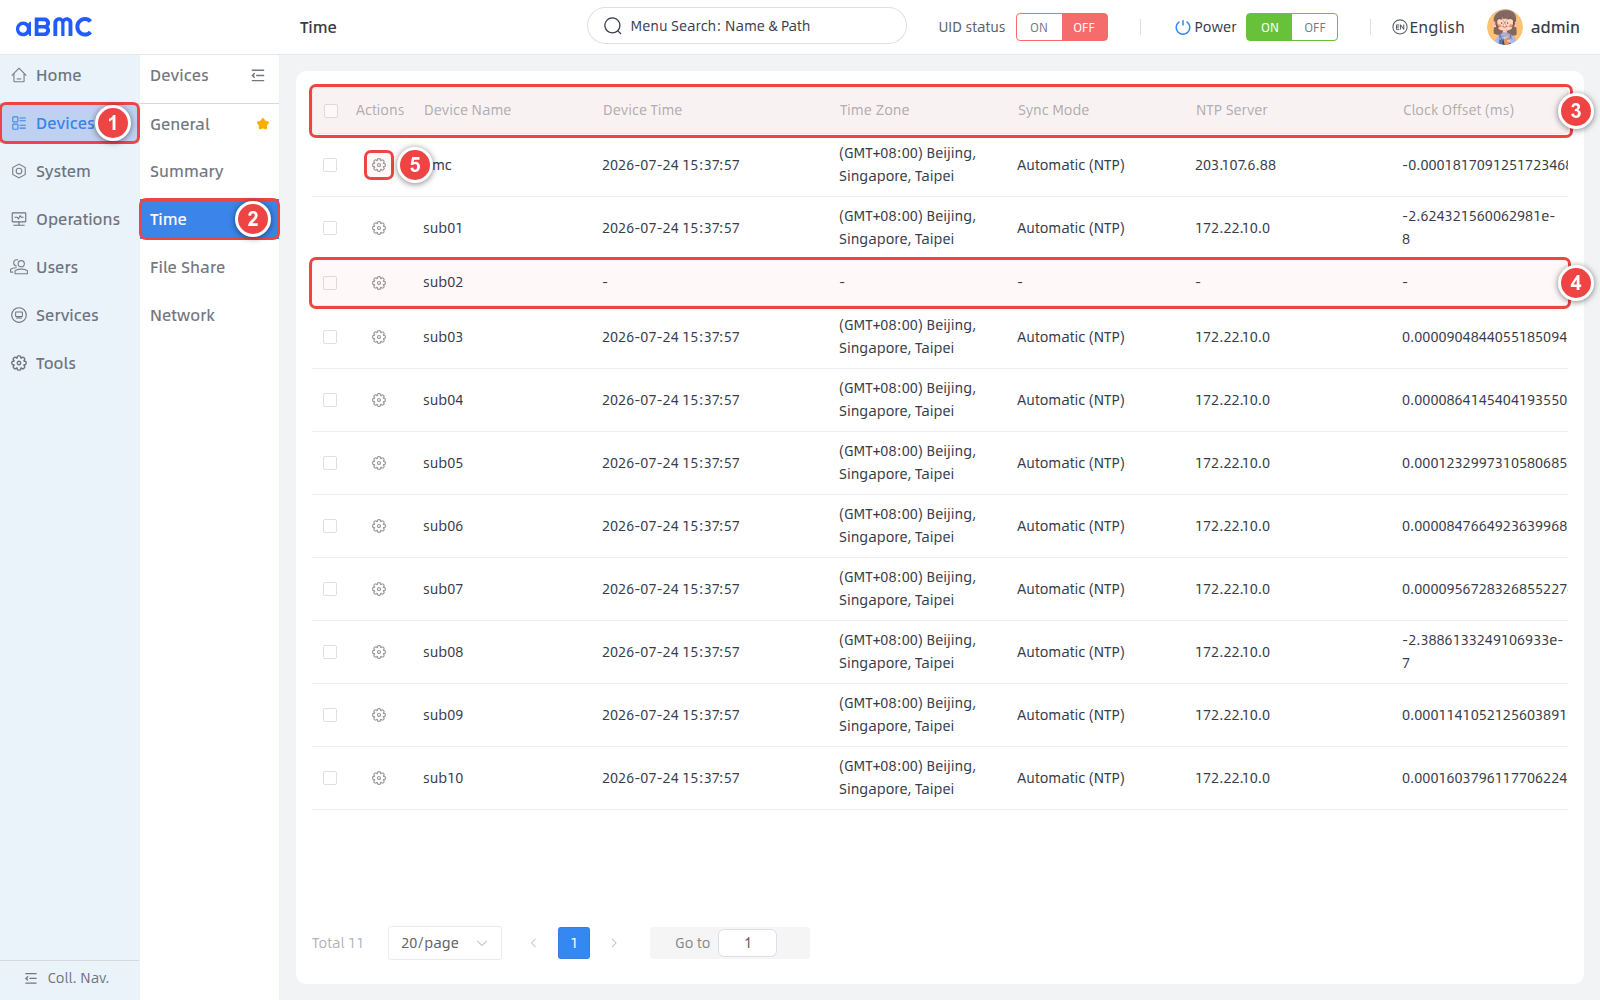
Time status field description
| Field | Description | Checkpoints |
|---|---|---|
| Device Name | The name of the device in aBMC, such as BMC or array daughterboard name. | Confirm the target device before operation to avoid modifying the wrong node. |
| Device Time | The system date and time currently returned by the device. | Should be consistent with expected time base; check device status before displaying -. |
| Time Zone | The time zone and GMT offset currently used by the device. | The same business cluster should usually use the same time zone. |
| Sync Mode | Current time synchronization mode, including Automatic (NTP) and Manual Mode. | For long-term operations it is recommended to use an available NTP time source. |
| NTP Server | The NTP time source currently used by the device. | should be consistent with the planned upstream server or BMC address. |
| Clock Offset (ms) | The device clock offset returned by the page. | Observing whether the deviation continues to increase or is abnormal for a long time should not be judged based on just one sampling. |
Determine device time status
- Confirm that Device Time is basically consistent with the current standard time.
- Confirm that the Time Zone complies with the region and business specifications of the device.
- When using NTP, confirm that Sync Mode is Automatic (NTP) and check whether the NTP Server is correct.
- Continuously observe Clock Offset (ms); when the deviation continues to expand, check the time source stability and network quality.
Status display description
The time list shows the most recent status returned by the device. When the device is offline, communication is abnormal, or status reading fails, the relevant fields may be displayed as -; the device connection should be restored first, and then the page should be refreshed to check.
Set the time of a single device
Open the time setting window
- Click the Settings icon in the Actions column of the target device.
- Select Time Settings to open the time settings window.
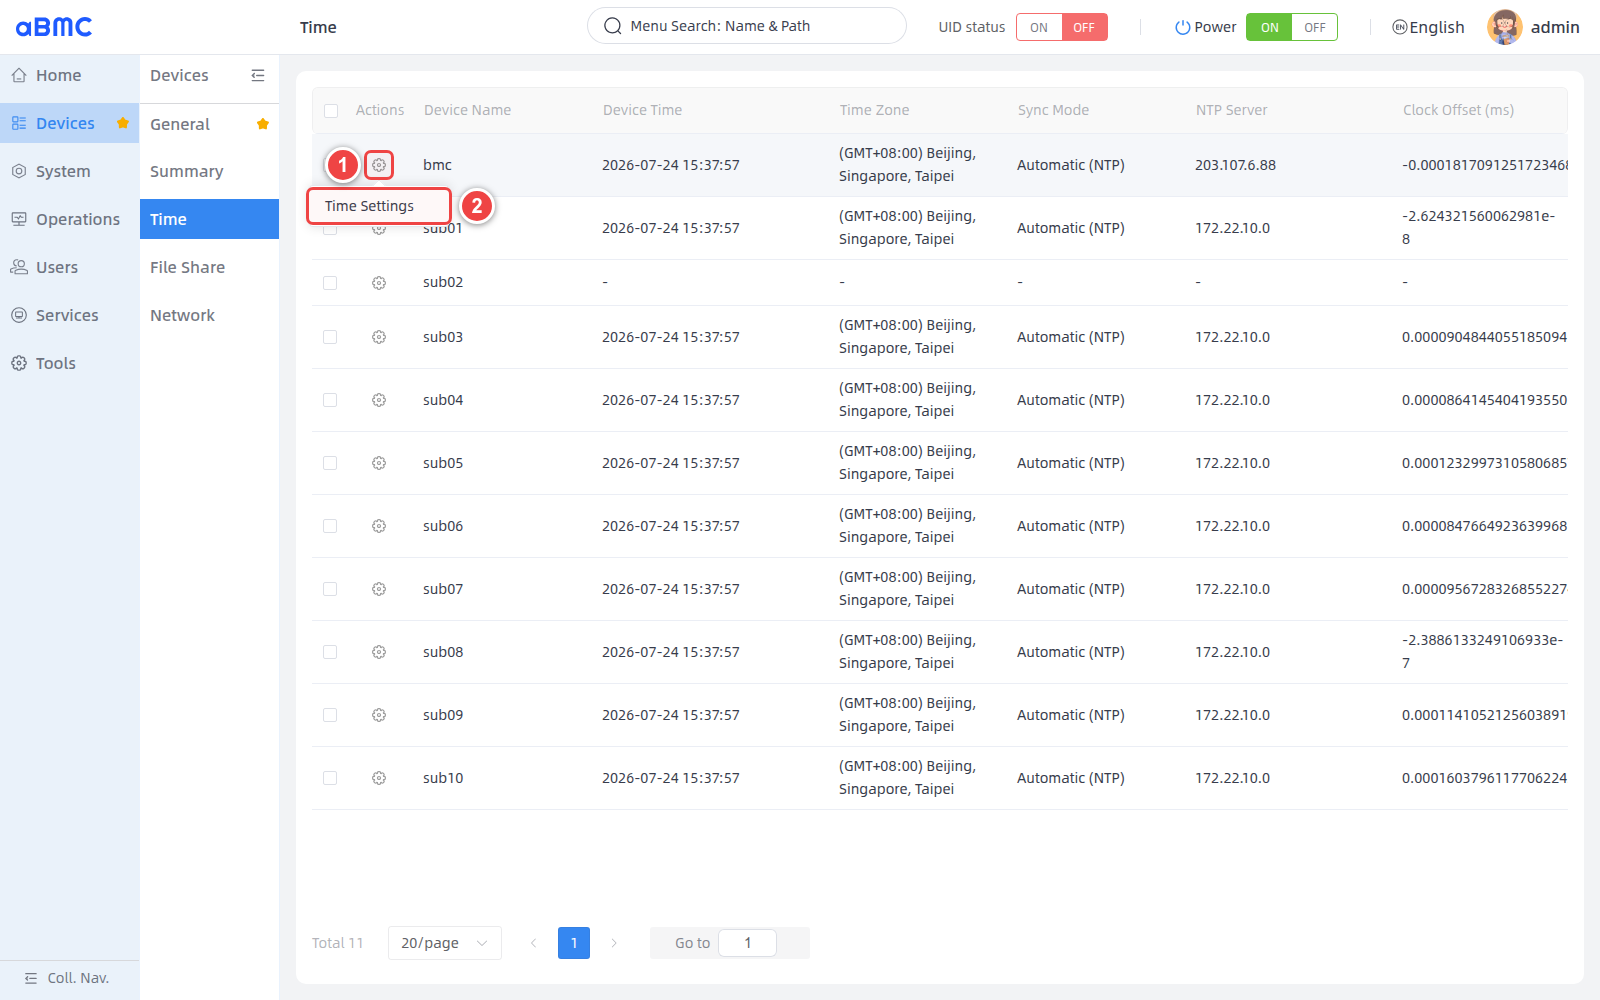
Configure NTP automatic synchronization
- Select Automatic (NTP) in Sync Mode.
- Select the time zone used in the area where the device is located in Time Zone.
- Fill in Preferred NTP; if an alternate time source is required, fill in Alternative NTP.
- When you need to set RTC, time adjustment threshold or local NTP service, expand Advanced.
- After checking that the configuration is correct, click Confirm.
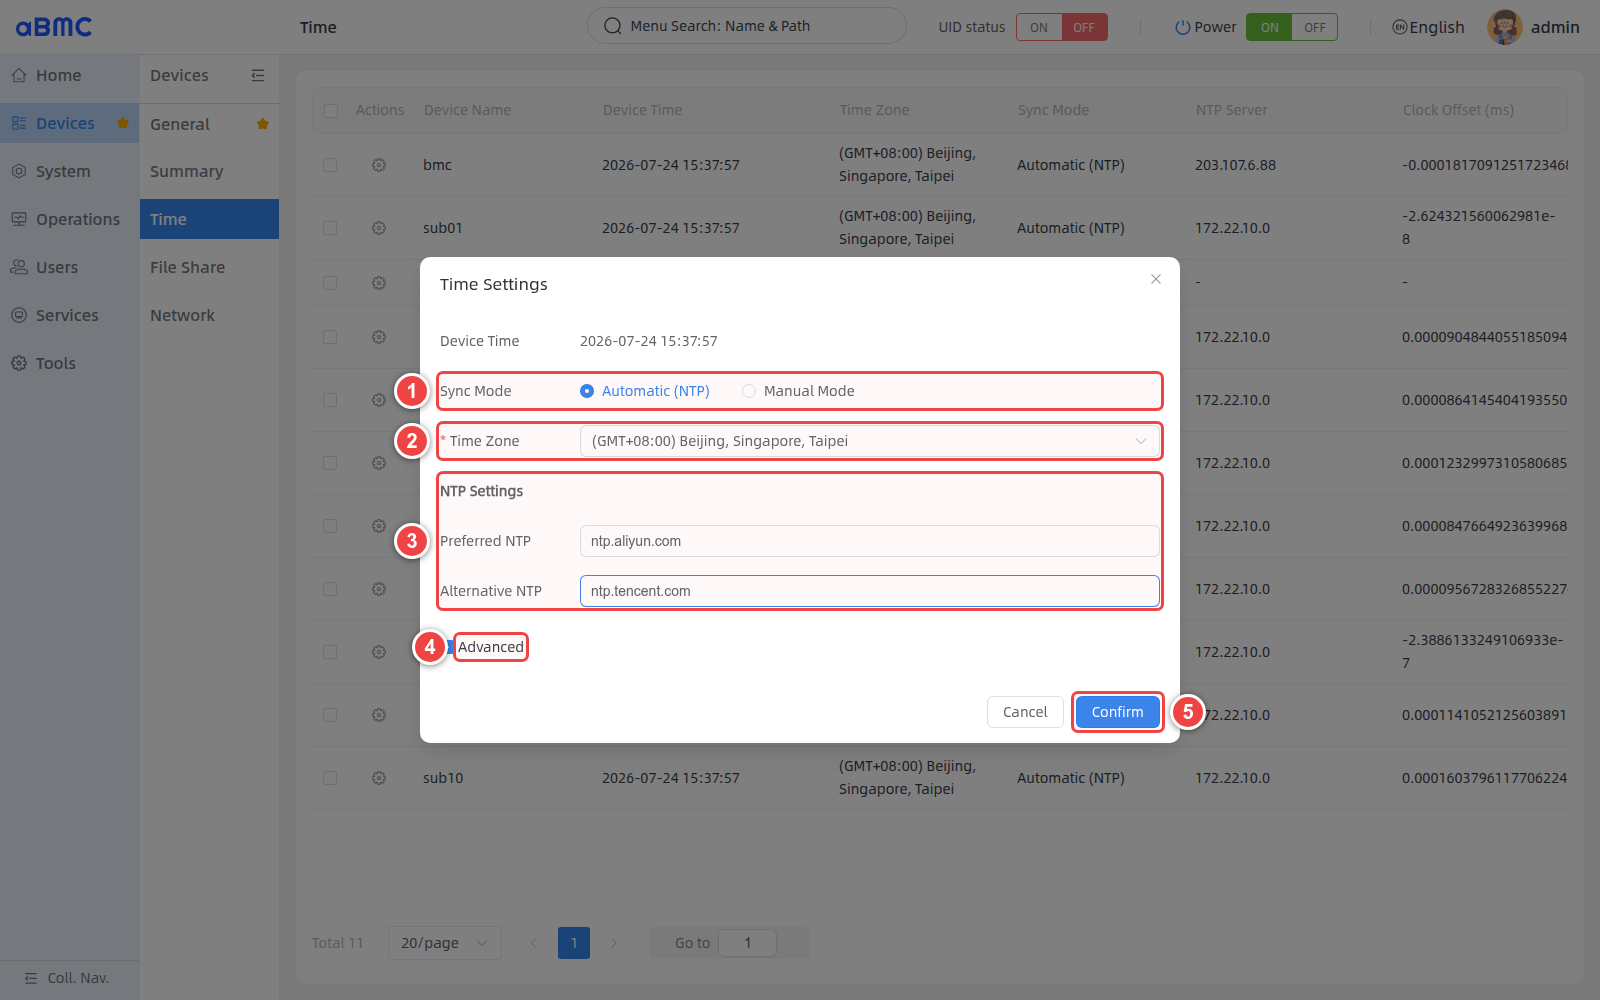
NTP parameter description
| Parameters | Description | Configuration recommendations |
|---|---|---|
| Device Time | Current device time, only used for verification before configuration. | This field is not editable. |
| Sync Mode | Choose automatic synchronization or manual settings. | Select Automatic (NTP) for continuous time adjustment scenario. |
| Time Zone | The time zone used by the device. | Should be consistent with business, log and operation and maintenance specifications. |
| Preferred NTP | Preferred NTP time source. | It is recommended to configure an IP address or domain name that the device can stably access. |
| Alternative NTP | Alternative NTP time source. | It is recommended to be independent of the preferred time source to improve time source availability. |
The NTP address can use an IP address or domain name that the device can reach, such as:
192.168.10.20
ntp.example.com
NTP network requirements
When using a domain name, ensure that the device can resolve the domain name correctly. You should also verify that routing and firewalls allow the device to access the NTP service, typically allowing UDP 123 port traffic. It may take a while for the first sync to complete.
Configure BMC and sub-board two-level synchronization
- Select Automatic (NTP) for BMC and set Preferred NTP to a reliable external time source.
- Configure the Local NTP Server parameters of the BMC according to the site plan so that it can provide time services to the sub-board.
- Return to the time list and confirm that the NTP Server and Clock Offset (ms) status of the BMC are normal.
- Open the Time Settings of the sub-board and select Automatic (NTP).
- Set the Preferred NTP of the sub-board to the BMC address that can be accessed in the sub-board management network.
- After saving, confirm that the NTP Server of the sub-board points to the BMC, and observe whether the clock deviation is stable.
Avoid time synchronization loops
Do not configure the BMC's upstream NTP time source as its downstream sub-board, otherwise a time synchronization loop may form. NTP service port communication should also be allowed between the BMC and the daughterboard.
Configure advanced NTP parameters
- Select Advanced to expand the advanced parameters.
- Set up Sync RTC according to device requirements.
- Set the number of previous calibrations and the deviation threshold in Step Calibration.
- Set the local NTP service listening port in Listen Port.
- Set up the local NTP server hierarchy in Stratum.
- After checking that the configuration is correct, click Confirm.
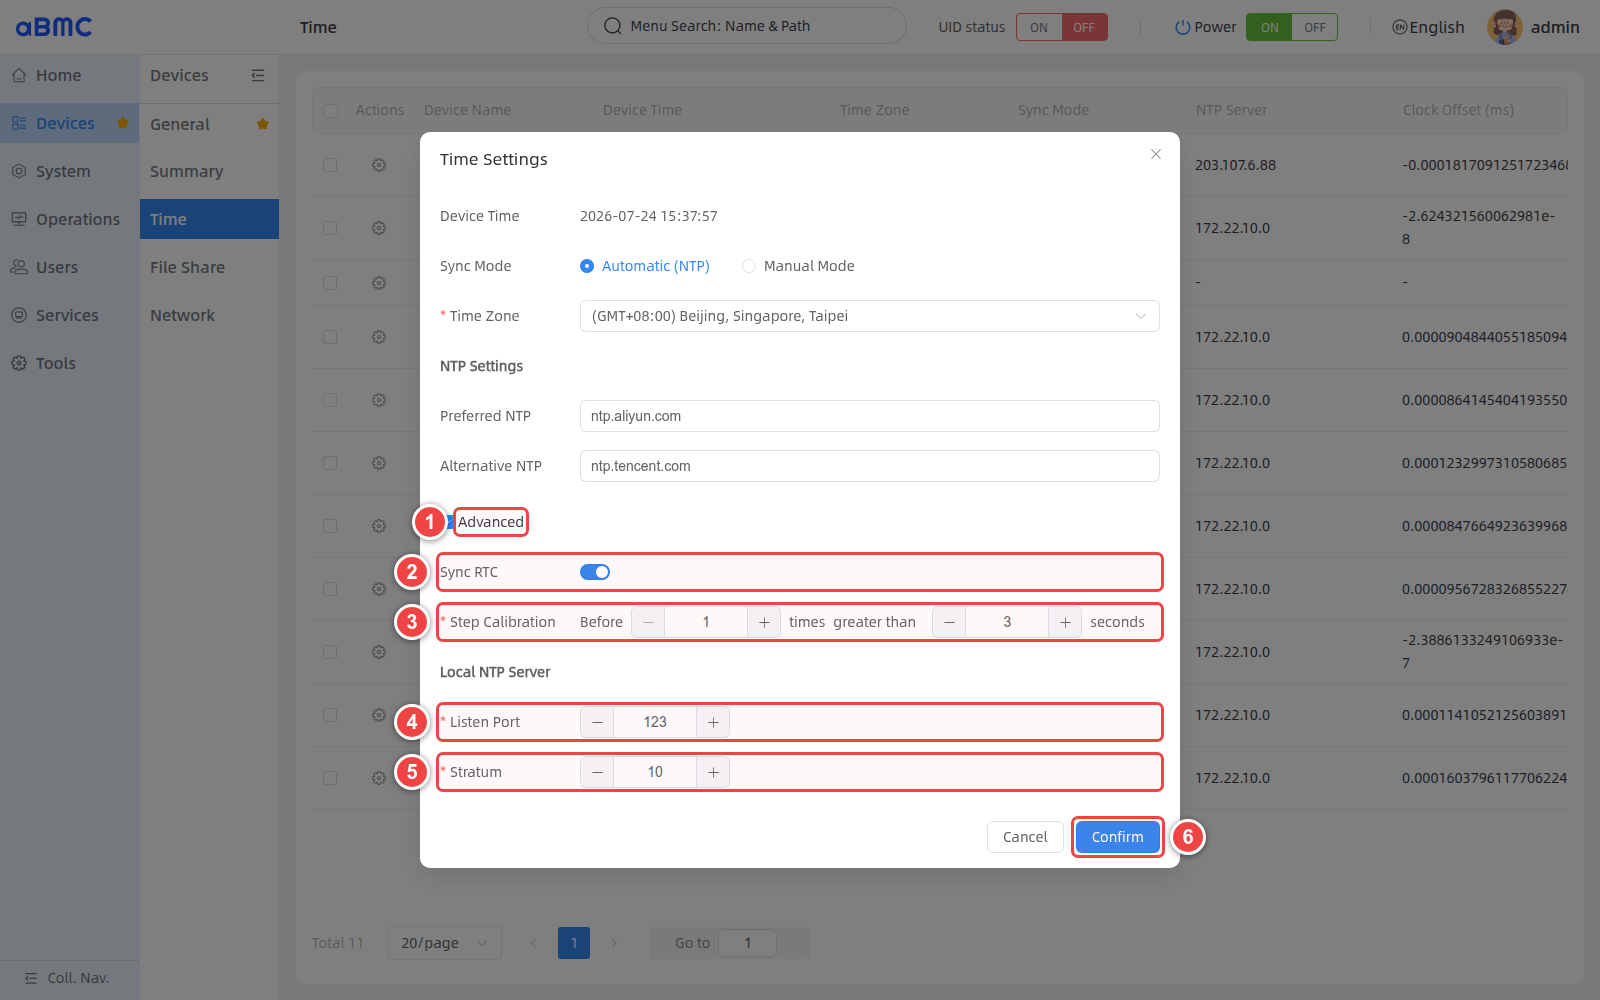
| Parameters | Page range or default value | Description |
|---|---|---|
| Sync RTC | Turn on or off | Controls the synchronization of system time with the device RTC hardware clock. |
| Step Calibration - Before | The minimum value is 1 | Specify the first N calibration times to enable step calibration judgment. |
| Step Calibration - greater than | The minimum value is 0 seconds | When the deviation of the previous calibrations exceeds this threshold, direct time correction is allowed. |
| Listen Port | 1–65535, the default value of the page is 123 | The listening port used by the local NTP service. |
| Stratum | 1–16, the page default value is 10 | Local NTP server level; the smaller the value, the closer the time source is to the base clock. |
Advanced parameter usage suggestions
Advanced parameters affect the device time adjustment method and the NTP services provided to downstream devices. Modify only when you understand the on-site time synchronization topology and device requirements, and prioritize verification on a small number of devices.
Manually set date and time
- Select Manual Mode in Sync Mode.
- Select the time zone used by the device in Time Zone.
- Set Date and Time; when you need to use the current management host time, click Get.
- After checking the date, time, and time zone, click Confirm.
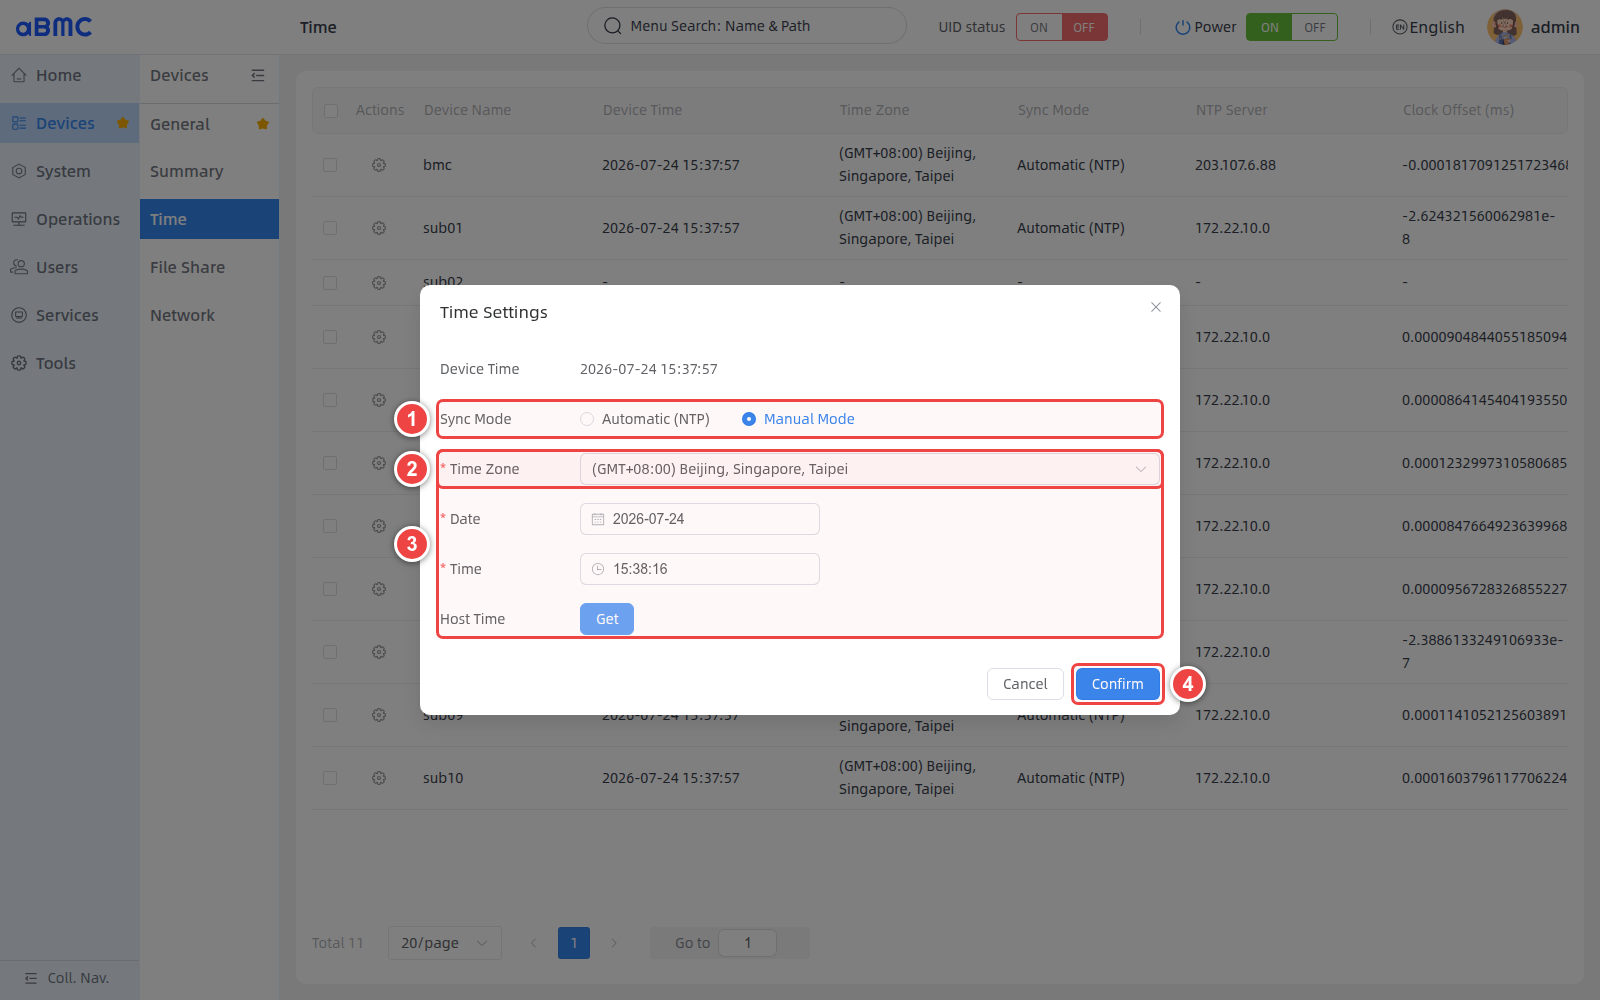
Manual mode instructions
Manual mode only sets the current time and cannot continuously correct device clock drift. After switching to manual mode, the device no longer relies on the configured NTP time source; when network conditions permit, it is recommended to use NTP automatic synchronization.
Confirm single device configuration result
- Return to the Time list and confirm that the target device's Device Time and Time Zone have been updated.
- Confirm that Sync Mode is consistent with the configuration.
- When using NTP, confirm that the NTP Server displays the expected time source.
- Wait for a while and then refresh the page to confirm that Clock Offset (ms) does not continue to increase.
Set device time in batches
Open batch time setting
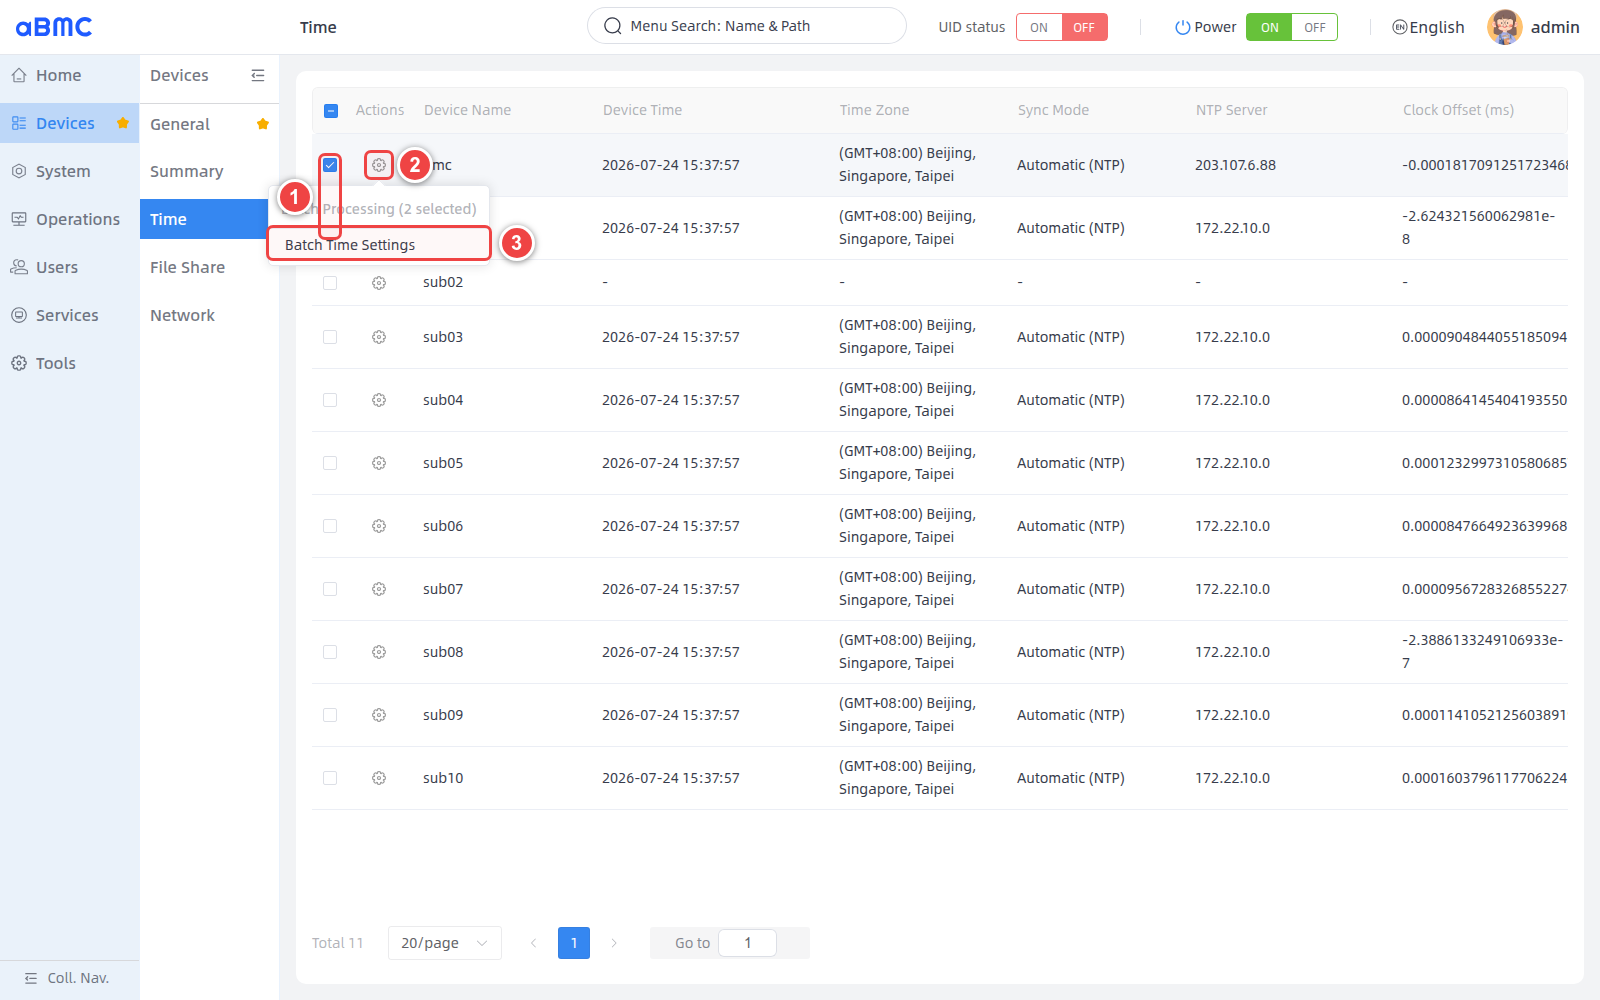
- Select at least two devices in the device list that need to be configured with the same time.
- Click the settings icon in the Actions column of any selected device.
- Select Batch Time Settings.
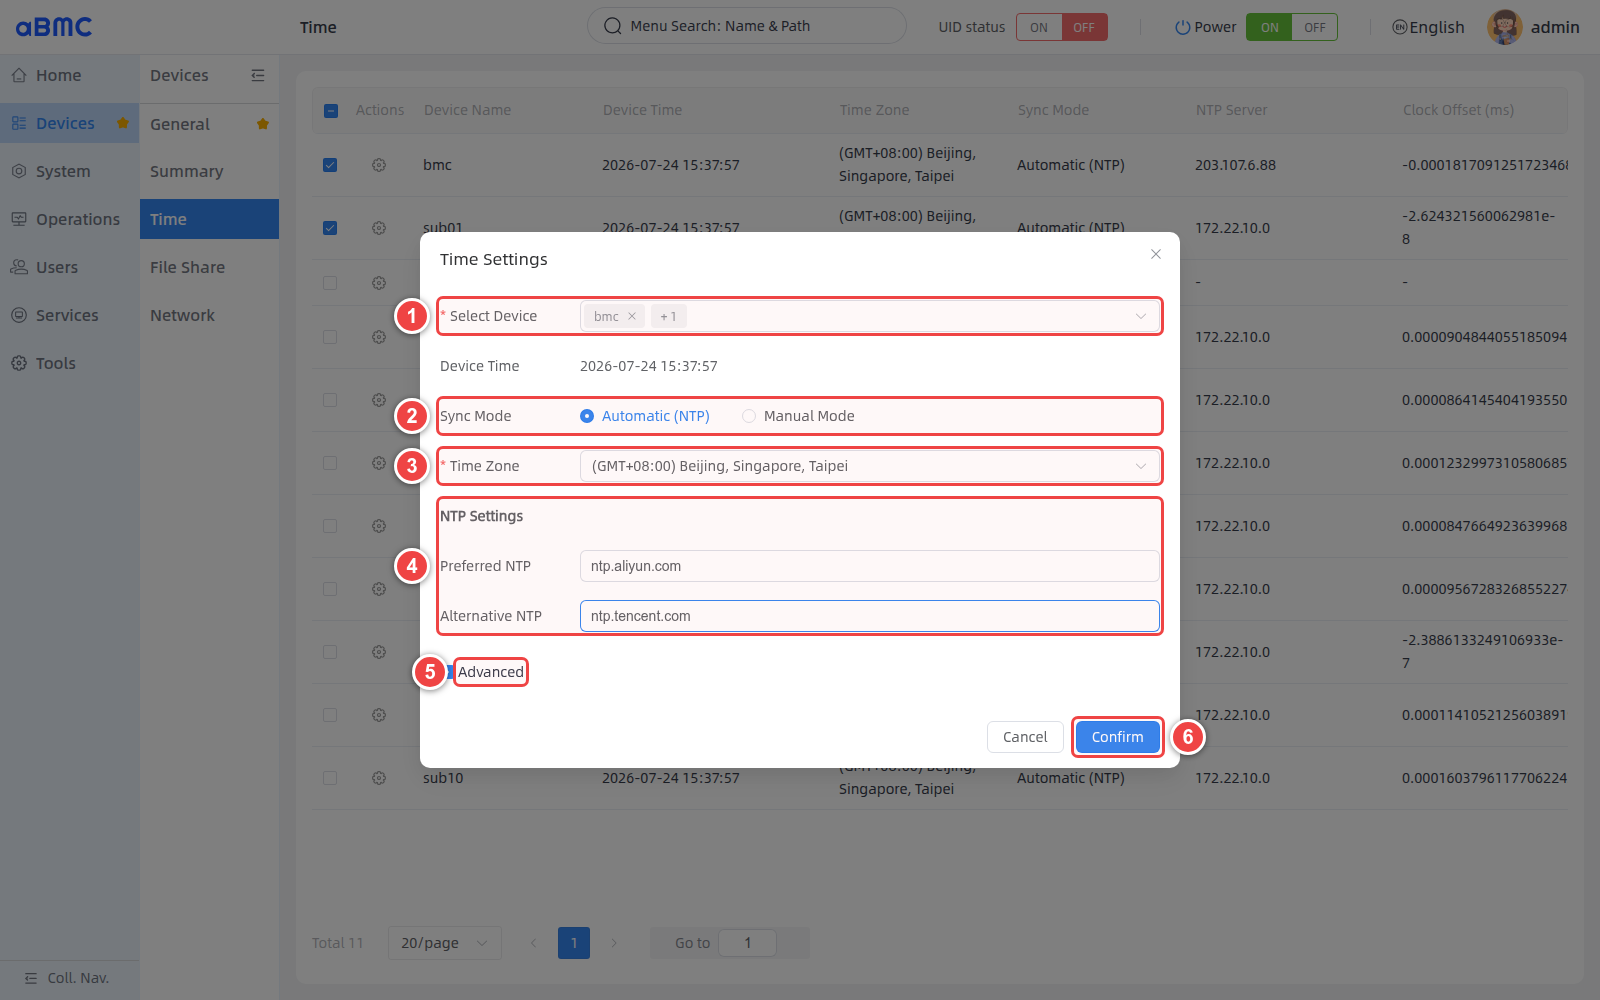
Deliver batch NTP configuration
- Check the target device and selected quantity in Select Device.
- Select the synchronization method common to all target devices in Sync Mode.
- Select a unified time zone in Time Zone.
- When using Automatic (NTP), fill in the preferred and backup NTP time sources.
- When you need to uniformly configure advanced parameters, expand Advanced.
- After verifying all configurations, click Confirm.
When using Manual Mode batch settings, the window will display Date, Time and Host Time. The setting method is the same as the single-device manual mode. After submission, the same date, time and time zone will be delivered to all selected devices.
Batch configuration range
Batch operations will overwrite the time policies of all selected devices. The devices and quantities in Select Device should be checked before execution. Do not mix and select devices that require different time sources, time zones or advanced parameters.
Confirm batch configuration results
- Return to the Time list and confirm Sync Mode and Time Zone one by one.
- When using NTP, check whether the NTP Server is the expected time source one by one.
- Check if any device still displays
-or retains the old configuration. - Open Time Settings separately for the device that has not taken effect, and check the device connection status and field editability.
FAQ
The device time or time zone is displayed as -
The device may be offline, not connected, or failed to read status. First confirm the running status of the device and the network connection between aBMC and the device, and refresh the time page after recovery.
Some devices did not take effect after batch setting.
Some devices may be offline, have different capabilities, or temporarily cannot modify the time configuration. Open the Time Settings of the failed device separately, check the status and parameters, and then reset them.
The sub-board cannot synchronize time through BMC
Confirm that the BMC has completed synchronization from the upstream time source and check the BMC's local NTP listening port, Stratum, the BMC address used by the sub-board, and the routing and firewall policies between the two.
4.BMC cannot synchronize domain name time source
Check the DNS resolution status and ping the domain name to confirm the network; if it fails, it is recommended to use the IP address test instead.