



General
Introduction
General configuration (General) is aBMC’s array device centralized management system designed for array servers. Administrators can uniformly view the online status, system information, running time, temperature, network address, hardware configuration and resource utilization of array sub-boards, and perform startup policies and power management operations on single or multiple devices.
Development Vision
- Provide users with centralized and visualized array device status and resource information, helping administrators quickly identify offline devices, resource anomalies, and configuration differences.
- Reduce the operation and maintenance costs and error probability of operating array sub-boards one by one through unified filtering, startup strategies and batch power management portals.
Feature Usage
View device overview
Open the general configuration page
- Select Devices in the main navigation on the left.
- Select General in the device menu.
- View the total number of devices, the number of available devices, and the number of unavailable devices at the top of the page.
- When you need to find a device, enter the device name or system name, or select the status in Select Device Status.
- Click Reset to clear search and status filters.
- View the device status, startup policy, system information and resource utilization in the device list; when you need to manage the device, use the settings icon in the Actions column or the shortcut entry in Shortcuts.
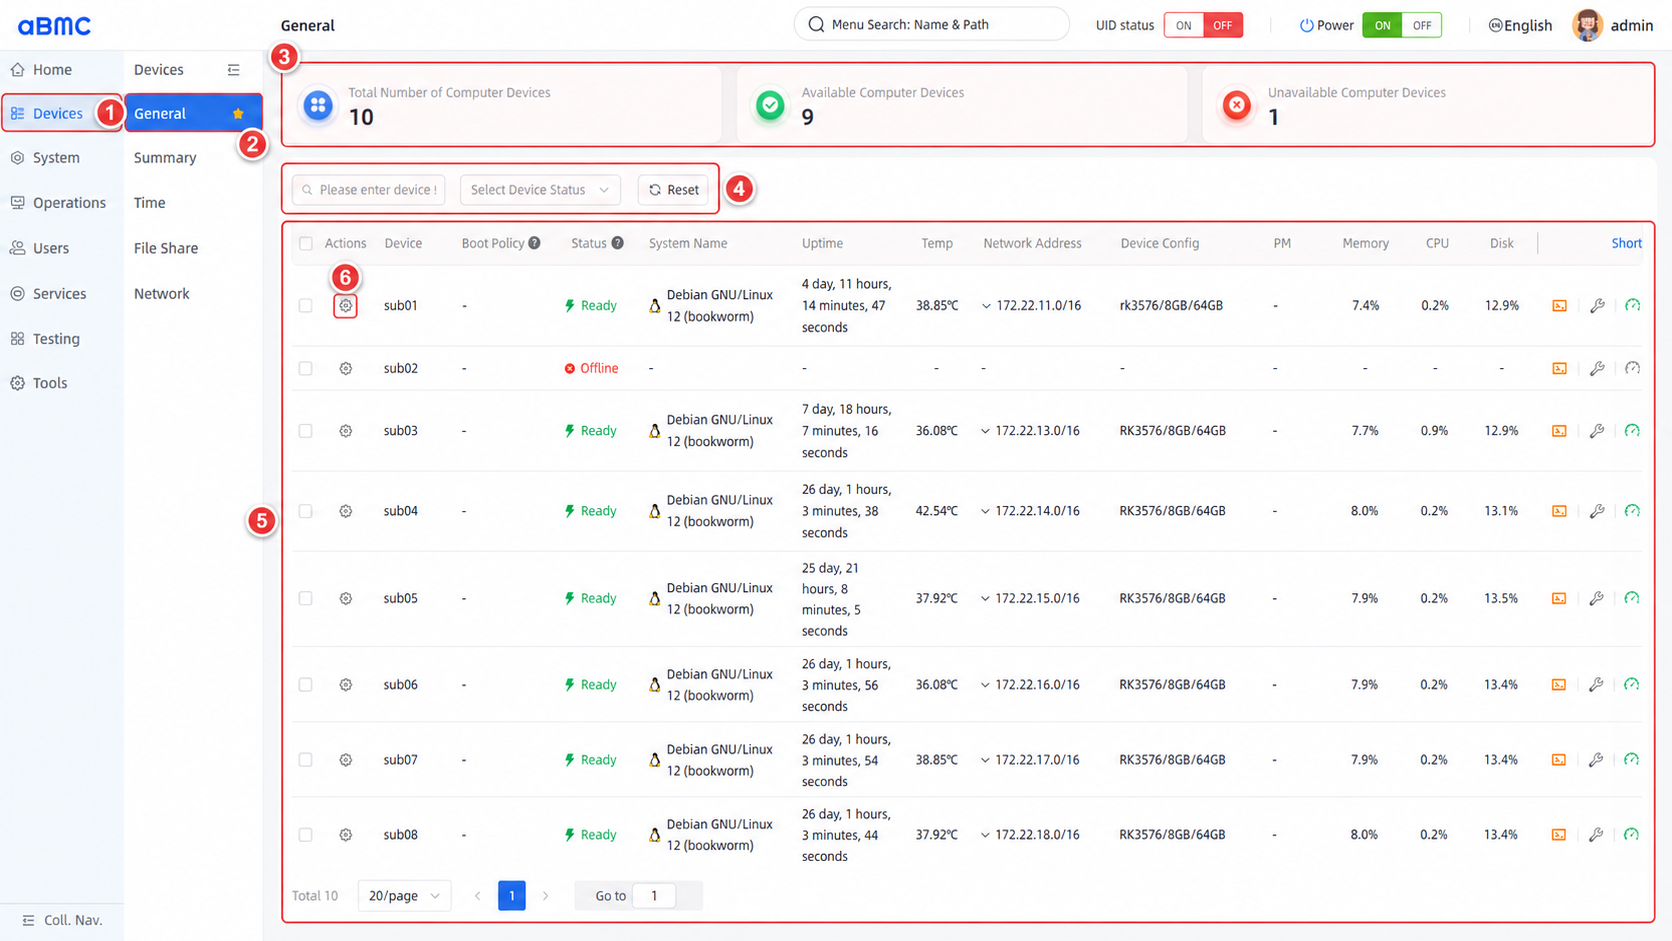
Equipment statistics description
| Statistical Items | Description | Check Points |
|---|---|---|
| Total Number of Computer Devices | The total number of array sub-boards currently managed by aBMC. | Should be consistent with the equipment planning and actual access number. |
| Available Computer Devices | The number of devices that are currently in Online or Ready status and can be used normally. | When the number decreases, check the device status, network connection, and microservice loading. |
| Unavailable Computer Devices | The number of devices that are not currently available. | Combine the Status in the list to locate the corresponding device and its stage. |
Device list field description
| Field | Description | Checkpoints |
|---|---|---|
| Actions | Opens the power management and startup policy menu for a single device or a batch of devices. | Confirm the target device before operation; check at least two devices to enter batch mode. |
| Device | The node name of the device in aBMC. | Should correspond to the asset record and actual array location. |
| Boot Policy | aDaughter board startup policy used when the BMC service is initialized or the power button is turned ON; Delay: <seconds> is also displayed when the delay is configured. | Check whether the policy complies with the service recovery sequence and power supply plan. |
| Status | The current status of the device, such as Offline, Loader, Online, Linking, or Ready. | Determine whether the device is operable and whether the microservice has completed loading based on the status. |
| System Name | The name and version of the operating system currently running on the device. | When displaying -, first check the device status and status collection link. |
| Uptime | The continuous running time of the device since the last startup. | Abnormal shortening may indicate that the device has recently rebooted. |
| Temp | Current temperature of the device. | Comprehensive judgment should be made based on device load, thermal management page and alarms. |
| Network Address | The management network address and prefix length returned by the device. | Confirm that the address is consistent with the network plan to avoid address conflicts or network segment errors. |
| Device Config | Summary of hardware configuration such as device platform, memory and storage capacity. | Used to check node specifications and identify configuration differences in the array. |
| PM | Reserved power mode field. The current version has a fixed display of -, which does not yet show the power mode in this list. | Do not judge - as a device failure; the current page does not provide a configuration entry for this field. |
| Memory | Current memory utilization. | When it continues to be high, you should check the process and business load together. |
| CPU | Current CPU utilization. | When it continues to be high, you should check the business load, system tasks and abnormal processes. |
| Disk | Current disk utilization. | When approaching the upper limit of capacity, it should be cleaned up or expanded in time to avoid service abnormalities. |
| Shortcuts | From left to right are Open Shell Command, Self Check, System Check, File Transfer and Info. | Shell, System Check and Info are currently implemented; Self Check and File Transfer are permanently disabled. |
Device status description
| Status | Description | Suggestions |
|---|---|---|
| Offline | The device is not online. | Check device power supply, physical connections, network and node services. |
| Loader | The device enters the upgrade state. | Wait for the upgrade to complete and do not perform power operations during the upgrade process. |
| Online | The device has been started. | The device is available, but the microservice may continue to load. |
| Linking | The device microservice is loading. | Wait for the status to change to Ready; check related services and logs if it is not completed for a long time. |
| Ready | The device microservice has been loaded. | Indicates that the device has completed loading the main services and can be used normally. |
| Unavail | The page does not recognize the device state as a known state. | Check device return values, communication status, and aBMC logs. |
Status data description
The statistical values, status and resource indicators on the page will be updated with the data reported by the device. When the device is offline, communication is abnormal, or indicators have not been collected yet, the relevant fields may be displayed as -; you should restore the device connection first, then refresh or wait for the page to update.
Use device shortcuts
Identify shortcuts
The icons in the Shortcuts column appear in the following order. Place the mouse pointer on the icon to view the corresponding English prompt.
| Sequence | Page Tips | Current Status | Function | Available Conditions |
|---|---|---|---|---|
| 1 | Open Shell Command | Implemented | Query the debugging connection method supported by the device, fill in the connection parameters and open the device terminal in a new window. | The target device can return to debugging mode; a valid account and authentication information must also be provided when using SSH. |
| 2 | Self Check | Not implemented | Reserved device self-check entry. | The icon is fixed to a disabled state and cannot be clicked in the current version. |
| 3 | System Check | Implemented | A system check window will pop up on the current page to view device historical resources and I/O trends. | Device status must be Online or Ready. |
| 4 | File Transfer | Not implemented | Reserved file transfer entry. | The icon is fixed to a disabled state and cannot be clicked in the current version. |
| 5 | Info | Implemented | Enter the device details page to view basic device information, resource status, system detection and network settings. | Device status must be Online or Ready; network settings also require appropriate permissions. |
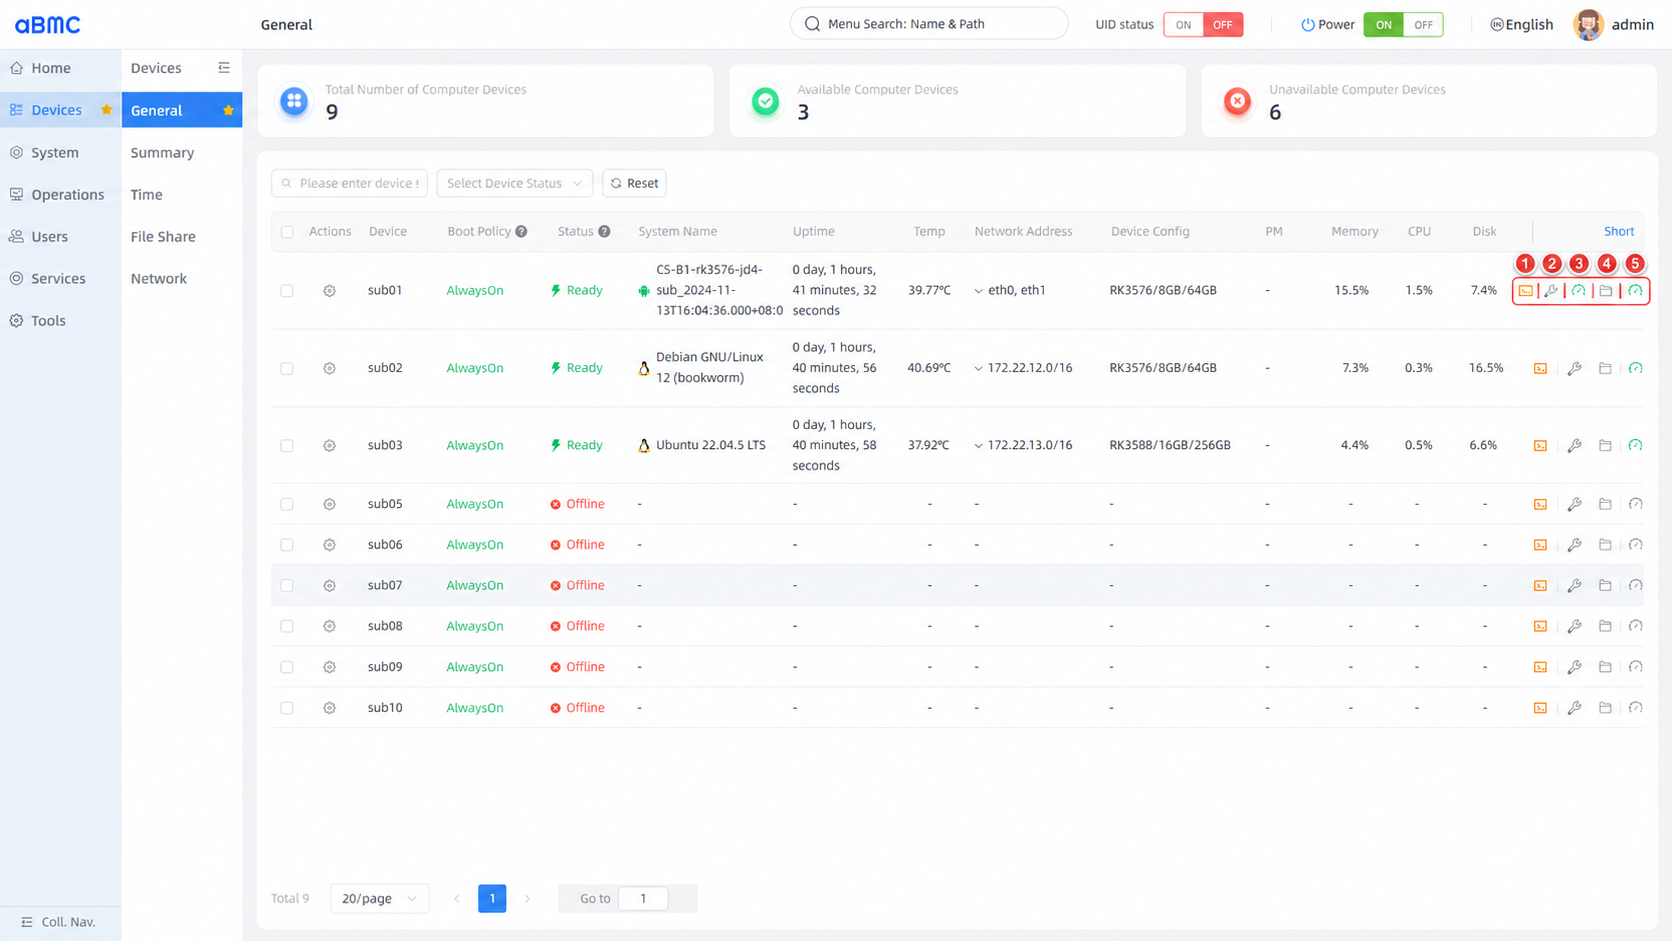
Disable icon description
Although Self Check and File Transfer are displayed on the page, the front end currently does not have binding operation events, and the disabled style is fixed. They are reserved functions and do not indicate device self-test failure or abnormal file transfer service.
Open device Shell
- Click the first terminal icon in the Shortcuts of the target device.
- Wait for the page to read
SerialConsole.ConnectTypesSupportedof the device, and select the debugging mode actually supported by the device in Debug Mode. - When selecting SSH, select or enter the username in User.
- Select account password or key authentication in Login Method.
- When using account and password authentication, fill in the port and password; the port range is
1–65535, and22is used by default. - When using key authentication, provide the corresponding private key.
- Click Confirm. The page opens the terminal in a new browser window and connects to the current device.
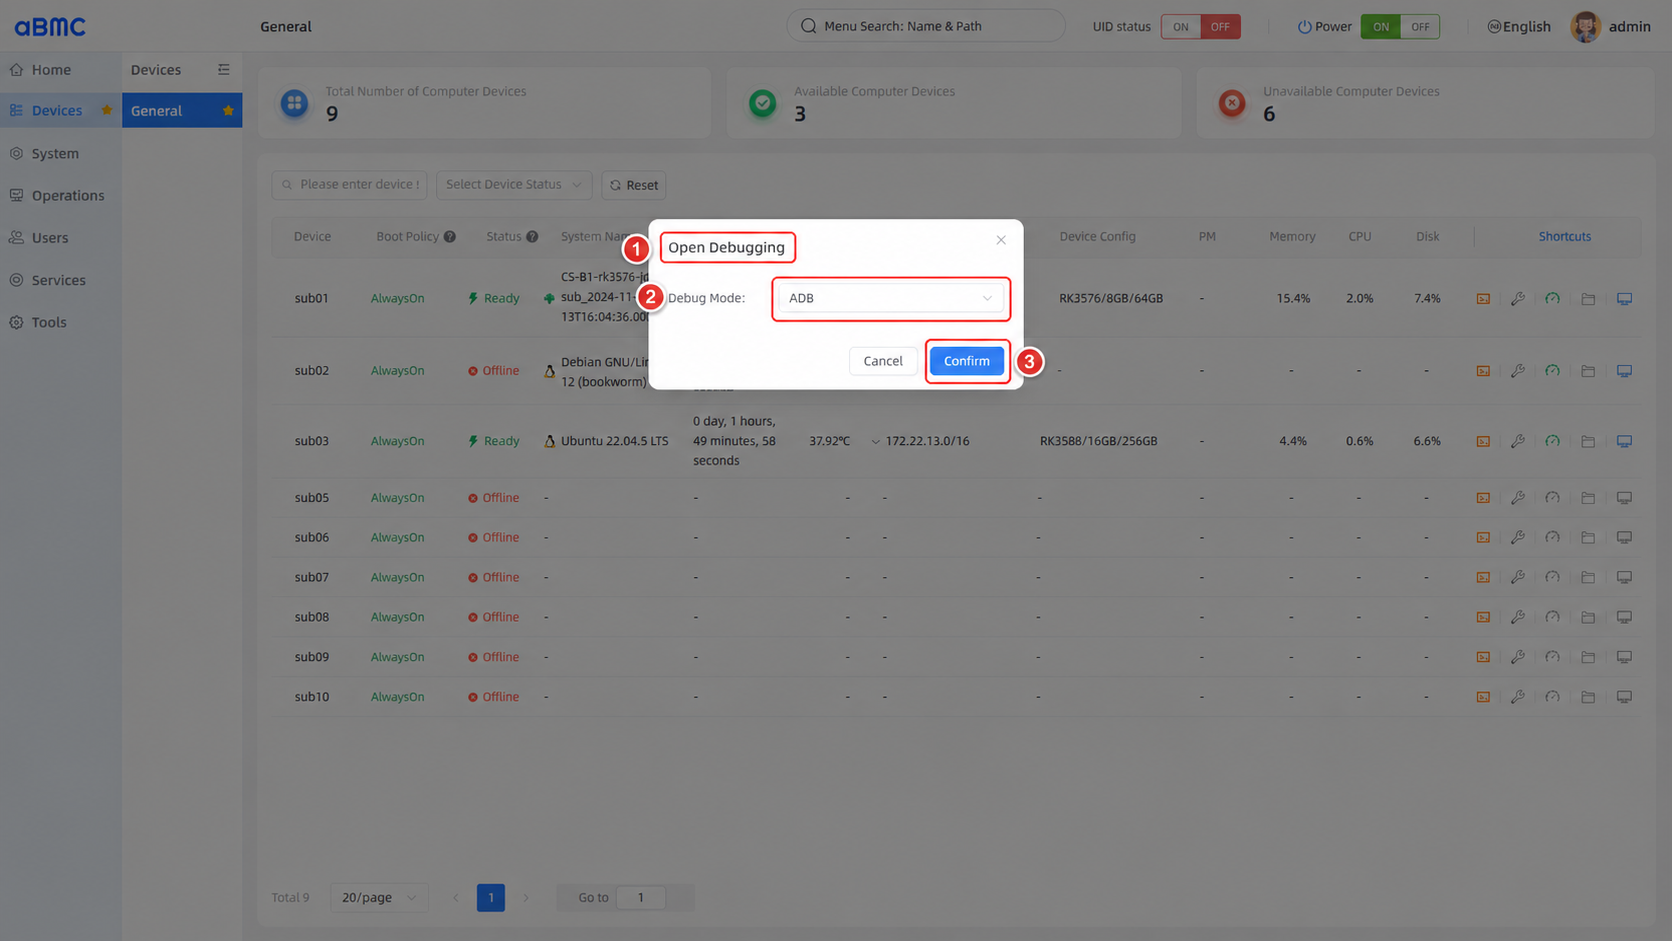
The device in the picture only returns ADB, so the pop-up window only displays the debugging mode and confirmation button; only when the device returns SSH, the page displays connection parameters such as user, login method, port, password or private key.
The page also allows creating or deleting SSH user configurations for the device. When creating a user, you need to fill in the user name, password, port, and key-related parameters; this operation will modify the SSH user information saved on the target device.
Shell Credential Security
Opening the terminal will encode the connection parameters and pass them to the new window, which may include username, password or private key. Use only in trusted management endpoints and controlled networks, do not save production credentials in shared browsers. You should close the terminal window when you are done using it and clean up SSH users that are no longer needed.
View System Check
- Confirm that the target device status is Online or Ready.
- Click the third trend icon in Shortcuts.
- Select the start time, end time and sampling step in the pop-up System Check -
<device>window. - View the following trend graph:
-CPU usage
- Memory usage
- temperature
- Network upload rate
- Network download rate
- CPU frequency
- Disk read rate
- disk write rate
- Refresh the data after modifying the time or sampling parameters; when the chart displays empty data, you should check the time range, monitoring service and equipment indicator collection status.
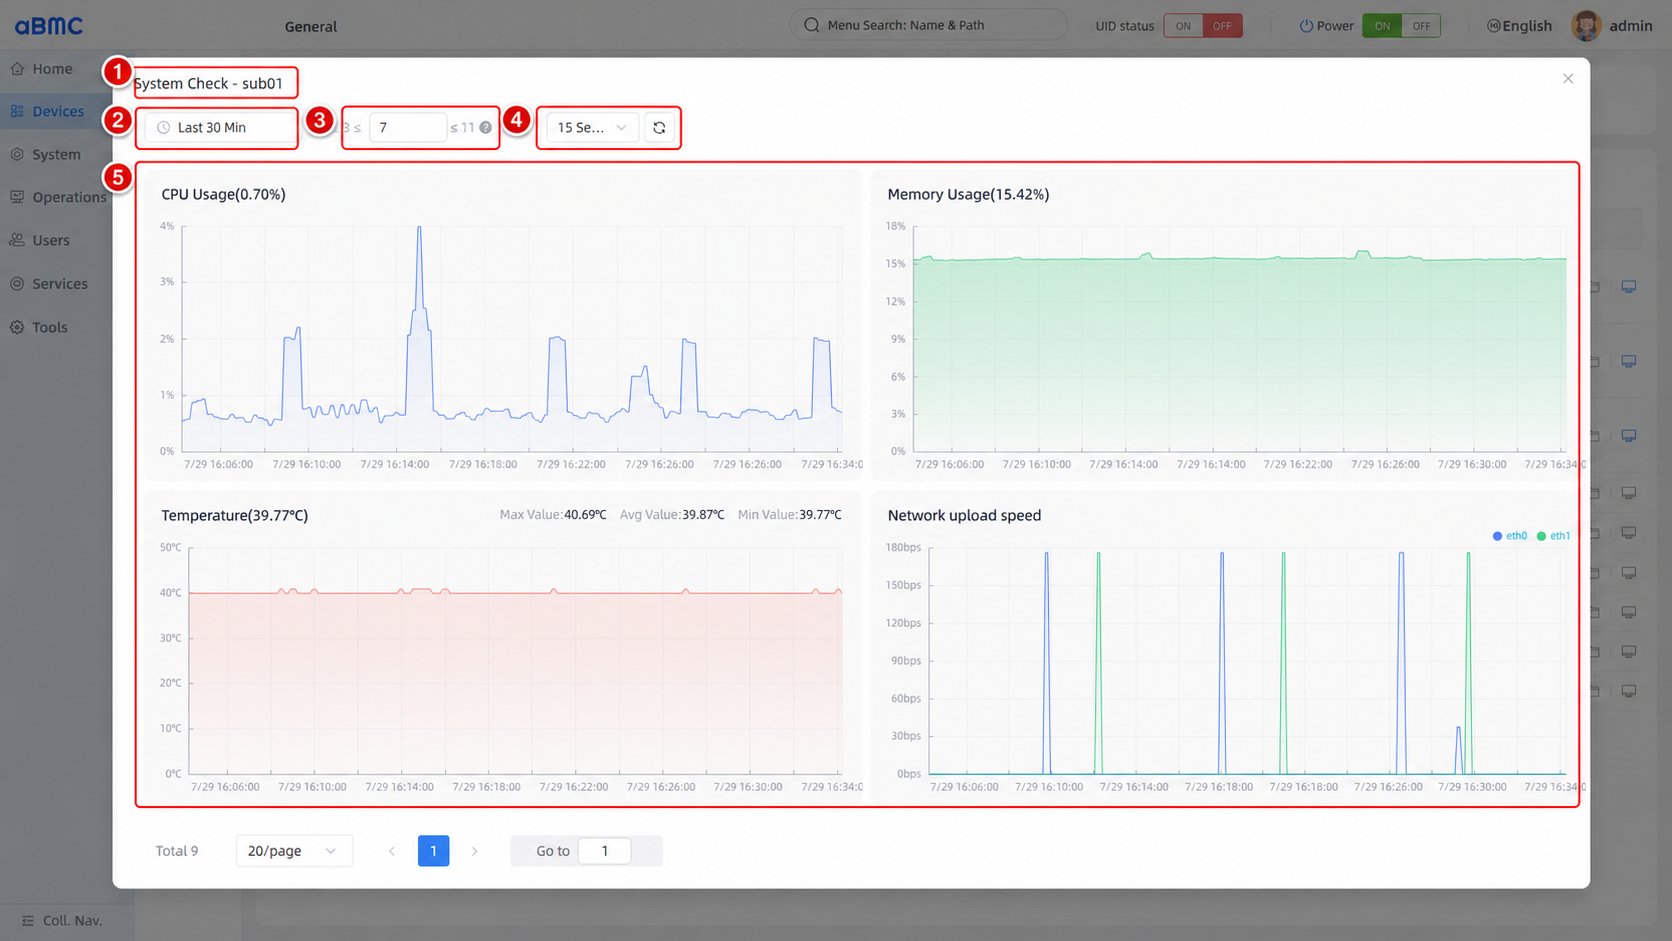
System Check only reads monitoring data and does not modify device configurations or interrupt services.
Open device Info
- Confirm that the target device status is Online or Ready.
- Click the device information icon on the far right in Shortcuts.
- The page enters the target device details, and the device name, hardware configuration, network speed and device status are displayed at the top.
- View the manufacturer, SOC, operating system, temperature, memory and storage capacity, runtime, network address, and resource utilization in the details area.
- Use the System Check tab to view the complete trend graph.
- When you have network configuration permission, you can use the Net Config tab to view or configure the device network.
- The details page also provides Debugger and Node Operation, whose Shell and power operation methods are consistent with the General page.
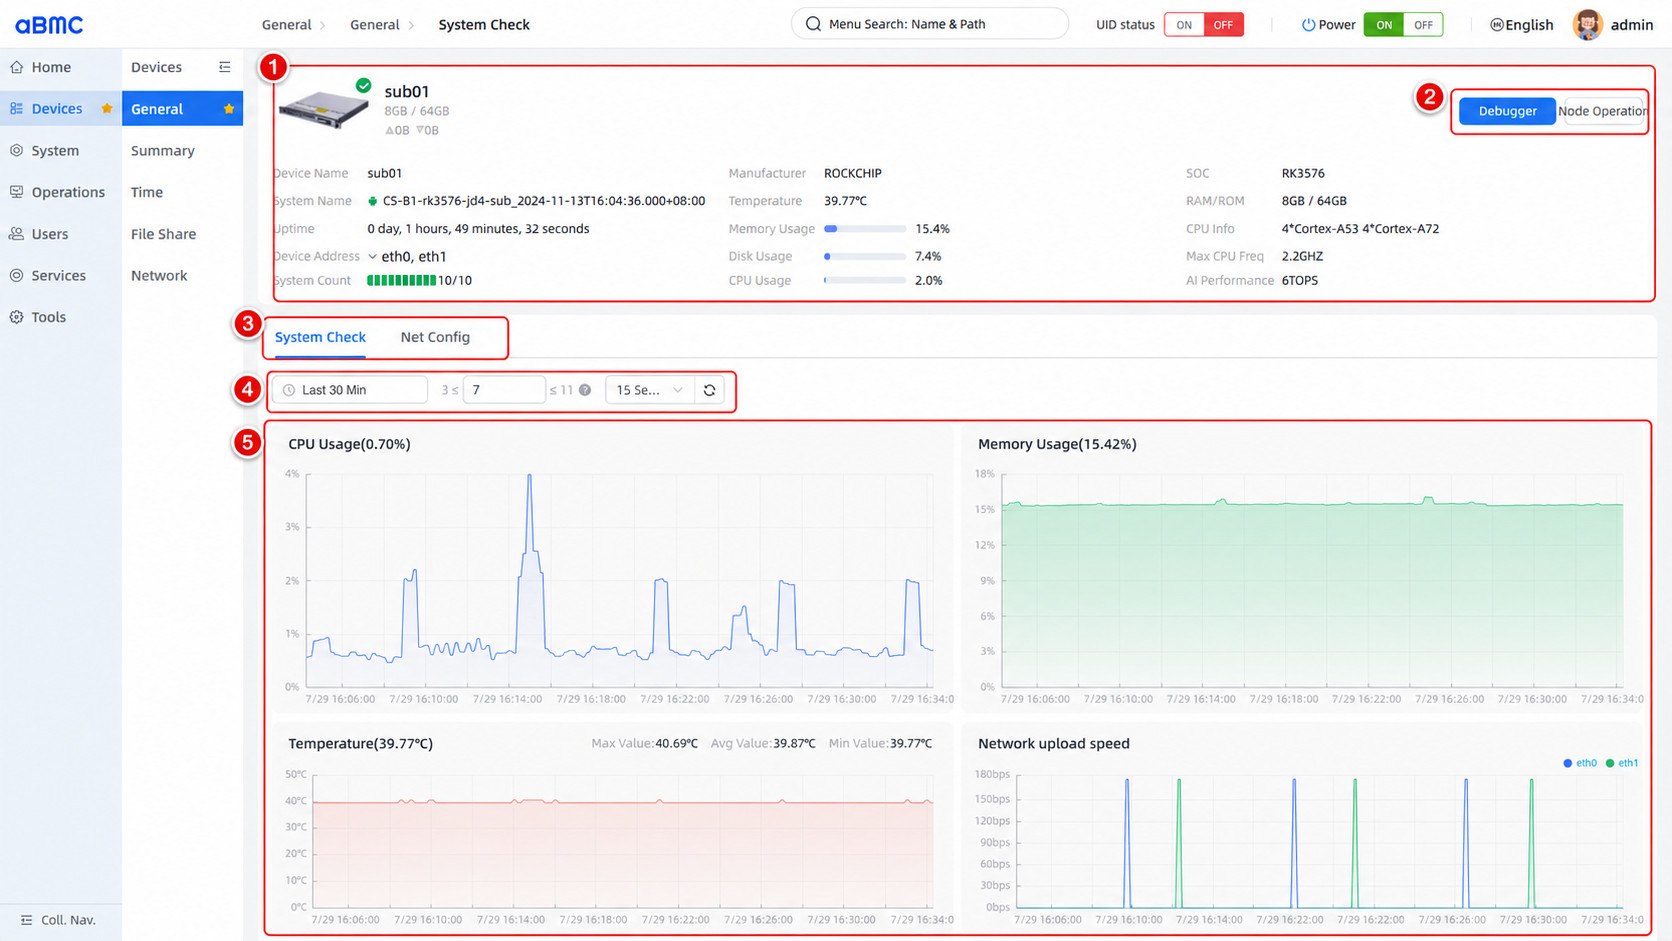
Shortcut available status
System Check and Info are only allowed for devices with status Online or Ready. When the device is Offline, Loader, Linking, or in an unknown state, these two icons are displayed as unavailable. Shell icons do not use the same state-disabled judgment, but it may still be impossible to obtain debugging mode or establish a connection when the device cannot communicate.
Set startup policy for a single device
Open startup policy window
- Click the Settings icon in the Actions column of the target device.
- Find the device power related configuration in the menu.
- Select Boot Policy Setting to open the boot policy window.
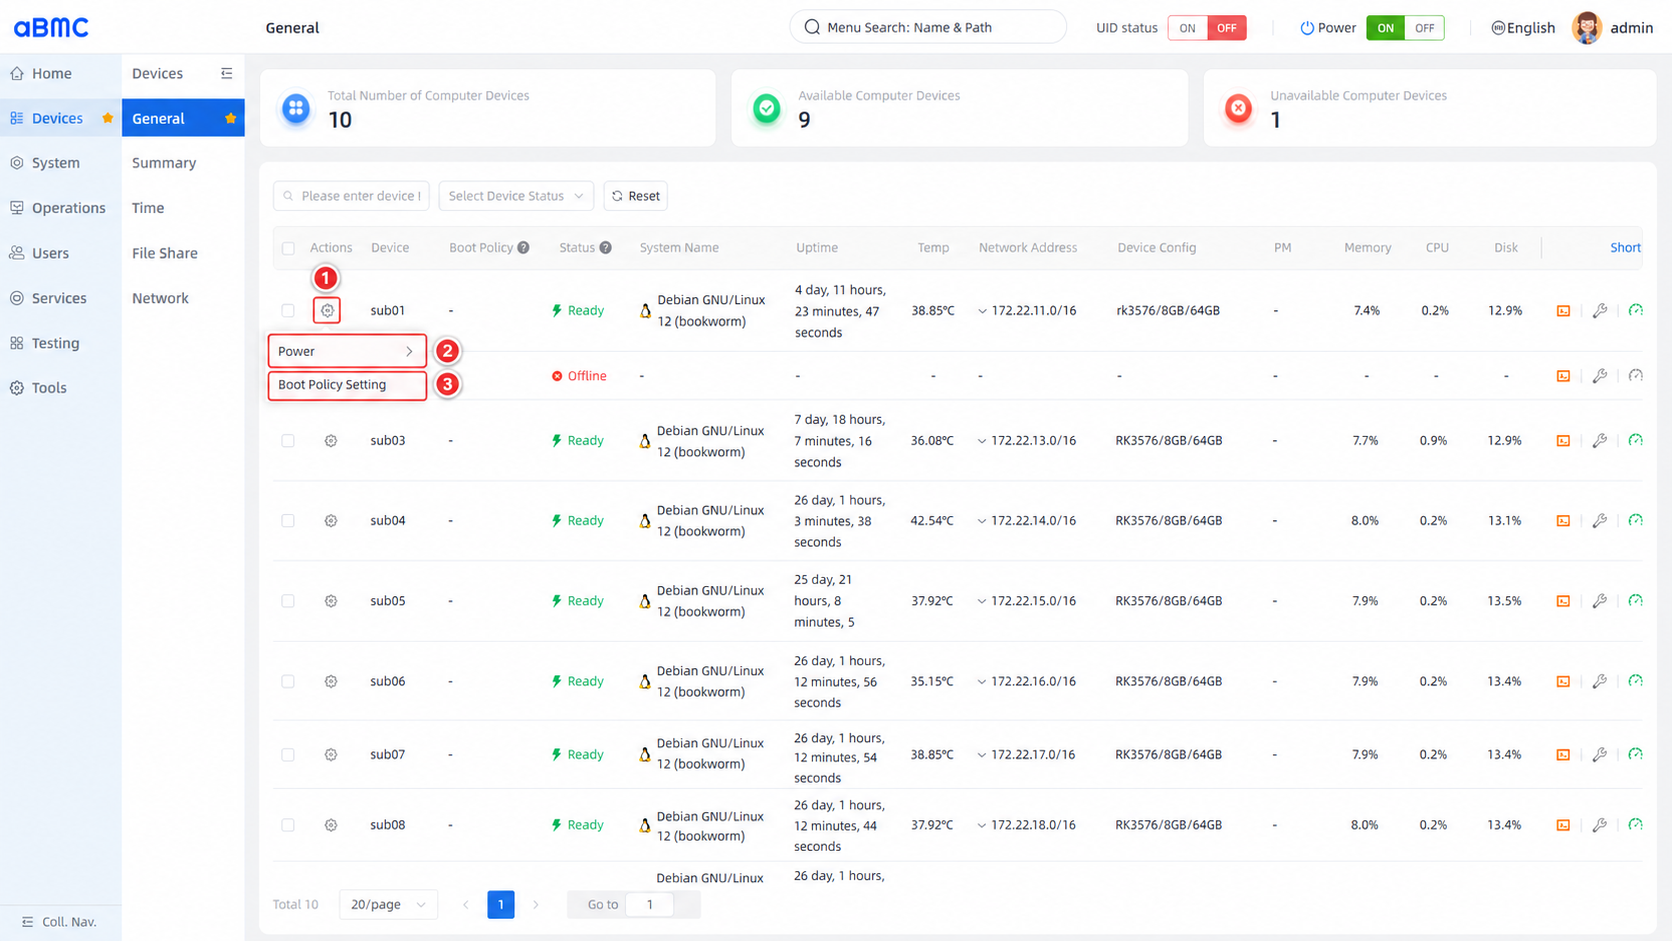
Configure startup policy
- In Boot Policy, select the daughterboard startup policy used when the aBMC service is initialized or the power button is turned ON.
- Set the number of seconds to wait before executing the power-on action in Power-on Delay. This value is an integer not less than
0. Setting it to0means not to increase the delay. - After checking the target device and configuration contents, click Confirm.
- When there is no need to save the changes, click Cancel.
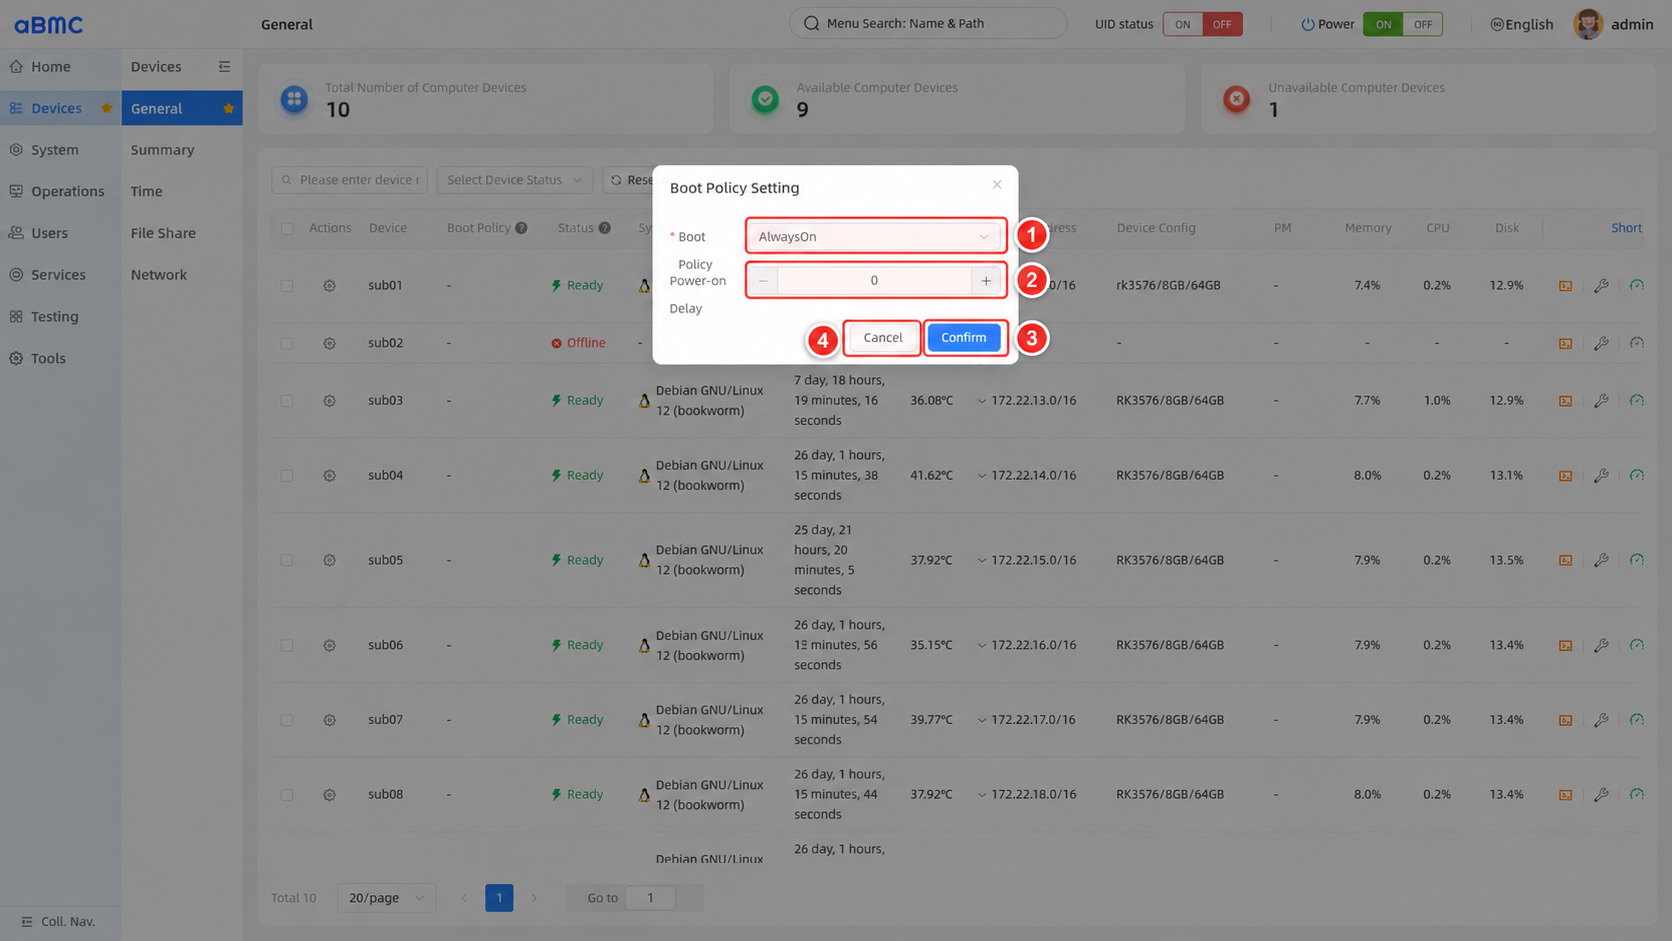
Startup strategy parameter description
| Parameters | Optional values or ranges | Description |
|---|---|---|
| Boot Policy | AlwaysOn | When aBMC service is initialized or the power button is turned ON, the power domain of the sub-board is forcibly turned on. |
| Boot Policy | AlwaysOff | When aBMC service is initialized or the power button is turned ON, the power domain of the sub-board is forced to remain closed. |
| Boot Policy | LastState | Restore the last power-on state of the persistent record; if there is no valid record, it will be treated as closed state. |
| Power-on Delay | An integer not less than 0, in seconds | The time the power manager waits before executing a power-on callback, which can be used to start array devices at off-peak times. |
Configurable item description
Whether the optional values and fields of Boot Policy are allowed to be modified is determined by the action parameter interface of the target device. If a parameter cannot be edited on the page, it means that the current device does not allow the parameter to be modified through this action.
Confirm configuration result
- Return to the General list and confirm that the target device's Boot Policy has been updated.
- When a delay greater than
0is configured,Delay: <seconds>is displayed below the confirmation policy. - Saving the configuration will not immediately restart or shut down the device; the policy will take effect during subsequent aBMC initialization or when the power button is turned ON, and the power-on delay will also be used for subsequent power-on actions.
Set device startup policies in batches
Select batch target devices
- Select at least two devices that need to use the same startup policy in the device list.
- Click the settings icon in the Actions column of any selected device.
- Select Boot Policy Setting.
Issue batch startup policy
- In Boot Policy select a policy that is common to all target devices.
- Set the unified delay start seconds in Power-on Delay.
- Double-check the checked devices to confirm that they are suitable for the same configuration.
- Click Confirm, and the page will deliver startup policies to each selected device.
- Return to the list and confirm that the Boot Policy and delay time have been updated one by one.
Batch configuration risk
Batch configuration will deliver the same startup policy and delay time to all selected devices. Devices with different hardware, business roles, or power supply sequences may require different strategies; the selection range should be confirmed before submission to avoid affecting the array recovery sequence.
Manage device power
Open the power management menu
- For single-device operation, click the settings icon in the Actions column of the target device, and then expand Power.
- When performing batch operations, first select at least two devices, and then expand the batch power management menu from the Actions menu of any selected device.
- The page reads
ResetActionInfoand only displays available actions currently returned by the target device; when there are no available actions, the Power menu is unavailable. - After confirming the action meaning, target device, and business impact, select the corresponding power action. After selection, the page will send the request immediately without a second confirmation window.
Power supply operation description
Currently bmc-core can return the following actions for the array sub-board. The actual menu only shows the value returned by the target device via ResetActionInfo.
| ResetType | Page meaning | Current front-end actual behavior | Usage suggestions |
|---|---|---|---|
On | Power on | Call hardware power control to turn on the daughterboard power domain. | Used to normally start a shutdown device. There is usually no need to repeat this when the device is already on. |
ForceOn | Power on | The current version calls the same hardware power on path as On. | Only used if the interface returns this action and the device is actually down. |
GracefulShutdown | Normal shutdown | Linux executes shutdown now -h; Android executes reboot -p, and the operating system completes the shutdown. | Preferred shutdown method. You should wait until the device status changes to offline before disconnecting external power supply. |
ForceOff | Forced power off | Directly shut down the hardware power domain without waiting for the operating system to exit. | Only used when there is no response during normal shutdown; it may cause damage to the file system or business data. |
GracefulRestart | Restart | Execute reboot through the operating system without directly cutting off the hardware power. | Preferred restart method. Requires the operating system command channel to be available. |
ForceRestart | Forced power on and off | The current version calls the hardware reset path. | Used when the operating system is unresponsive and the device must be restored. Unsaved data will be lost. |
PowerCycle | Forced restart | The current version calls the hardware reset path the same as ForceRestart; execute the reset signal according to the hardware capabilities, or power off and on again. | The actual effect of ForceRestart is basically the same in the current version. |
LoaderByHardware | Enter the hardware Loader | Pull up the Maskrom/Loader control signal and perform a hardware reset to make the device enter the underlying recovery or burning mode. | Only used for firmware recovery, burning or repair; do not use for normal restart and business operation and maintenance. |
Although PushPowerButton and Nmi exist in the Redfish type definition, they are currently not returned by ResetActionInfo, and backend action processing is not enabled, so they do not appear in the page menu.
Perform single device power operation
- Confirm the target device based on Device, Status and current services.
- Prioritize GracefulShutdown or GracefulRestart to allow the operating system to stop services and write back data normally.
- Use ForceOff, ForceRestart or PowerCycle only if the operating system becomes unresponsive.
- Click the action to start execution immediately. Observe Status, Uptime and device business status to confirm that the action is completed.
- If the action fails, first requery available actions and check device communication, permissions, and hardware power control status. Do not click continuously.
Perform batch power operations
- Check at least two devices that need to perform the same action.
- Open Actions > Power for any selected device.
- Verify that all selected devices support target
ResetTypein the menu. - After clicking the power action, the page will send requests to all selected nodes in parallel.
- After the operation is completed, check the status one by one; if a single request fails, other devices that have been successfully executed will not be automatically rolled back.
Source of batch action capabilities
The action list in batch mode is taken from the first selected device, other devices may not support the same ResetType. Before batch execution, you should confirm that the device model, firmware, and capabilities are consistent; otherwise, some devices may succeed and some may fail.
Power supply operation risk
There is no secondary confirmation in the power menu. Power operations may immediately shut down, start up, reset the device, or cause the device to enter Loader, causing business interruption, loss of unsaved data, file system damage, or upgrade failure. Before execution, you should stop relevant services, save data, and confirm that the device is not in the process of upgrade or maintenance. Performing power actions requires OemPowerControl permission.
FAQ
Device information or resource utilization is displayed as -
The device may be offline, upgraded, or in the microservice loading stage, or it may be temporarily unable to return corresponding indicators. Check Status first; after the device returns to Online or Ready, wait for the page to update. If the field is still missing, you should check the device communication, metric collection service, and related interface responses.
The device stays in Linking or Loader for a long time
Linking indicates that the device microservice is loading, and Loader indicates that the device is in an upgrade state. You should wait for the current process to complete and check related services, upgrade tasks, and logs. Do not shut down or restart during the upgrade process.
Unable to modify Boot Policy or Power-on Delay
The page will determine whether the field is allowed to be modified based on the startup policy action parameter interface. Confirm that the device is online and check DisallowedInput and AllowableValues returned by SetPowerConfig.ActionInfo. If the interface does not allow entry of this field, the existing configuration should be used according to the device firmware capabilities.
Some devices are not updated after batch settings.
The batch operation will send requests to each selected device separately. Some devices may not be updated due to offline, different capabilities, or interface failure. Return to the list and check the Boot Policy one by one, and check the status, action parameters and interface response of the failed device and try again individually.
5.Power menu is empty or unavailable
The page only displays available power actions returned by the target device via ResetActionInfo. Confirm that the current account has OemPowerControl permission, the device is in a communicable state, and check the interface response; different devices, states or firmware versions may support different actions.
6.Self Check or File Transfer icon cannot be clicked
These two entries are fixed to a disabled state in the current front-end version. There is no binding self-check or file transfer operation, and they are reserved functions. Unclickable is the current design and does not require troubleshooting device status or backend services.
Cannot open the terminal after clicking Open Shell Command
First check whether /redfish/v1/Managers/{{nodename}} returns SerialConsole.ConnectTypesSupported. When using SSH, you should also confirm that the username, password or private key is correct, the port is accessible, and the browser is allowed to open a new window for aBMC; when the browser blocks pop-ups, the terminal page will not be displayed.
8.What is the difference between ForceRestart and PowerCycle?
From the perspective of Redfish semantics, the two represent forced restart and power cycle respectively; but the current bmc-core implementation maps both to the same hardware reset function. This function gives priority to controlling the reset signal; when there is no independent reset control, the reset is completed by powering off and then on again. Therefore, the actual effect in the current version is basically the same, and both may cause the loss of unsaved data.