



Disk Management
Introduction
Disk Management is aBMC's visual management system designed for server storage devices. The system consists of three modules: disk status monitoring, physical disk management and software RAID management.
- Status monitoring module: Responsible for displaying information such as hard drive slot, capacity, media type, health status and model.
- Physical disk management module: Responsible for managing disk partitions, file systems, volume labels and mounts, and providing Udev and SMART information query capabilities.
- Software RAID management module: Responsible for creating RAID arrays and providing maintenance capabilities such as adding disks, replacing hard disks, expansion, mode adjustment, and deletion.
Development Vision
- Provide users with centralized and visualized disk status and storage topology, helping administrators quickly identify hard disk anomalies, partition differences and RAID risks.
- Through unified partition, file system, mounting and RAID operation entrances, the operation threshold and probability of misoperation are reduced for server on-site storage operation and maintenance.
Feature Usage
Learn about disk management
Function scope
| Function module | Function description |
|---|---|
| View hard disk status | View slot, capacity, media type, health status and model |
| Disk and partition view | Display disk, partition and unallocated space in graphical segmentation |
| Create Partition | Create a new partition on unallocated space, you can set the size, offset, alignment, partition label and file system |
| Format Partition | Format disk or partition to ext4, exfat, ntfs, ext2, ext3, fat32 and other file systems |
| Modify Label | Modify the Label of an existing file system partition |
| Mount/unmount | Mount the partition to the specified directory, supporting temporary mounting and persistent mounting |
| Information View | View Udev Properties and SMART Diagnostic Information |
| Logical View | Create a RAID array, and maintain the existing RAID by adding disks, replacing disks, expanding capacity, adjusting modes, and deleting |
Dangerous Operation Tips
Creating partitions, deleting partitions, formatting partitions, deleting RAID, RAID expansion and RAID mode adjustment may affect disk data. Before operating, please confirm that the target disk, partition or RAID array is not occupied by business, and necessary data backup has been completed.
Preparation before use
- Log in to aBMC using an account with system configuration permissions.
- Confirm that there is no running business writing on the target hard disk, partition or RAID array.
- Before performing formatting, deletion, or RAID change, confirm that the data has been backed up.
- Before performing the mount, confirm that the mount directory is an absolute path and not the root directory
/. - Before performing RAID creation or expansion, confirm that there are available free hard disks.
Interface terminology
| Chinese | English |
|---|---|
| Disk Management | Disk |
| Status View | Status View |
| Physical View | Physical View |
| Logical View | Logical View |
| Create Partition | Create Partition |
| Format Partition | Format Partition |
| Modify Label | Modify Label |
| Delete Partition | Delete Partition |
| Mount | Mount |
| Unmount | Unmount |
| Temporary Mount | Temporary Mount |
| Persistent Mount | Persistent Mount |
| Create RAID Array | Create RAID Array |
| Add Disk | Add Disk |
| Replace Disk | Replace Disk |
| Expand with Disks | Expand Disk |
| Modify RAID Mode | Modify RAID Mode |
Open the disk management page
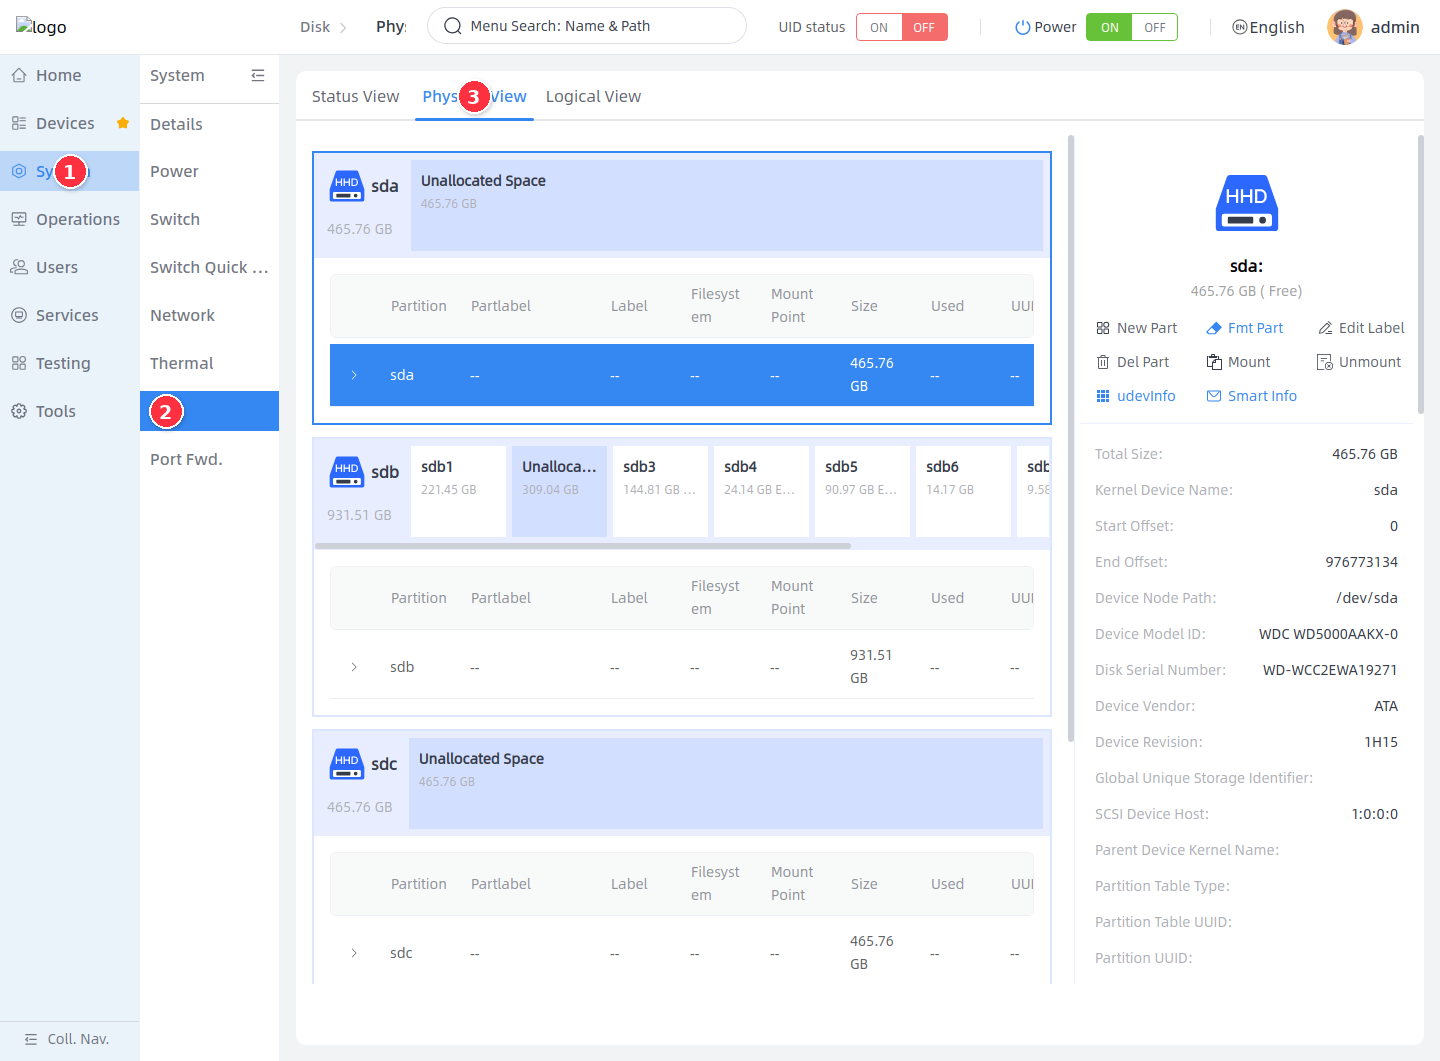
- Select System in the main navigation on the left.
- Select Disk in the system secondary navigation.
- Switch between Status View, Physical View or Logical View at the top of the page.
View disk status
Check slot status
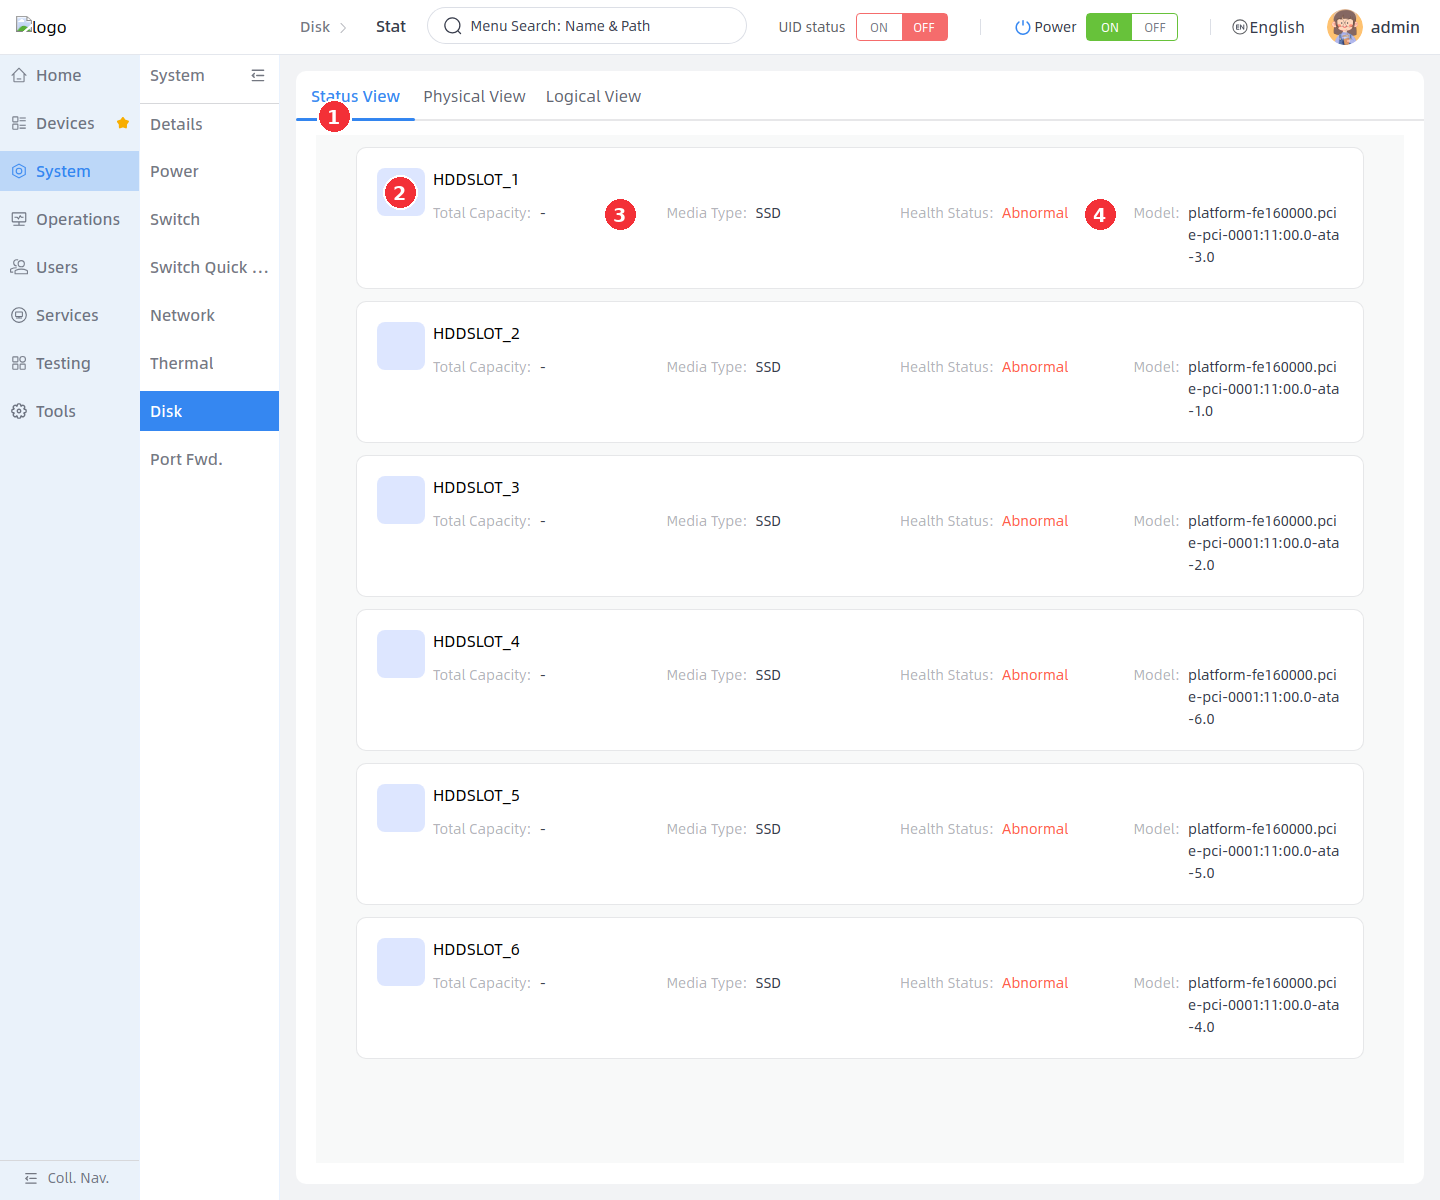
The status view is used to view the chassis hard disk slot status. The page displays the hard drive capacity, media type, health status, and model by slot. The backend reads the slot list through the Drives collection, and then reads the single disk details one by one.
- Click Status View.
- Check the slot card to confirm the currently recognized hard drive slot.
- Check Total Capacity and Media Type to confirm the capacity and media type.
- Check Health Status and Model to determine the health status of the hard disk and locate the specific device.
Example environment description
In the current example environment, the 6 slots are all displayed as Abnormal, and the capacity is displayed as -. This means that the backend has returned the slot and device ID, but no effective capacity has been obtained, and the health status is not normal. The actual site should be combined with hard disk connection, SMART information and system logs to continue troubleshooting.
Status field description
| Field | Description |
|---|---|
| Total Capacity | Current slot hard disk capacity |
| Hard drive type | HDD, SSD, NVMe, MMC and other media types |
| Health Status | Normal or abnormal |
| Model | Unique identification of hard drive model or device |
Health status description
The health status is converted by the backend DriveBase.Status.Health:
| Backend value | Page display | Description |
|---|---|---|
true | Normal | The hard disk health status is normal |
warning | Warning | The hard disk is at risk, and the page may display past_threshold, error_log, self_test_log or smartctl_warning through prompts and other reasons |
| Other values or null values | Abnormal | Abnormal hard disk health status, usually caused by SMART read failure, hard disk abnormality, or the backend cannot confirm the health status |
Slot status description
The slot status is represented by backend HDDSlot.LastSent. The current page mainly displays the health status. The front end still retains the slot status and LED definition logic, which can be understood as follows:
| LastSent | Slot Status | Description |
|---|---|---|
0 | Disk Present | The hard disk is in place and has been recognized by BMC |
1 | Disk Read/Write | The hard disk is reading and writing |
2 | Rebuild Slave | The hard disk is participating in RAID reconstruction |
3 | Located by BMC | BMC is locating the hard drive |
4 | Disk Removed from RAID | The hard disk in the RAID group was removed or hot-swapped abnormally |
5 | Disk Fault | The system recognizes a hard disk failure |
6 | Disk Absent | No disk is inserted in the slot or the hard disk is not in place |
7 | Init State | The hard disk is in initialization state |
Slot LED description
The relationship between hard disk slot LED and status is as follows:
| Slot status | Green light | Red light | Blue light |
|---|---|---|---|
| Located by BMC | On | Off | Flashing |
| Disk Present | On | Off | Off |
| Disk Read/Write | Flashing | Off | Off |
| Rebuild Slave | Flashing | Flashing | Off |
| Disk Absent | Destroy | Destroy | Destroy |
| Disk Fault | On | On | Off |
| Disk Removed from RAID | Off | On | Off |
If no disk is inserted into the slot or the backend does not return data, the page will display an empty slot or no data status.
Manage physical disks
View physical view
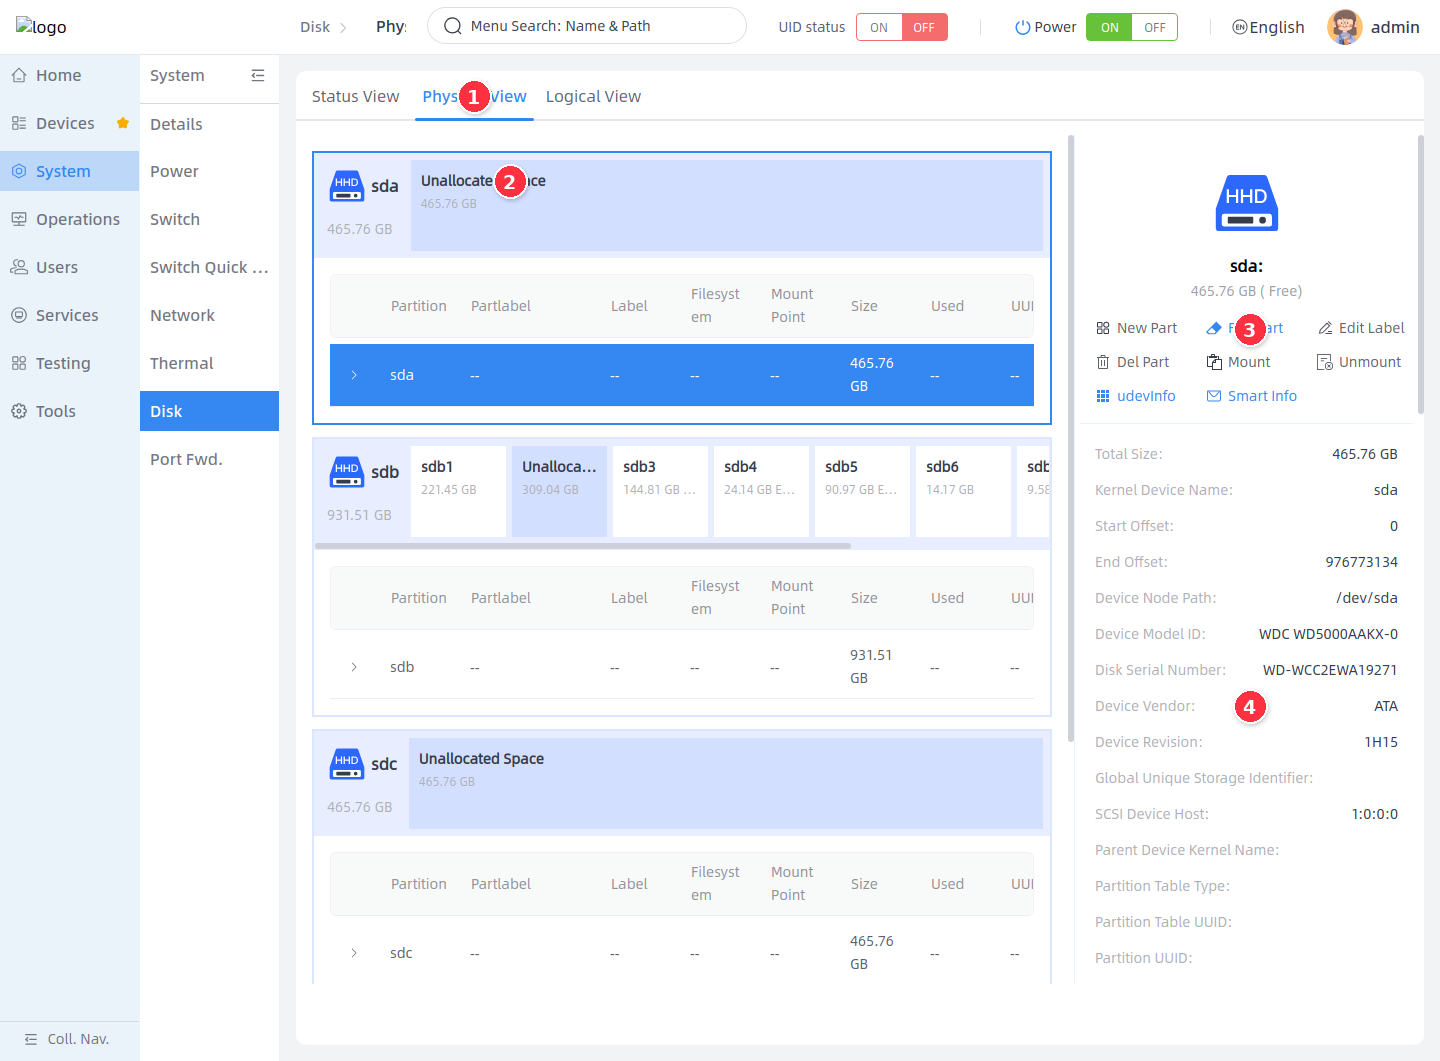
The physical view is the main operating page of disk management. The disk and partition graphics are displayed on the left, the partition fields are displayed in the table, and the operation buttons and detailed properties of the currently selected object are displayed on the right.
- Click Physical View.
- Select the entire disk, partition or unallocated space in the disk area on the left.
- Select the operations supported by the current object in the operation area on the right.
- View the kernel device name, device node, model, serial number, partition table, file system, mount point and other information in the property area on the right.
| Table fields | Description |
|---|---|
| Partition | Disk, partition, or unallocated space name |
| Partlabel | Partition label |
| Label | File system volume label |
| File system | Current file system type |
| Mount Point | Current mounting directory |
| Size | Disk or partition capacity |
| Used space | File system used ratio or amount |
| UUID | File system UUID |
Create partition
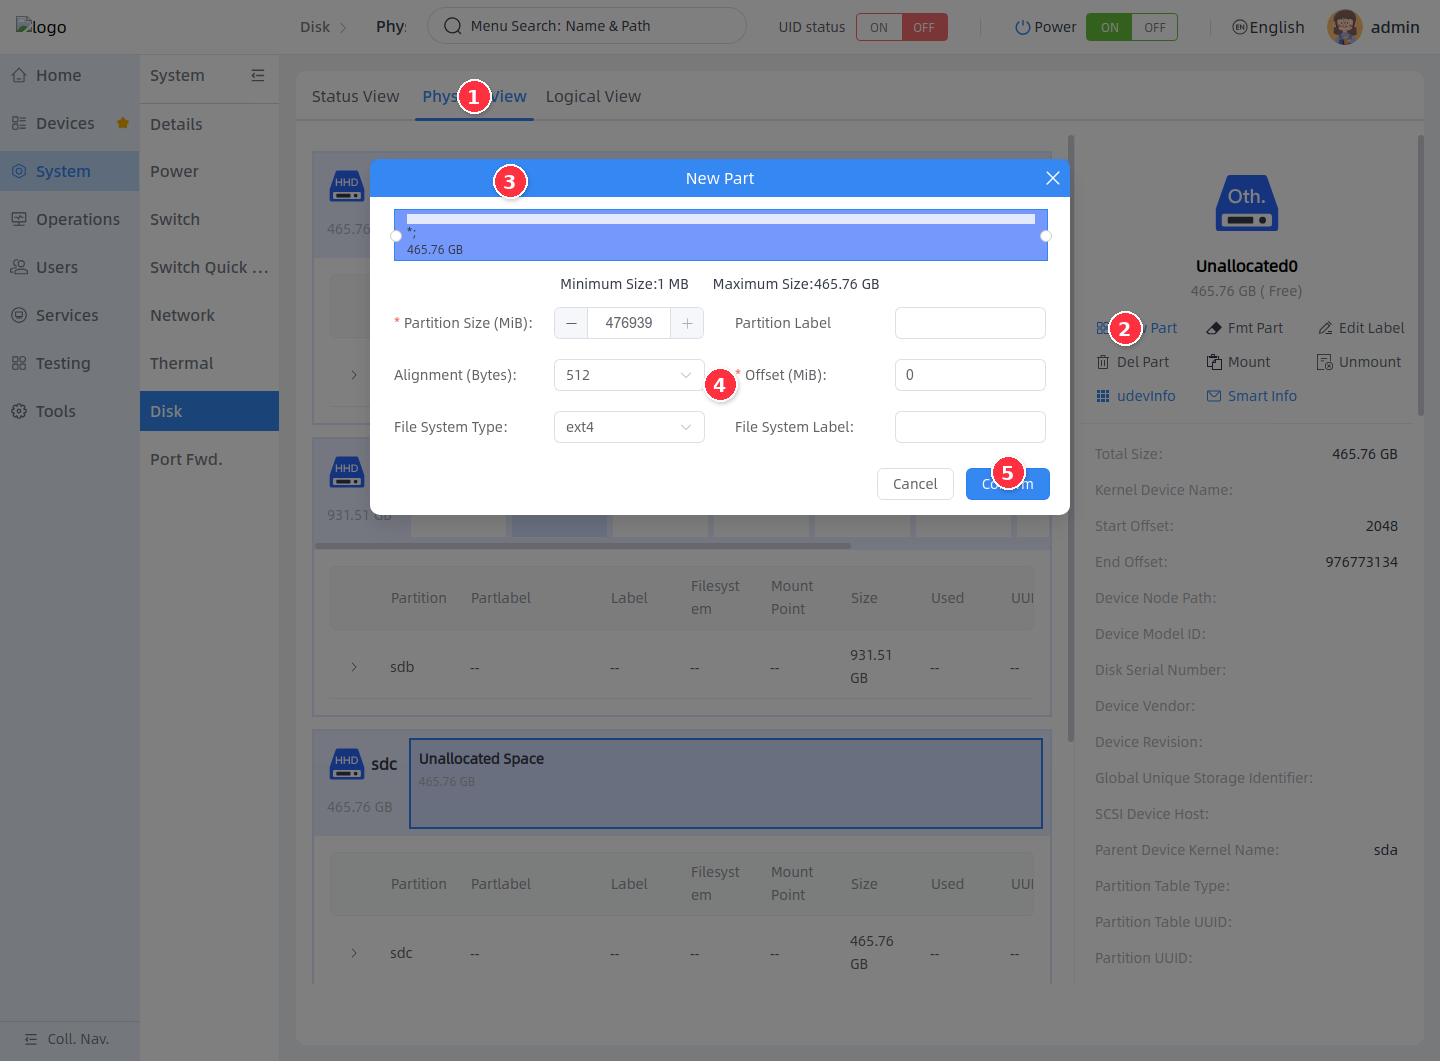
Creating partitions is only available on Unallocated space. The front end first reads NewPartitionActionInfo to obtain the available size, alignment, offset range and file system type, and then submits NewPartition to create the partition.
- Enter Physical View.
- Click Create Partition on the right.
- Select the Unallocated space on the target disk.
- Set the partition size, partition label, byte alignment, offset, file system format and file system label in the pop-up window.
- Click Confirm to create the partition.
| Parameters | Description |
|---|---|
| Partition size (MiB) | The new partition capacity must be within the minimum and maximum values displayed in the pop-up window |
| Partlabel | Partlabel in the partition table, optional |
| Byte alignment (B) | Partition alignment parameters, usually use the default value returned by the backend |
| Offset (MiB) | Offset from the start of unallocated space |
| File system format | You can choose ext4, exfat, ntfs, ext2, ext3, fat32 or not create a file system |
| File system label | Label written when creating the file system |
Format partition
Formatting is used to create a new file system for a disk or partition. The backend will reject formatting requests for mounted objects, so the mount must be unmounted before operation.
- Enter Physical View.
- Select the disk or partition to be formatted.
- Click Format Partition on the right.
- Select the file system type in the pop-up window.
- Click Confirm and confirm again in the warning confirmation box.
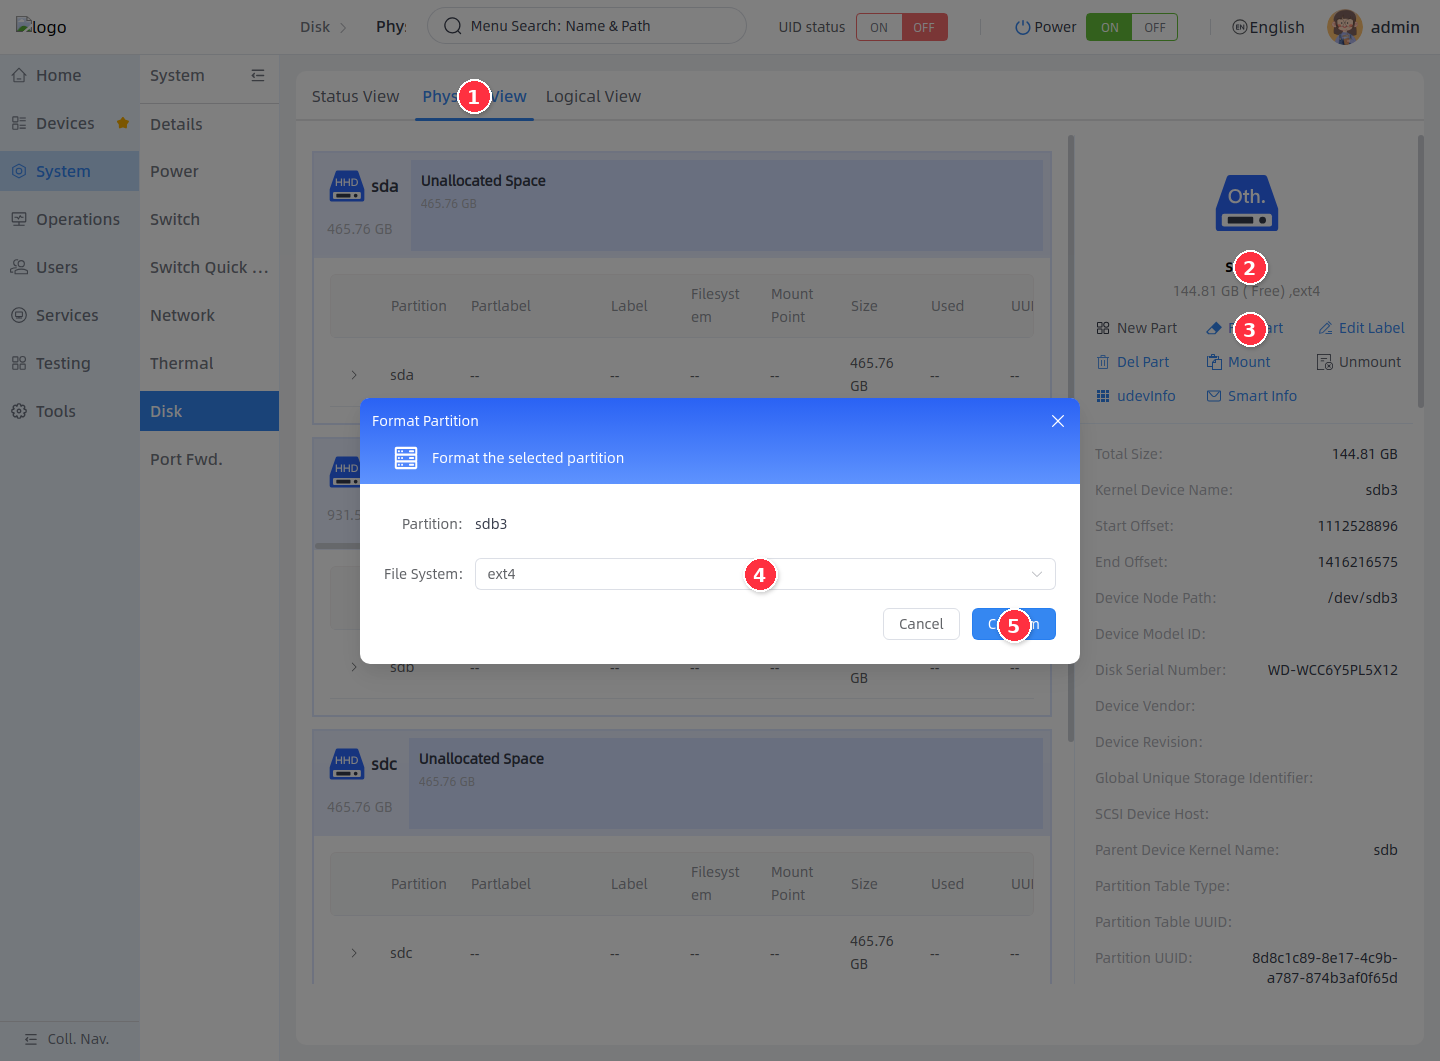
Formatting will clear file system data
Formatting will re-create the file system and the data in the original partition will be unavailable. Mounted partitions need to be Unmount first, otherwise the backend will refuse to format.
Modify volume label
Modifying the volume label is used to update the Label of an existing file system. This button is only available if the current object exists on the file system.
- Select the target partition in Physical View.
- Click Modify Label on the right.
- Enter the new partition label in the pop-up window.
- Click Confirm and confirm the changes in the confirmation box.
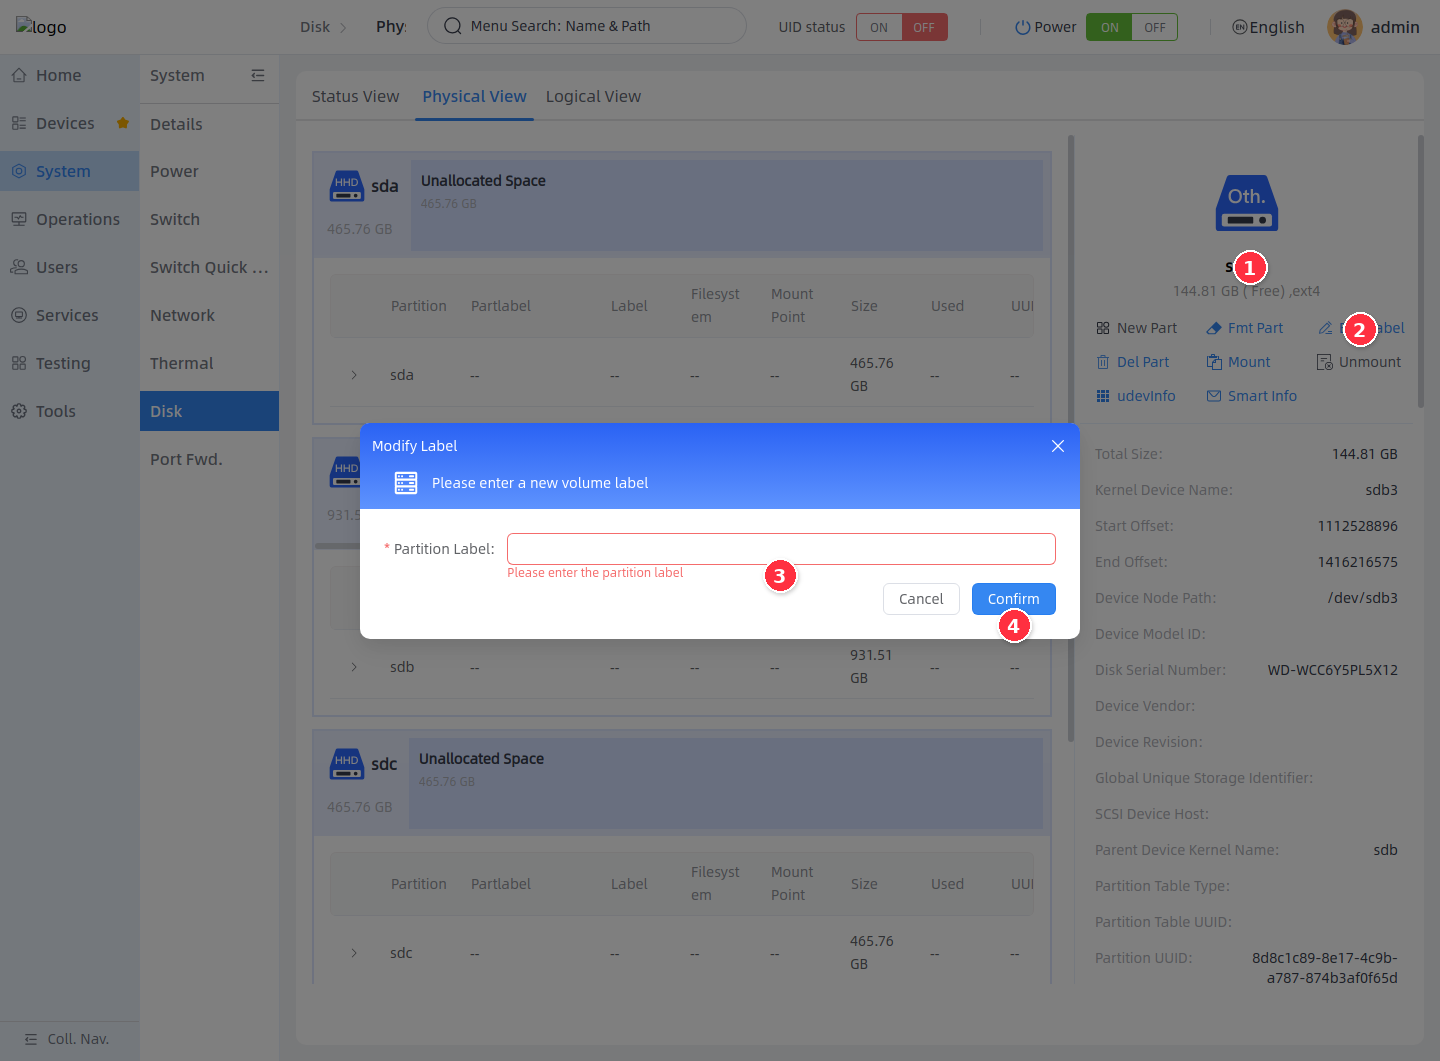
Mount or unmount partition
Mount is used to mount a partition with an existing file system to a specified directory. The backend requires that the mounting directory must be an absolute path and cannot be the root directory /. Mounting methods include:
| Mounting method | Description |
|---|---|
| Temporary Mount | It takes effect while the current system is running and needs to be remounted after restarting |
| Persistent Mount | The backend will create a systemd mount unit managed by aBMC and mount it automatically after restarting |
- Enter Physical View.
- Select a partition with a file system.
- Click Mount on the right.
- Enter the mount directory and select Temporary Mount or Persistent Mount.
- Click Confirm.
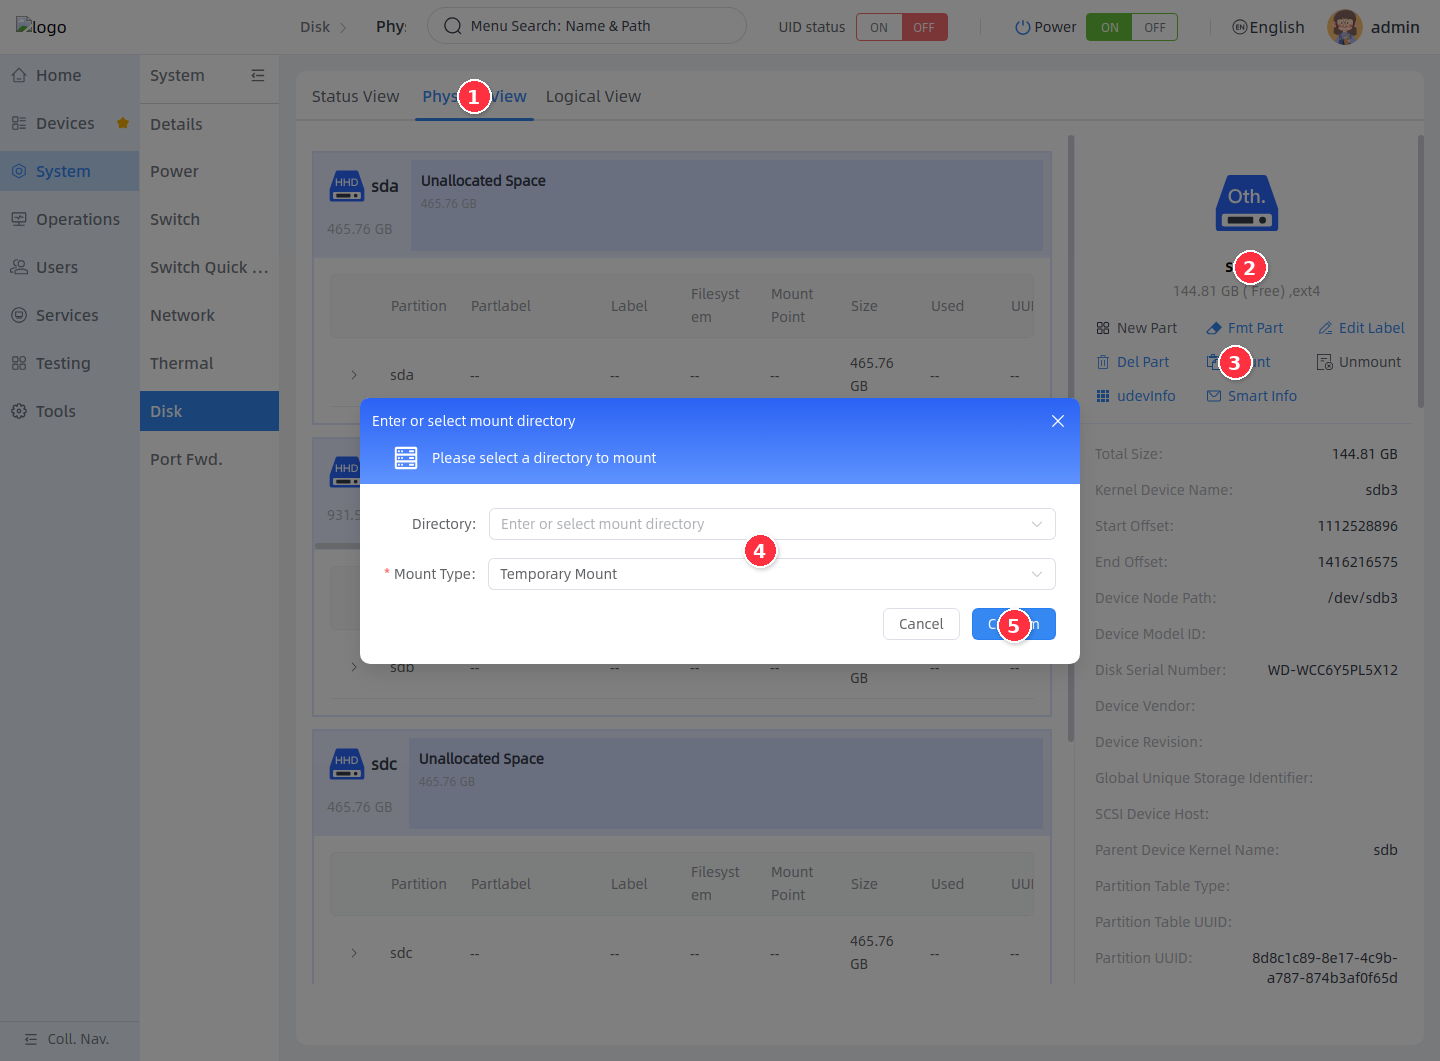
When unmounting, select the mounted partition, click Unmount on the right, confirm the directory to be unmounted in the pop-up window, and submit. Mounted partitions have the unmount button enabled and some write operations disabled.
View Udev information
Udev information is used to troubleshoot device paths, buses, manufacturers, serial numbers, and system identification attributes.
- Select the target disk or partition in Physical View.
- Click udevInfo on the right.
- View the Udev properties in JSON format in the pop-up window.
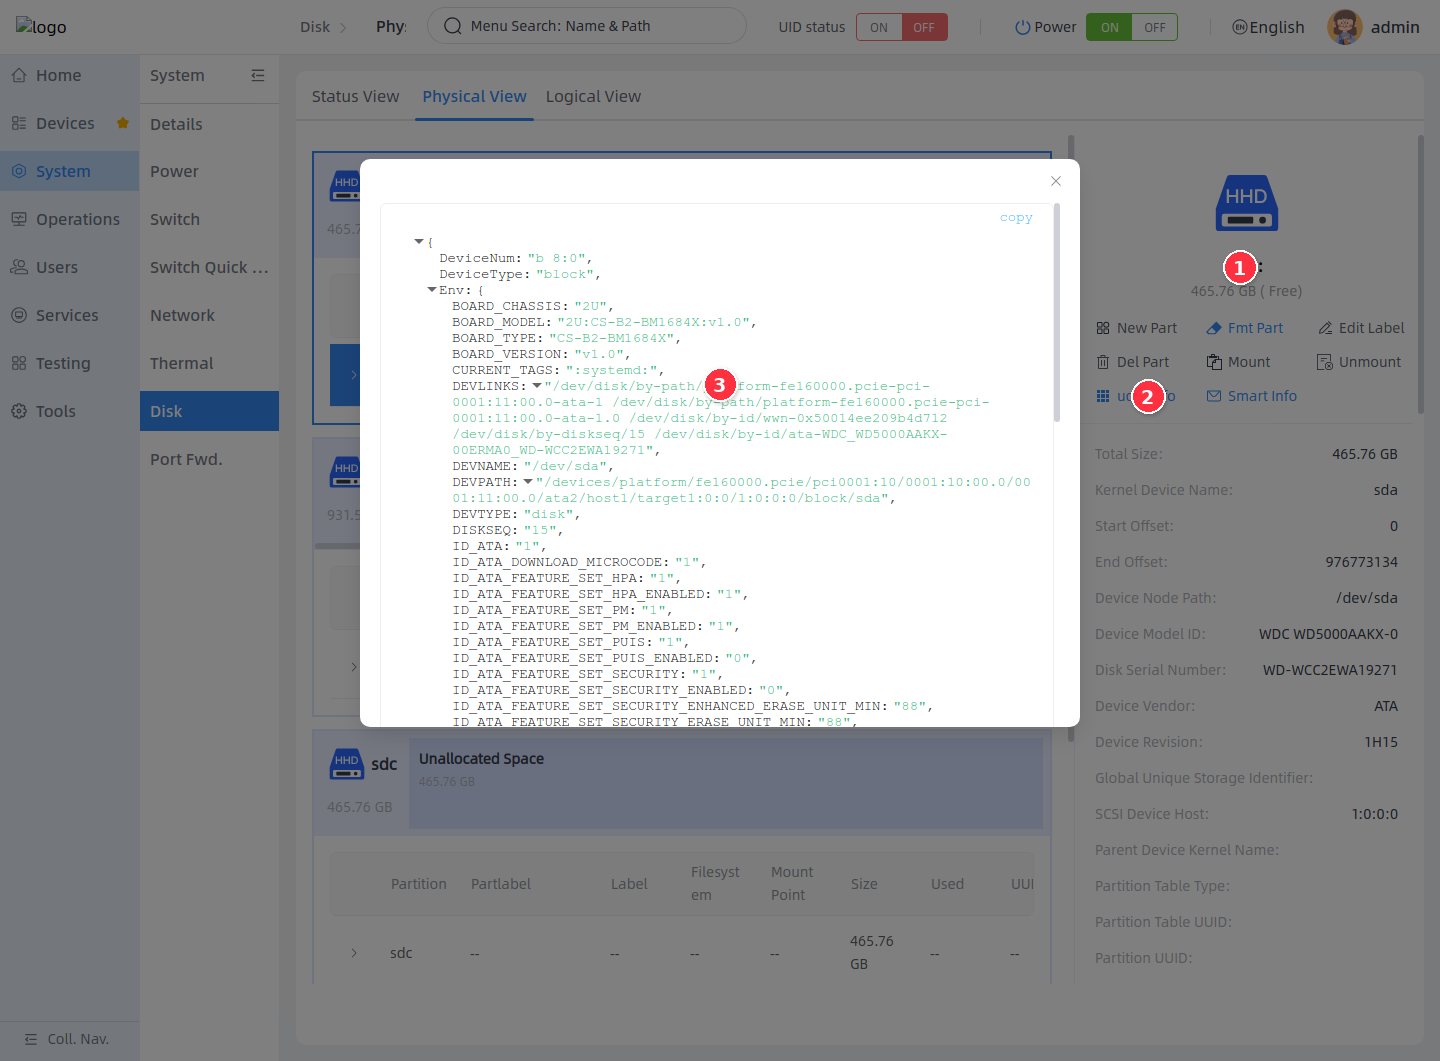
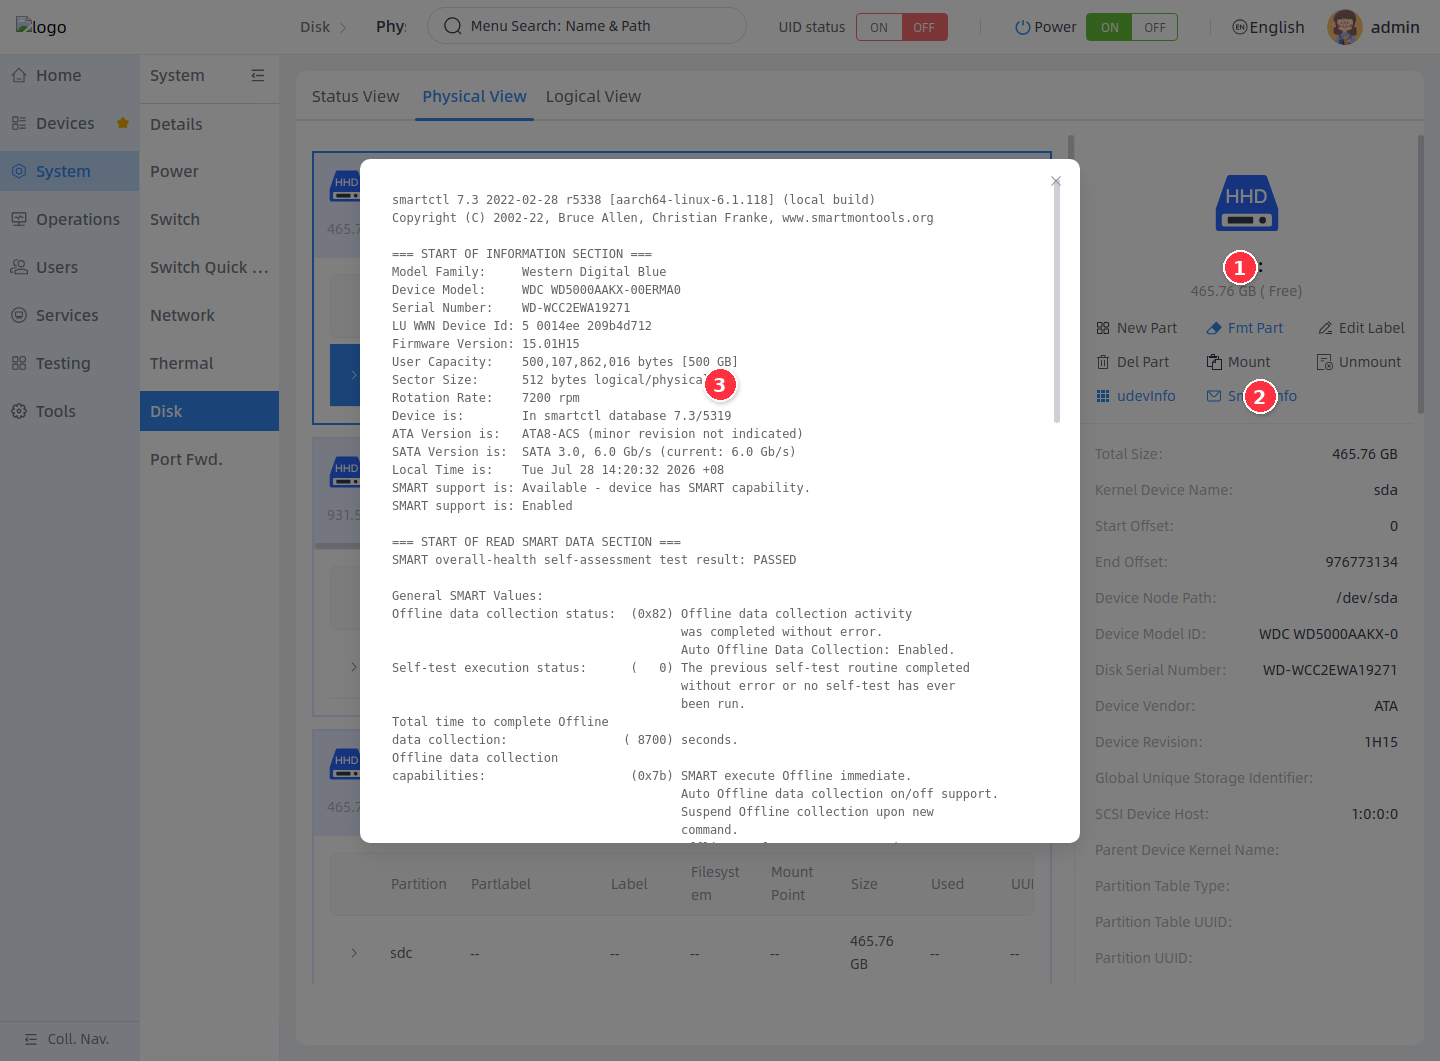
View SMART information
SMART information is used to view hard drive self-test, error count, health status, and device diagnostic output. The front end will call the SmartInfo interface, and the back end will read the SMART result of the corresponding block device and display it.
- Select the target hard drive or its partitions in Physical View.
- Click Smart Info on the right.
- View the SMART output in the pop-up window.
Manage RAID arrays
Understanding logical views
Logical views are used to create and maintain software RAID arrays. The data on the page comes from the Mdraid Redfish resource. The front-end determines which hard disks can be selected, which RAID modes can be created, and which maintenance operations can be performed on existing arrays based on the available hard disks, RAID Level capabilities, and RaidOps operation enable returned by the backend.
RAID operations are high-risk storage operations. Creation, deletion, expansion, disk replacement, and mode adjustment will all modify disk metadata or trigger array reconstruction. Before execution, confirm that there is no business data on the target hard disk, and complete data backup if necessary.
Create RAID array
When creating a RAID array, the left side of the page displays the hard drives that can be used to form the array, and the right side displays the RAID storage modes that can be supported by the current number of hard drives. After selecting a hard drive, the page will recalculate available capacity, theoretical read and write performance, and data protection capabilities.
- Enter Logical View.
- Click Create RAID Array in the upper right corner.
- Select an available hard drive in the pop-up window.
- Select a RAID storage mode on the right.
- Click Next to proceed to the next step.
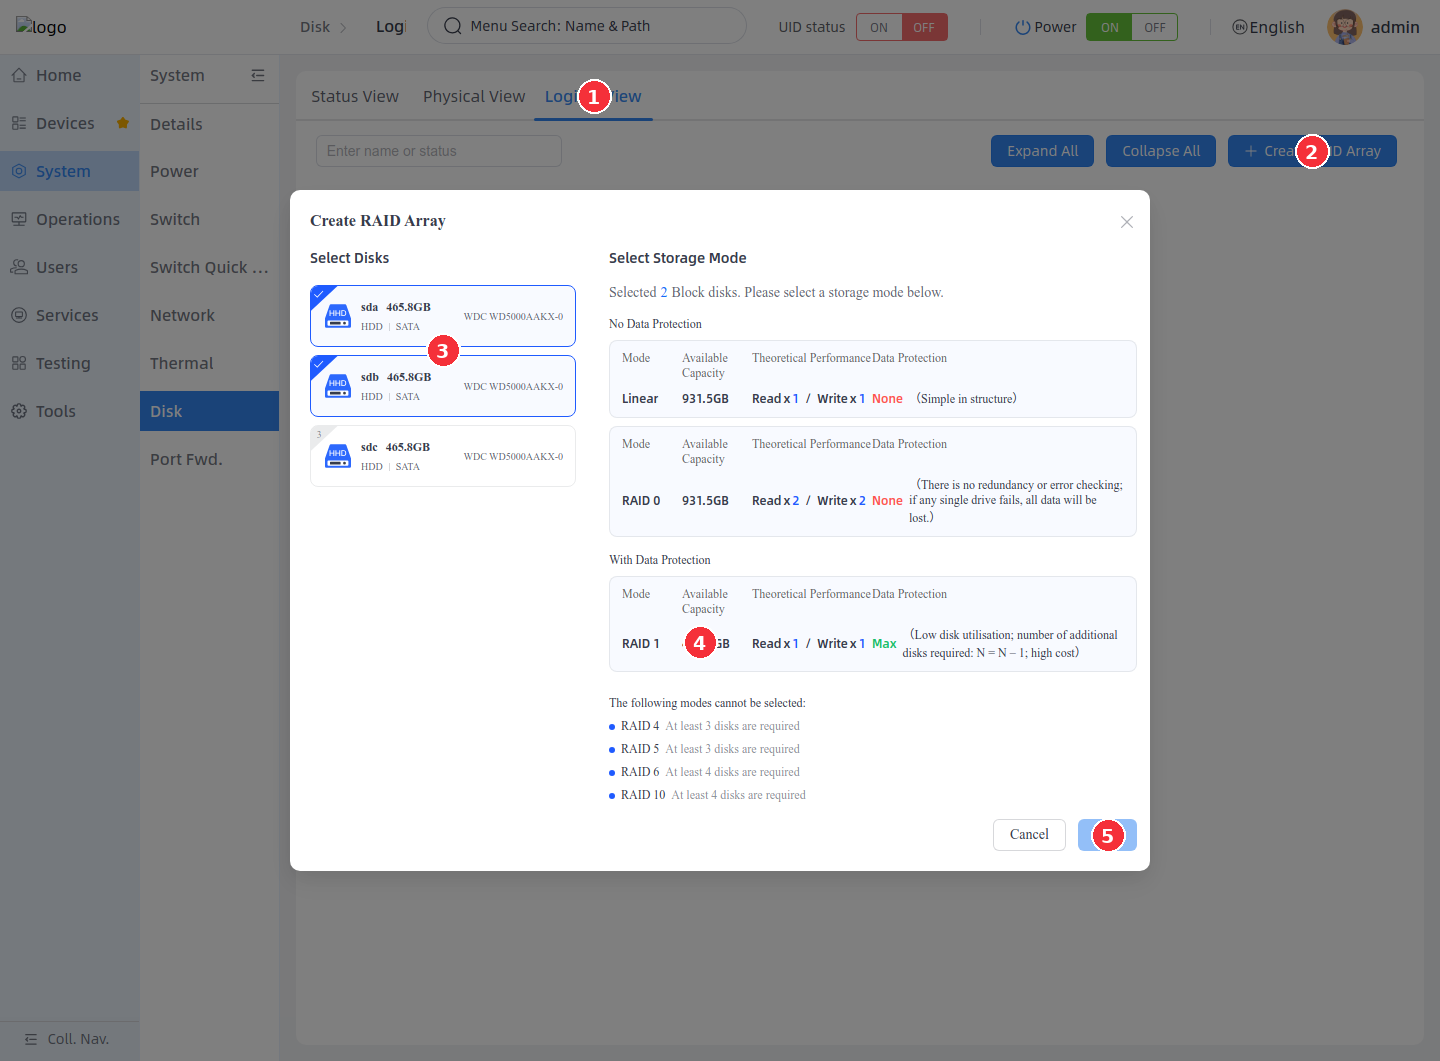
The key fields for creating a page are described as follows:
| Field | Description |
|---|---|
| Select Disks | List of hard drives that can be used to create RAID. Unavailable hard drives will not be created as options. |
| Select Storage Mode | A list of RAID modes calculated based on the number of selected hard drives and backend capabilities. |
| Available Capacity | The capacity expected to be available for storing business data after creation. |
| Theoretical Performance | The theoretical read and write performance reference value returned by the backend based on RAID Level. |
| Data Protection | The data protection capability of the current RAID mode, such as None, Medium, Max. |
Common RAID mode requirements are as follows:
| RAID mode | Minimum number of hard disks | Description |
|---|---|---|
| Linear | 2 | Multiple disks are connected in series with no redundancy; any abnormality of any member disk may affect the overall data. |
| RAID 0 | 2 | Striped read and write, high performance, but no redundancy protection. |
| RAID 1 | 2 | Mirror protection, high data security, available capacity is approximately equal to the smallest member disk capacity. |
| RAID 4 | 3 | Independent parity disk, single disk failure is allowed, and write performance is affected by the parity disk. |
| RAID 5 | 3 | Distributed parity, allowing single disk failure, capacity utilization is higher than RAID 1. |
| RAID 6 | 4 | Double parity, allowing double disk failure, higher write overhead. |
| RAID 10 | 4 and usually an even number of disks | Mirror plus striping, taking into account performance and redundancy. |
When the current device has no available hard disk
If there is no optional hard drive in the pop-up window, or the target RAID mode is not selectable, it means that the current machine does not have a free hard drive that meets the conditions. The disks need to be freed, old RAID metadata cleared, or a new available hard drive inserted before creation.
Capacity and reconstruction time description
After RAID creation is completed, it may enter the Resync or Recovering state. The larger the array capacity, the longer the initialization or reconstruction time. Some maintenance operations will be disabled during reconstruction. It is recommended to wait for the status to return to Clean before continuing.
View RAID array card
After the RAID is created, the logical view displays the arrays as cards. Cards are used to view basic array information, member disks, and current status.
- Enter Logical View.
- View the RAID name, status, RAID Level, and capacity.
- View the Used Disk member disk list.
- Click the More icon in the upper right corner of the card to open the maintenance menu.
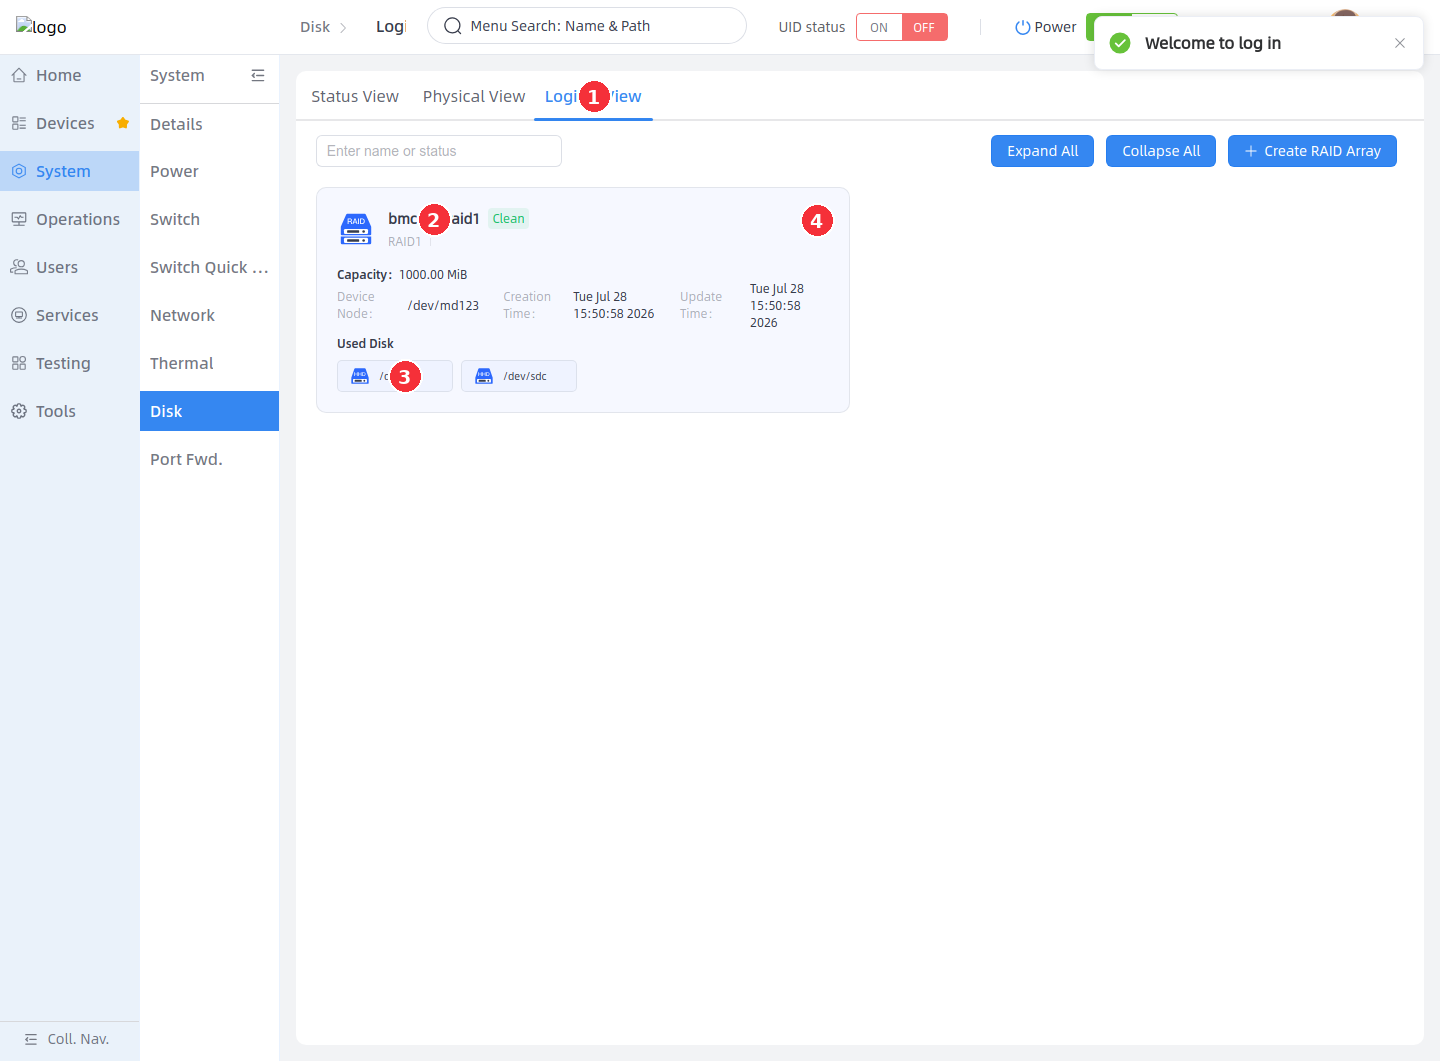
RAID card field descriptions are as follows:
| Field | Description |
|---|---|
| RAID Name | MdName written when creating the array to distinguish between different arrays. |
| Status | Current array status, such as Clean, Degraded, Resync, Recovering, Failed. |
| RAID Level | Current array mode, such as RAID1, RAID5, RAID10. |
| Capacity | Current available capacity of the array. |
| Device Node | The md device node in the system, such as /dev/md0. |
| Creation Time / Update Time | Array creation time and last update time. |
| Used Disk | The member disk currently participating in the array. |
Using the RAID operation menu
The operation menu in the upper right corner of the RAID card is controlled by the backend RaidOps field. The page will enable or disable operations such as adding disks, replacing hard disks, expanding capacity, modifying RAID mode, deleting member disks, and deleting arrays based on the array status.
- Click the More icon in the upper right corner of the RAID card.
- Select Add Disk to add a hot spare disk.
- Select Replace Disk to replace the member disk.
- Select Expand with Disks to add hard drive expansion.
- Select Modify RAID Mode to modify the RAID Level.
- Select Delete to delete the RAID array.
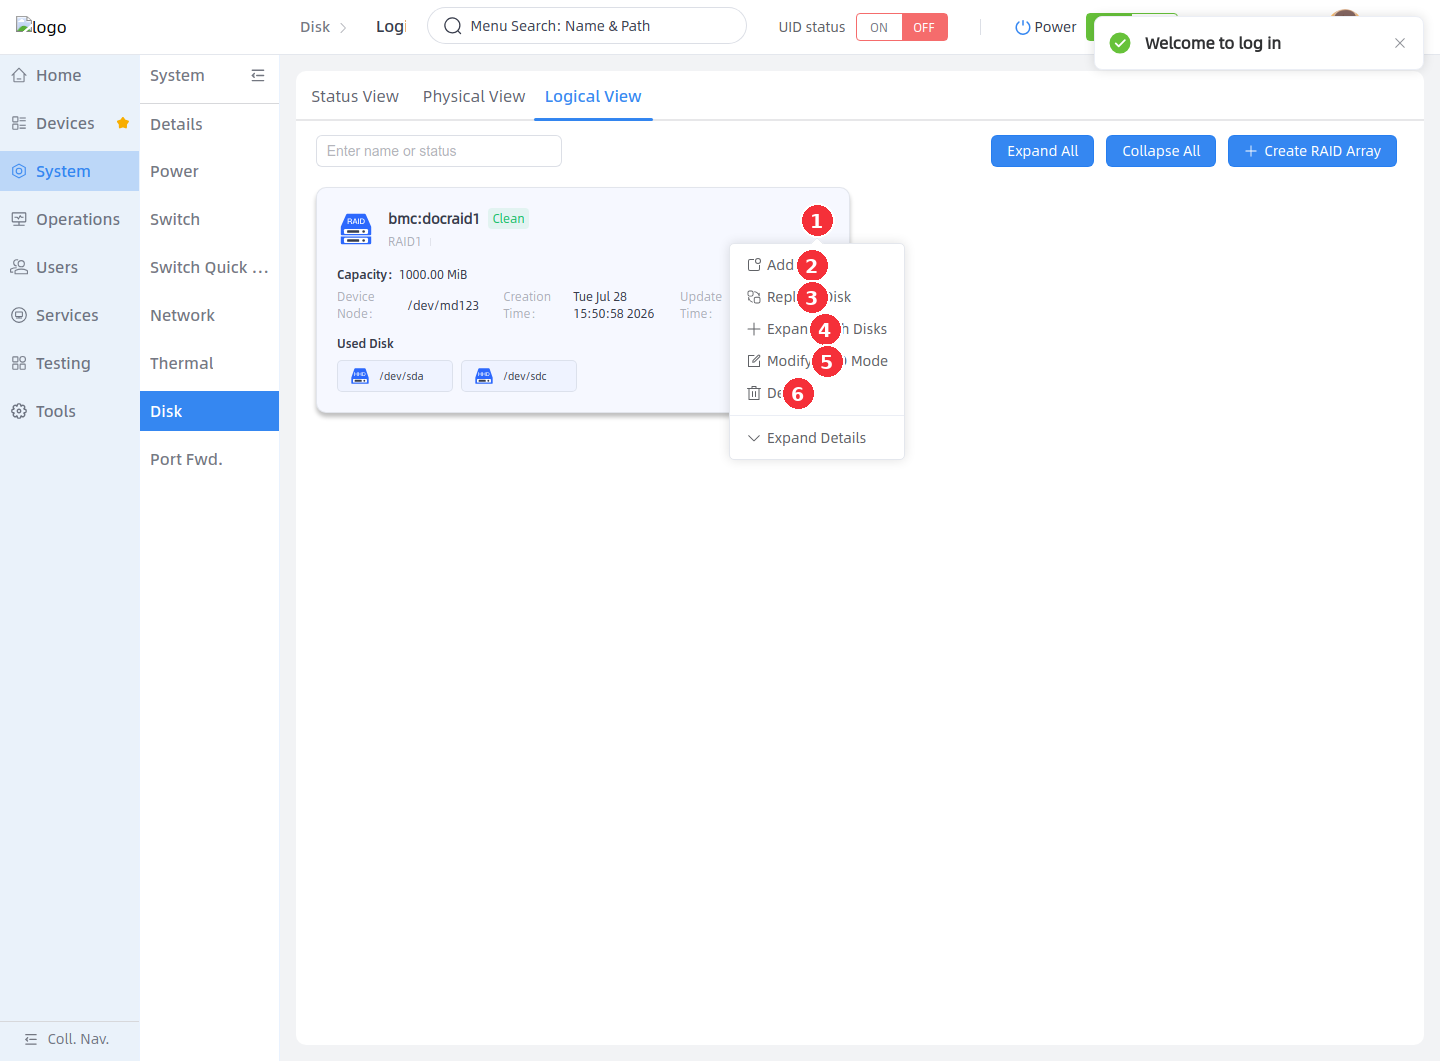
Commonly available operations in different states are as follows:
| RAID status | Available instructions |
|---|---|
| Clean | The array is OK. Non-RAID 0/Linear can usually add disks, replace disks, expand capacity, change modes, delete member disks, and delete arrays. |
| Degraded | The array is degraded. Usually, you can delete the array or add a hot spare disk. It is not recommended to continue to delete member disks. |
| Resync / Recovering | The array is synchronizing or recovering. Usually only the deletion array entry remains, and other maintenance operations need to wait for completion. |
| Reshaping | The array is expanding or changing mode. Other than deleting arrays, other maintenance operations are generally restricted. |
| Failed / Inactive | The array is abnormal or inactive. The hard drive status and data risks should be confirmed first before subsequent processing is performed. |
Add disk
Adding a disk is used to add a hot spare disk to an existing RAID array. After a hot spare disk is added, it is usually displayed as spare and does not immediately increase the available business capacity. Hot spare disks can participate in automatic recovery when the active member disk in the array fails or is removed.
- Open the Add Disk pop-up window.
- Confirm the current RAID name, used member disks, capacity and storage mode.
- Select an available hard drive to add.
- Click Confirm to submit.
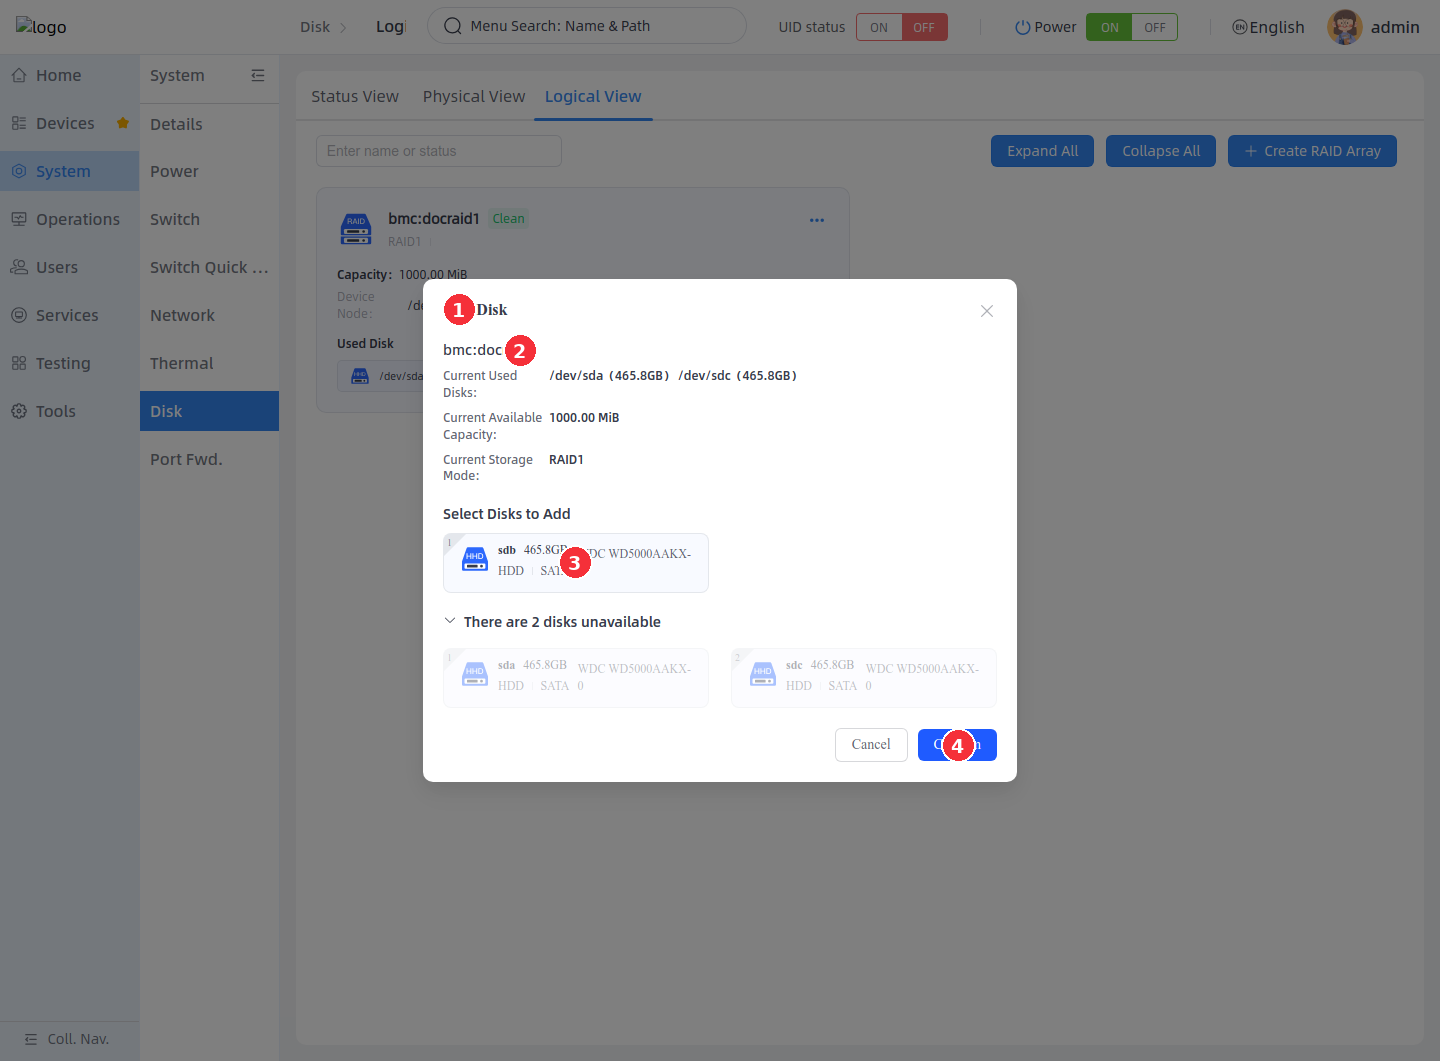
After adding a disk, it is recommended to return to the RAID card to check the status of the member disks. If the new disk is displayed as spare, it means that the disk exists as a hot spare disk; if the array is in the downgrade recovery process, it may enter the reconstruction state.
Replace hard drive
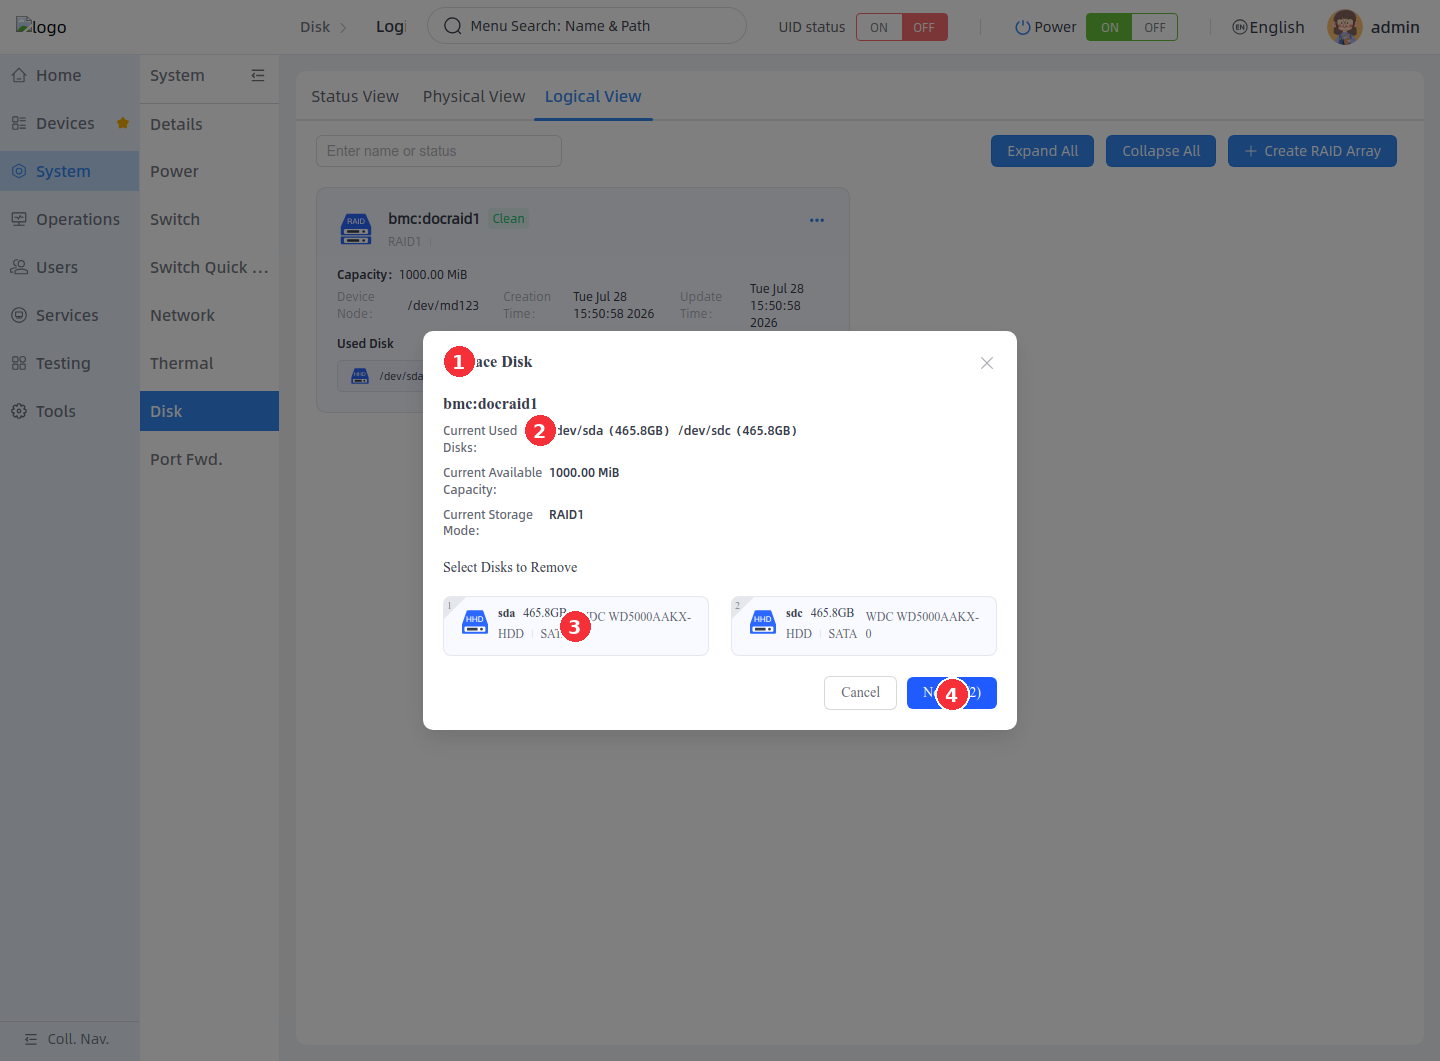
Replacement hard disk is used to replace an old member disk in a RAID array with a new available hard disk. This operation is divided into two steps: first select the old disk, and then select the new disk. After submission, the backend calls ReplaceDisk, and the array will enter the reconstruction process.
- Open the Replace Disk pop-up window.
- Confirm the current RAID information.
- Select the old member disk to be removed.
- Click Next (1/2) to proceed to the next step.
- Select the new hard drive for replacement in the second step.
- Confirm that the new hard disk corresponds to the old member disk.
- Click Confirm to submit the replacement.
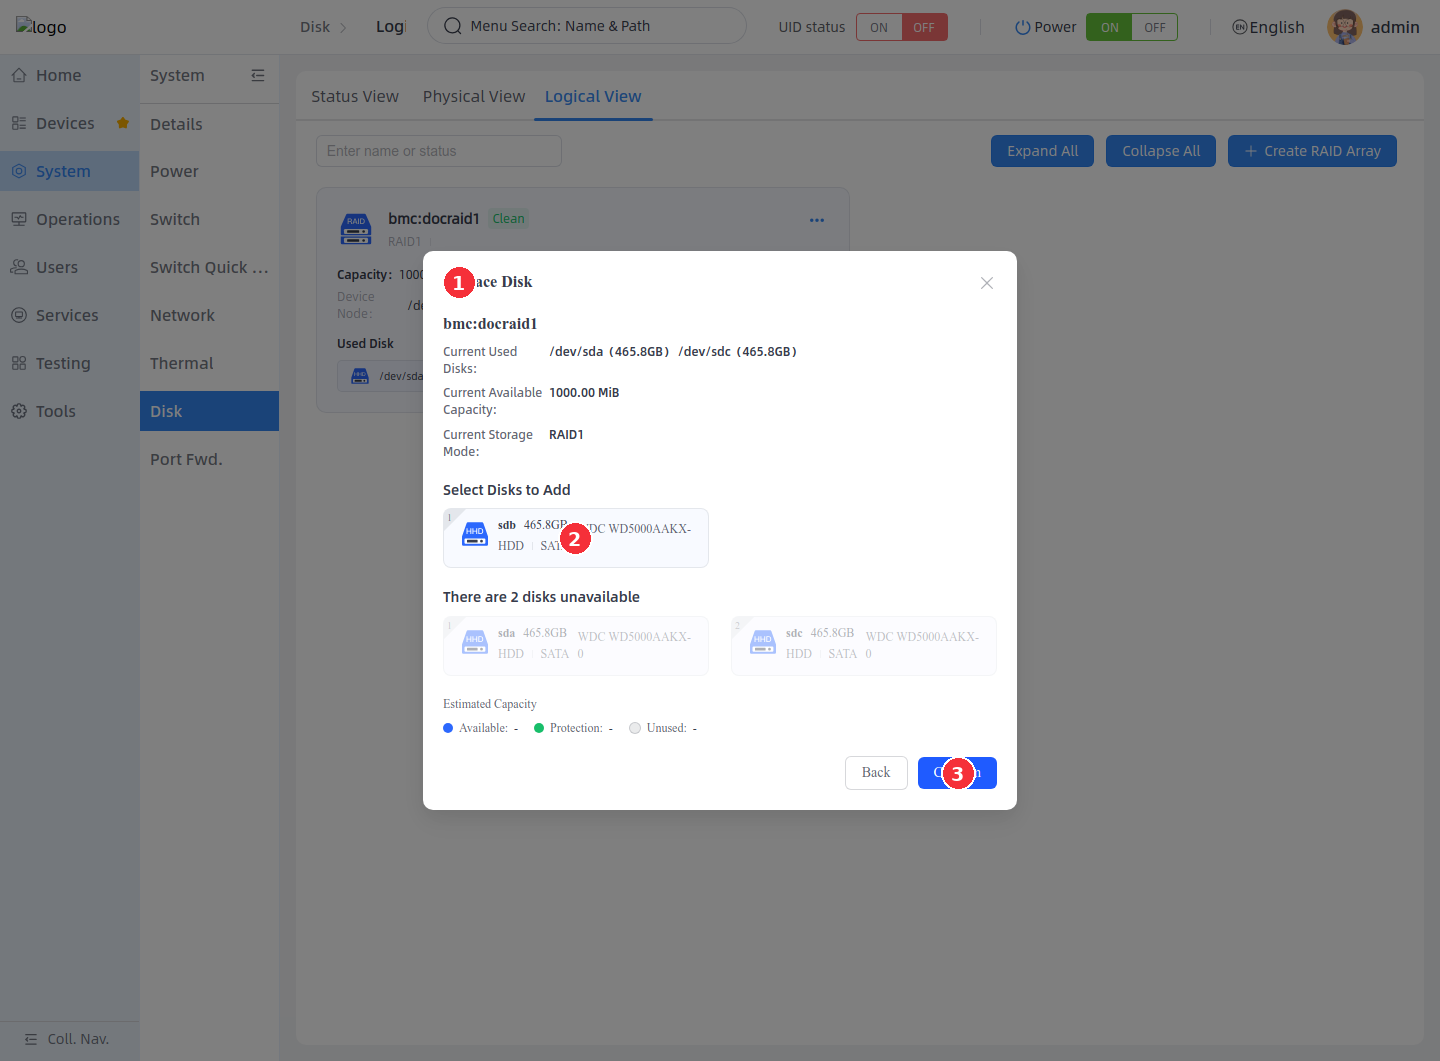
RAID capacity usually does not change immediately during the replacement process, and the reconstruction time is related to the member disk capacity. After the replacement is completed, the old disk may still remain in the array information in a fault, removed or similar status. You can follow the page prompts to delete the member disk again.
Add hard disk expansion
Expansion is used to add new hard drives to a RAID array and expand the array capacity. The page displays current RAID information, optional hard drives, and expected capacity changes. After submission, the backend executes Reshape/Exec, and the array enters the Reshaping or Resync state.
- Open the Expand with Disks pop-up window.
- Confirm the current RAID information.
- Select the available hard drives to be added to the array.
- Review projected capacity changes.
- Click Confirm to submit the expansion.
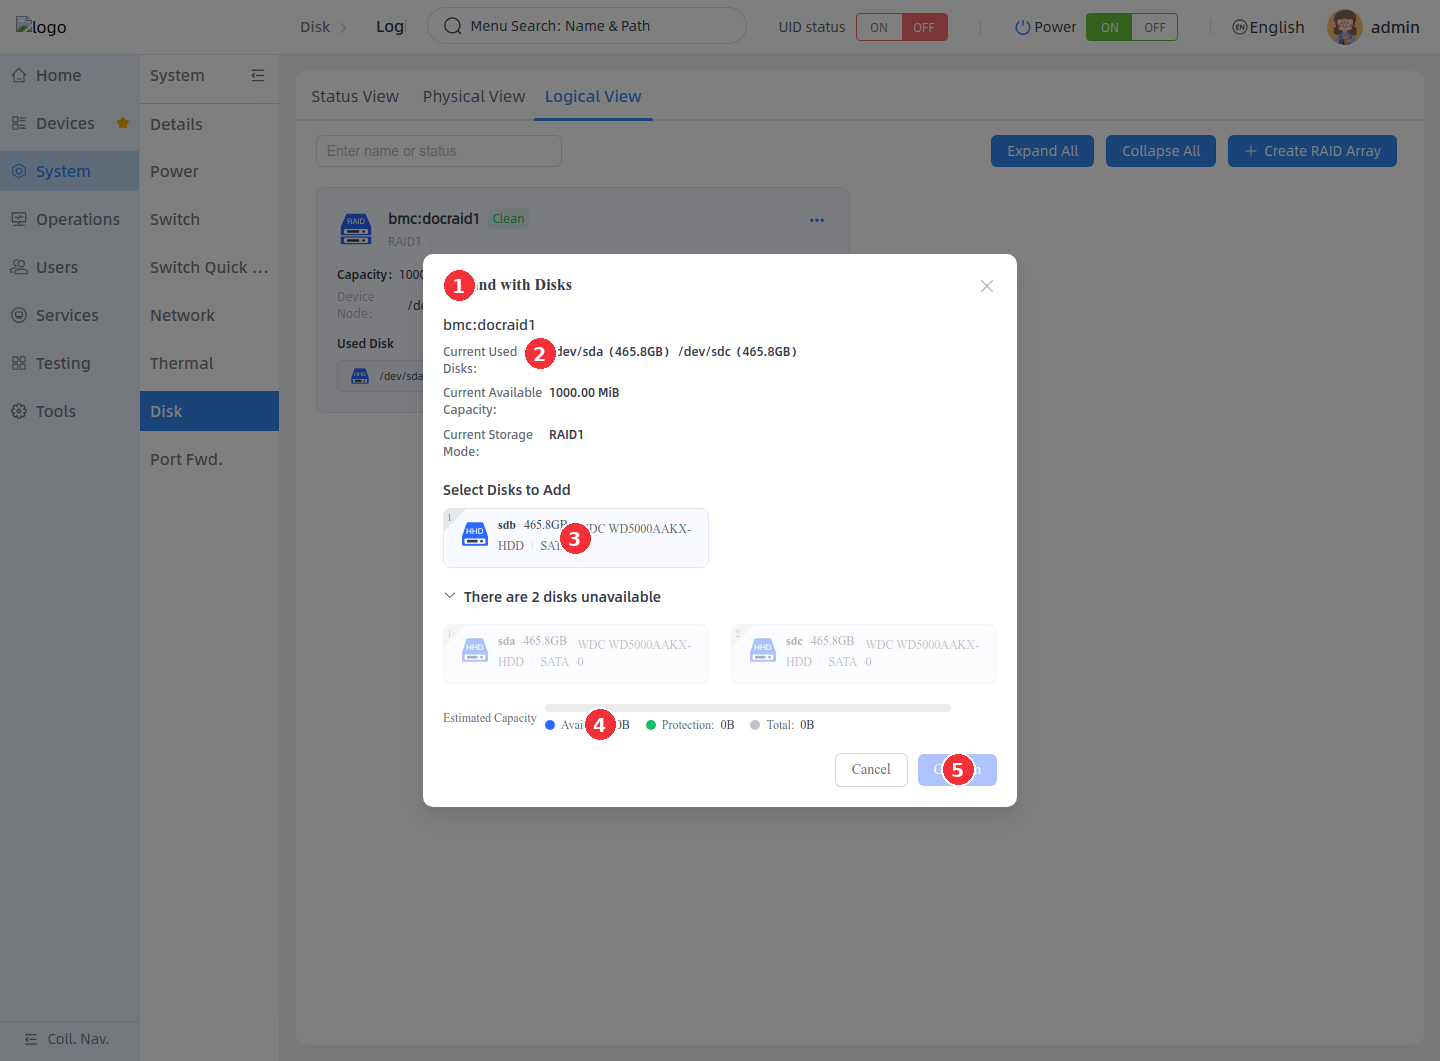
Expansion rules are related to RAID Level. For example, when expanding RAID 10, the number of active disks after expansion needs to meet an even number requirement; if the number of selected hard disks does not meet the backend rules, the page will refuse to submit or the backend will return an error.
Expansion period limit
RAID expansion will trigger background reconstruction. During reconstruction, do not power off, remove disks, or continue to perform other maintenance operations. It is recommended to wait for the RAID status to return to Clean before formatting, mounting or business writing.
Modify RAID mode
Modify RAID Mode is used to switch the current array to another supported RAID Level. The page will display the current mode first, and then the selectable target modes. The target mode may be downgrade, level change or upgrade; if the upgrade requires adding a new hard disk, the page will enter the hard disk selection step.
- Open the Modify RAID Mode pop-up window.
- Check the current RAID mode, capacity, theoretical performance and data protection capabilities.
- Select the target RAID mode.
- Click Next (1/2) or Confirm to continue.
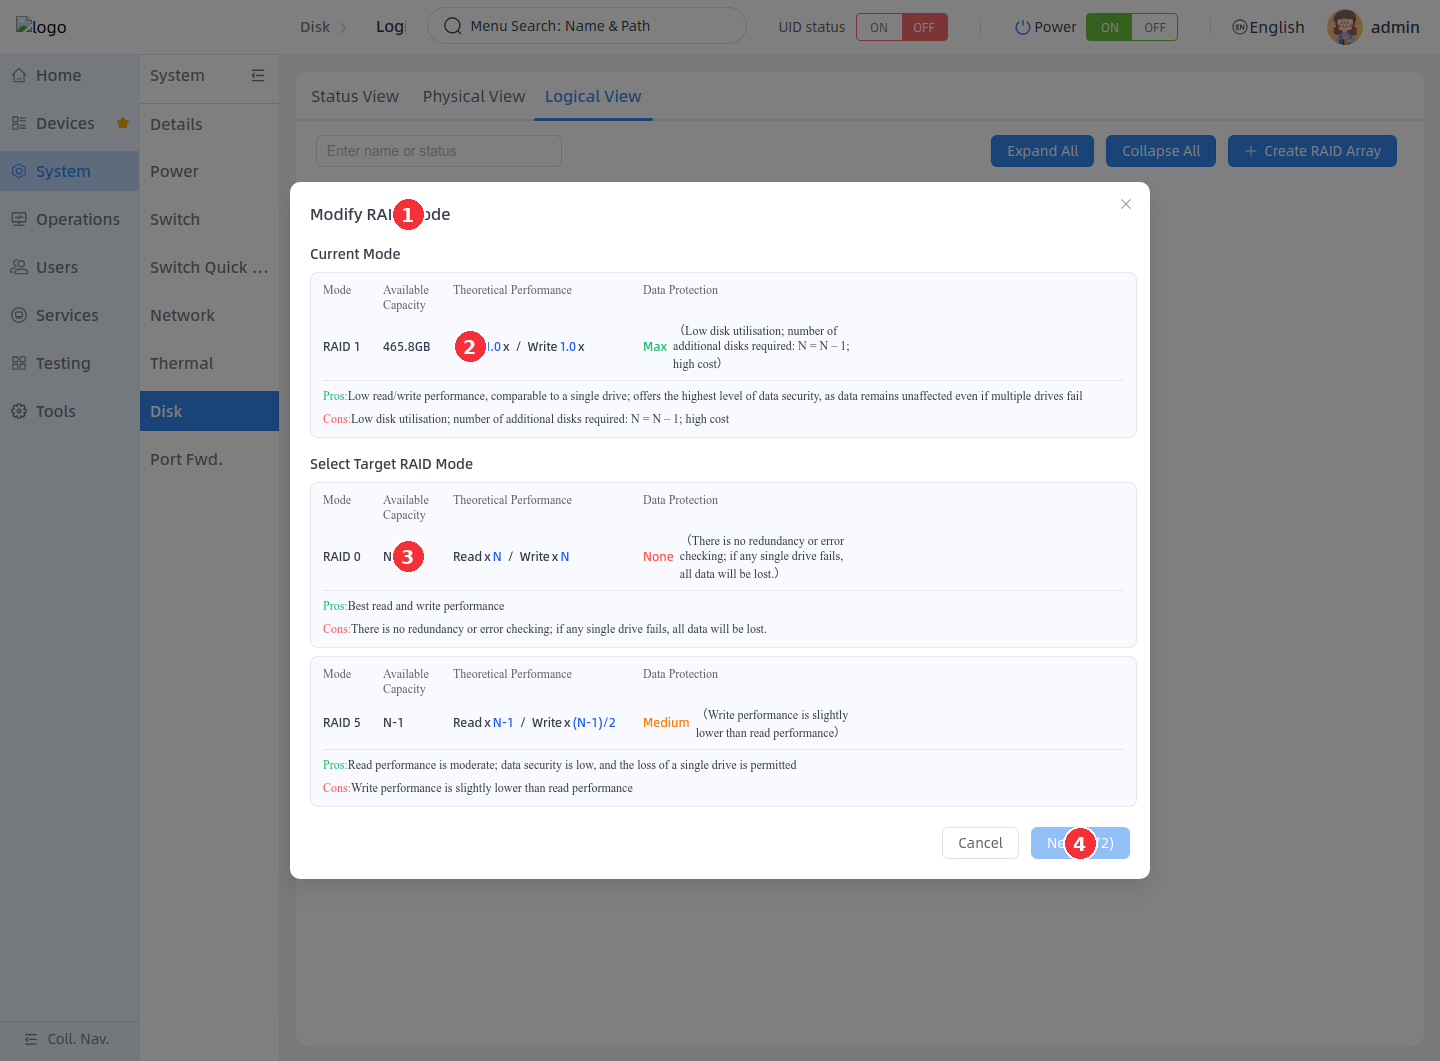
If the target RAID mode requires a new hard disk, the page will enter the second step.
- In the second step, select the new hard disk to be added to the array.
- View projected capacity changes.
- Click Confirm to commit the mode adjustment.
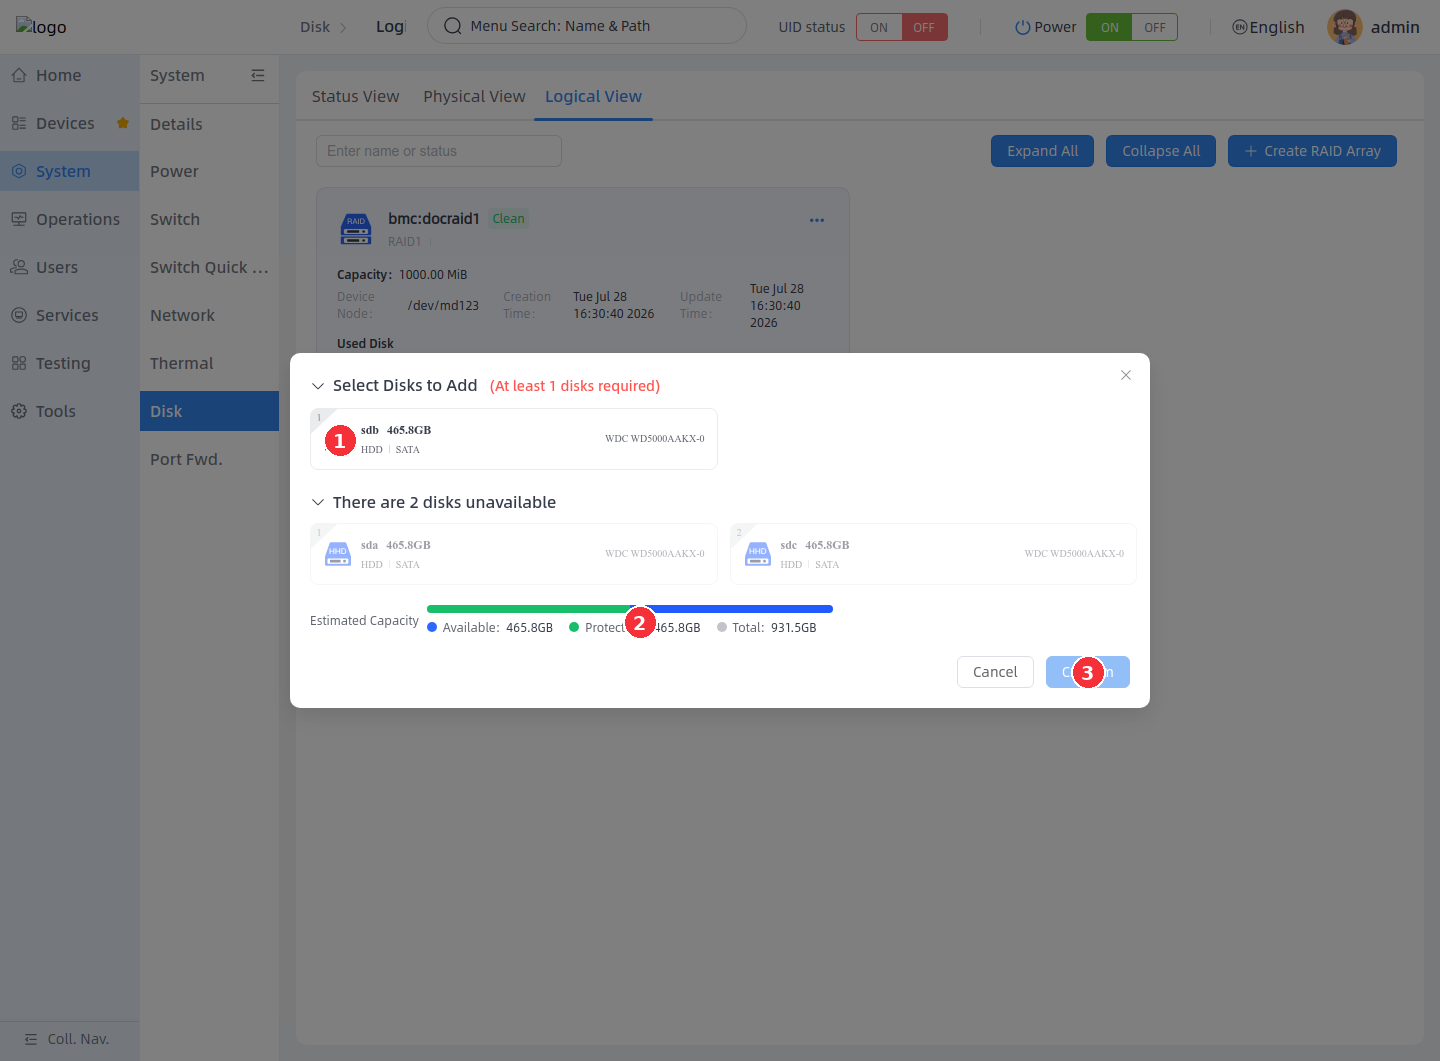
Common results of mode adjustments are as follows:
| Type | Description |
|---|---|
| Downgrade | Switching from a more protective RAID Level to a less protective mode, potentially reducing redundancy. |
| Upgrade | Switching to a mode with higher protection capabilities or different capacity rules usually requires adding a new hard disk and triggering reconstruction. |
| Horizontal changes | Some modes can be changed directly when the hard disk quantity and capacity rules are met. |
The RAID card may display Reshaping, Resync, or Recovering until the mode adjustment is complete. Wait for the status to return to Clean, and then confirm whether the capacity, member disks, and RAID Level are as expected.
Delete member disk
Delete member disk is used to remove the specified disk from the RAID array. This operation only deletes the RAID membership and is not equivalent to deleting the entire RAID array.
- Click the X icon on the member disk label.
- Confirm the target member disk and RAID array name in the delete confirmation box.
- Click Delete to delete the member disk.
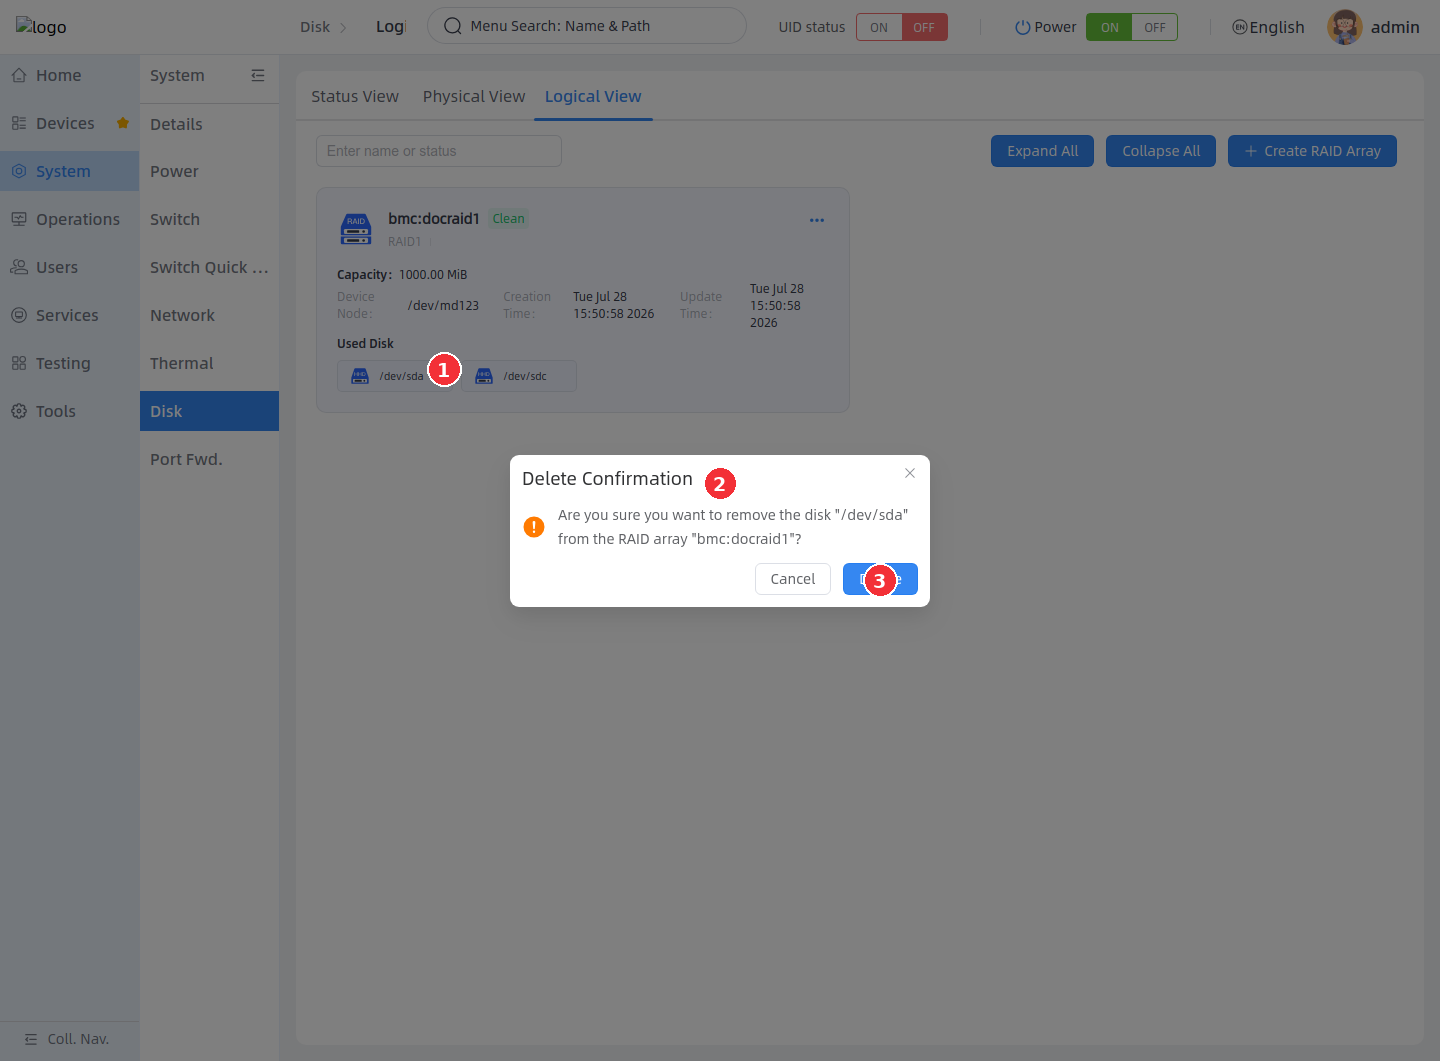
Deleting spare, fault, or removed member disks is typically used to clean up the array member list. Deleting an active member disk will cause the array to be degraded, posing data risks; if the array is already in the Degraded state, the backend usually restricts continued deletion of member disks.
Delete RAID Array
Deleting a RAID array stops the array and clears the RAID superblock on the member disks. After deletion, the original RAID device is no longer available and the member disk is restored to a normal block device that can be repartitioned, formatted, or re-created as a RAID.
- Click the More icon in the upper right corner of the RAID card and select Delete.
- Confirm the RAID array name in the Delete confirmation box.
- Click Delete to delete the RAID array.
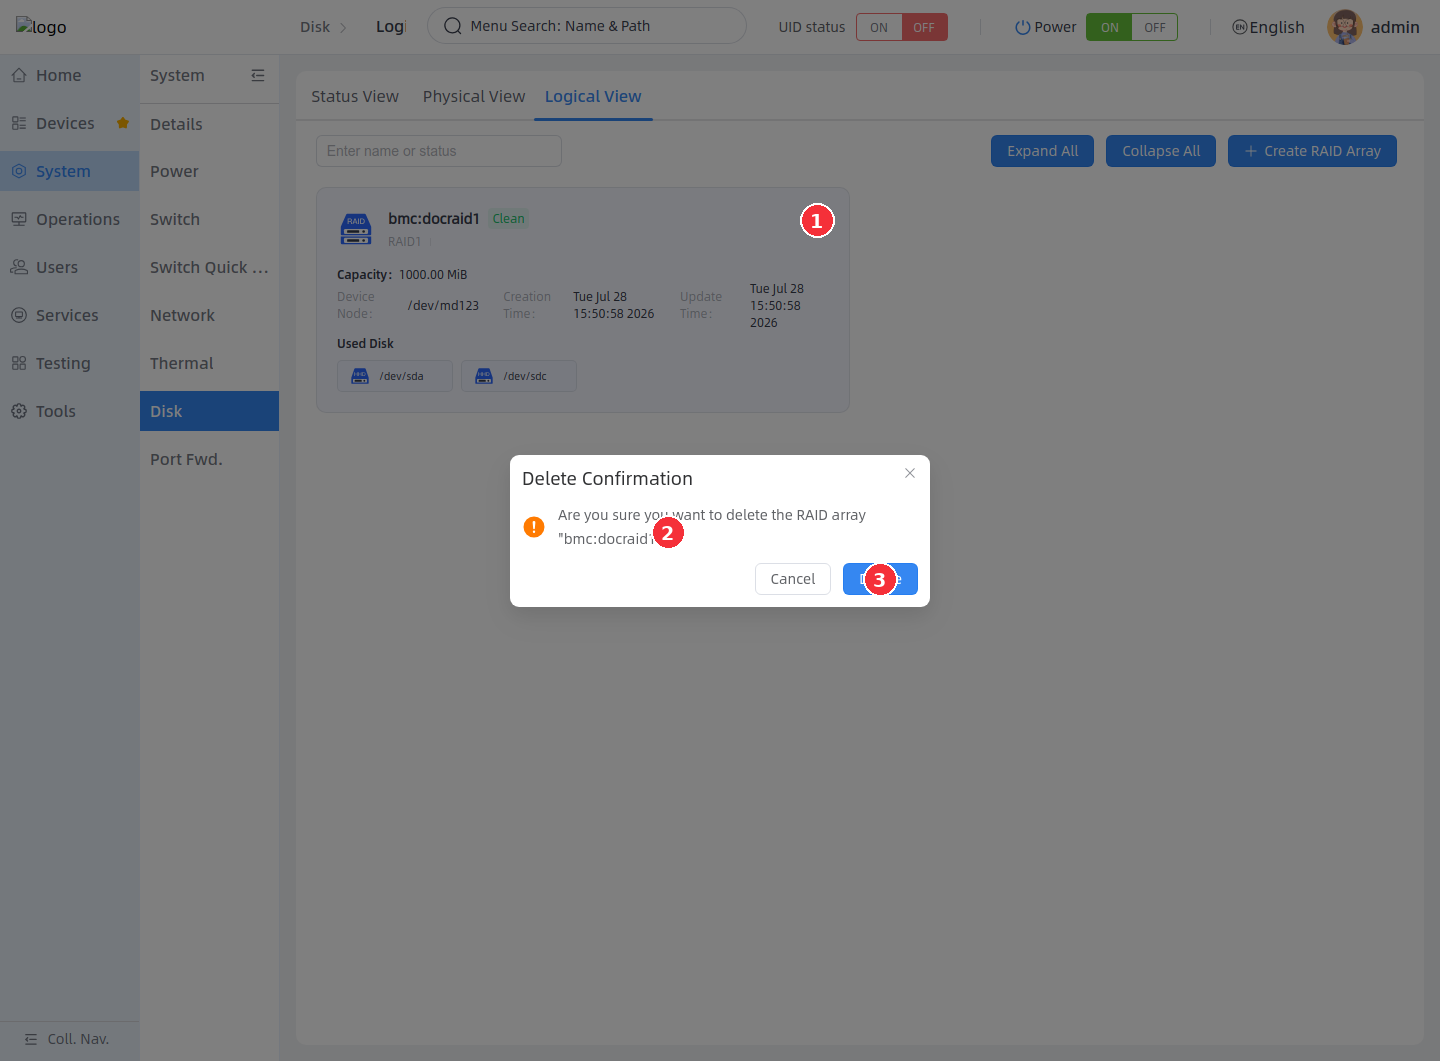
Deleting a RAID array will discard the current array
Deleting a RAID array will render the file system and business data on the array unusable. Before executing, please confirm that the target RAID array is not occupied by services and necessary data backup has been completed.
Verify configuration results
Confirm disk and RAID status
After the operation is completed, it is recommended to verify as follows:
- Return to Physical View and confirm whether the disk partition, file system, mount point and UUID are updated.
- After formatting or checking the file system, check the task progress and results in the log pop-up window.
- Return to Logical View and confirm whether the RAID status is Clean and whether the member disk status is
active sync. - If RAID expansion or mode adjustment is performed, wait until the reconstruction is completed before performing business writing.
- If the page does not refresh, manually refresh the page and confirm the backend status again.
FAQ
1.Create partition button is not available
The currently selected object is not unallocated space. Please select the Unallocated block in the disk graph and then execute Create Partition.
The format button is unavailable or formatting fails.
The current disk, partition, or its subpartitions may already be mounted. Please execute Unmount first to confirm that the mount point has been cleared, and then execute Format Partition.
The mount button is not available
The current object has no mountable file system. Please execute Format Partition to create a supported file system first, and then execute Mount.
The cancel mount button is unavailable
The current partition has no mount point. Please select the mounted partition and confirm that the mounting directory is displayed in the details area.
5.RAID mode is not optional
The number of available hard disks is insufficient, or the current number of hard disks does not meet the minimum requirements of the target RAID Level. Please add more free hard drives, or select a RAID mode that requires a lower number of hard drives.
Some operations in the RAID maintenance menu are unavailable
The current RAID status does not allow the corresponding operation to be performed. Please wait for Resync, Recovering or Reshaping to complete; when the array is in Degraded state, you should first check and deal with the faulty disk.
7.SMART information is empty
The target device may not support SMART, or the backend may fail to read the SMART information. Please check the hard drive connection and system logs and confirm that the target hard drive supports SMART.