



Sub Network Manager
Introduction
Sub Network Manager is a centralized network configuration function provided by aBMC for array servers. This function consists of two modules: network information management and configuration file operation.
- Network information management: Centrally view the IPv4 address, gateway, gateway priority, MAC address and DNS of the array sub-node network card, and supports DHCP or manual configuration.
- Configuration file operation: Provides network data export, template export and configuration import entrances. The import function only supports Linux devices.
Development Vision
- Provide array servers with a unified and visual network entrance to manage array sub-nodes, reducing the workload of logging in to devices one by one to configure the network.
- Reduce the risk of sub-board loss due to incorrect network configuration through clear configuration scope, private network card restrictions and result verification.
Feature Usage
View and configure network cards
Enter the network management page
- Select Devices in the main navigation bar on the left.
- Select Network in the secondary navigation bar.
- If you need to find the specified device, enter the device name in Enter device name; if you need to re-obtain the data, click Refresh.
- Confirm the target interface based on Device Name and Net Card in the network card list. The list displays both the BMC and the subboard network card, and does not display the loopback interface
lo.
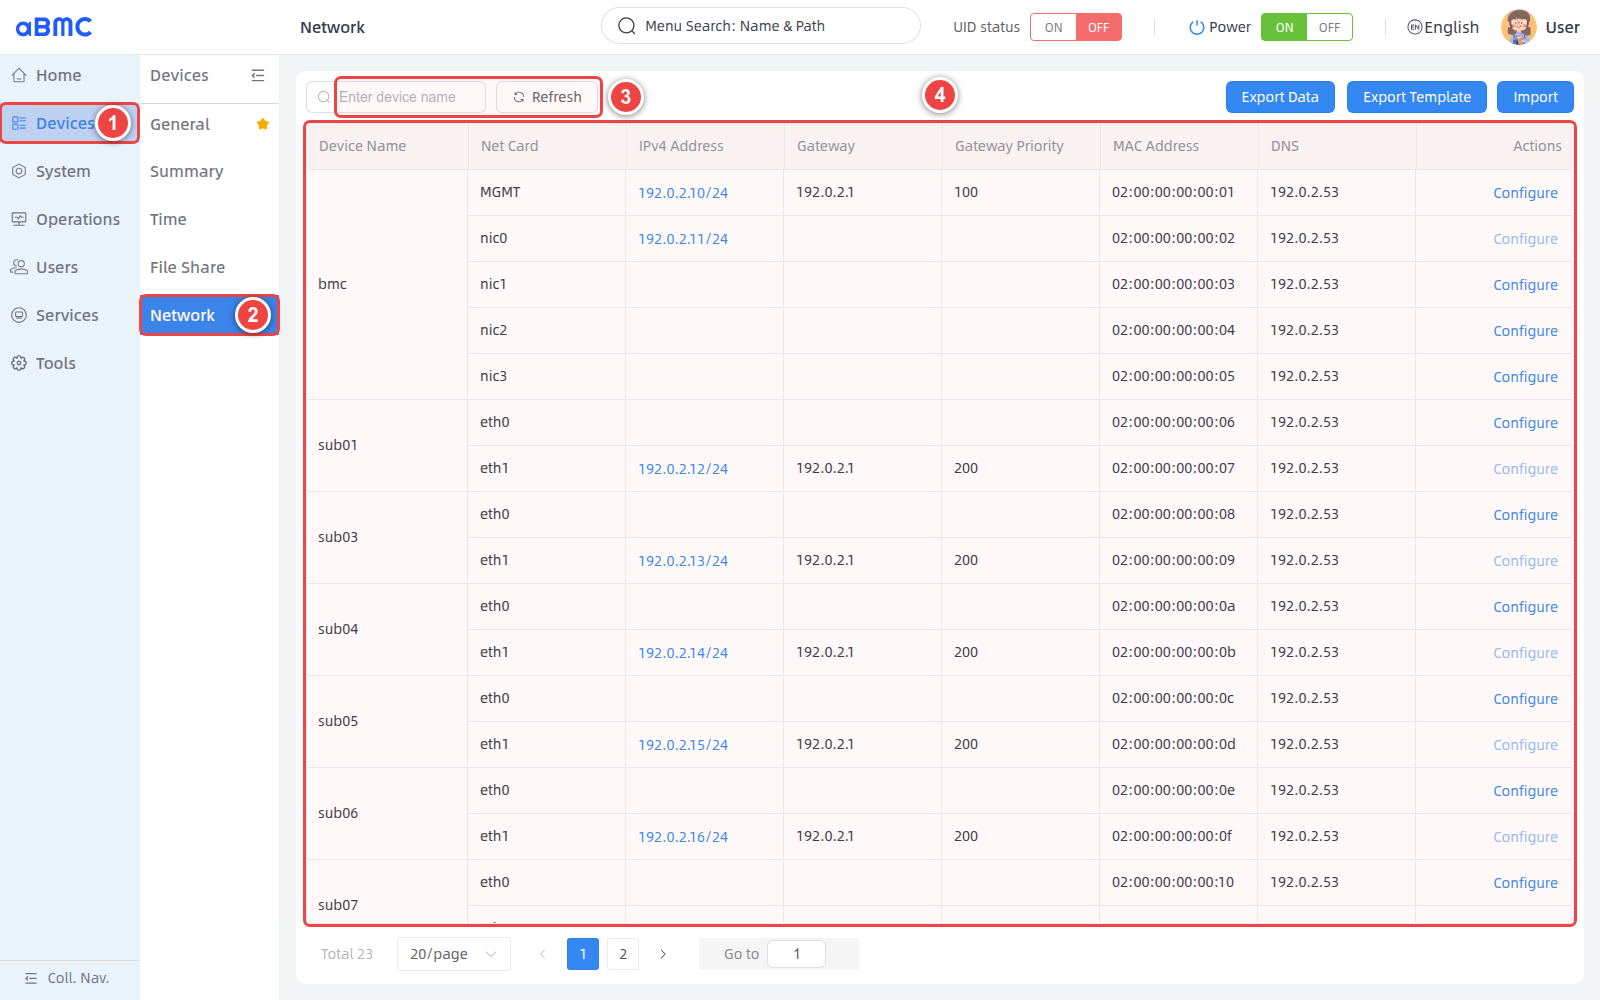
View network card information
The same device may contain multiple network cards. Before configuration, the device name and network card name should be checked at the same time, and the original address, gateway, and DNS should be recorded to facilitate recovery in case of abnormalities.
| Field | Description |
|---|---|
| Device Name | Node name, such as bmc or sub01. |
| Net Card | The name of the network card, such as MGMT, eth0, or eth1. |
| IPv4 Address | Current IPv4 address and prefix length. When there are multiple addresses for an interface, click the address to expand and view them. |
| Gateway | The current IPv4 default gateway. |
| Gateway Priority | The routing priority of the current gateway. |
| MAC Address | Network card MAC address, used to identify the physical interface. |
| DNS | Current DNS server list. |
| Actions | Configure allows configuration when available; when the button is disabled, move the mouse over the button to see the reason for the restriction. |
Determine whether the network card is allowed to be configured
- Configure available: allows modification of this interface.
- Configure Disabled: This interface is usually a private network card used by the BMC to communicate with the sub-board, or is restricted by the current topology policy and is not allowed to be configured.
Private network card restriction
Do not attempt to bypass page limits via the CLI or API. The backend will check the network card policy and return an error similar to card eth1 can not setting when Oem.Firefly.SettingEnabled is false.
Use DHCP to obtain the address
- Click Configure in the Actions column of the target interface.
- Select Auto (DHCP) in IPv4 Mode.
- If you need to specify DNS, enter the DNS server in DNS. Use commas to separate multiple addresses.
- Click Confirm.
- Return to the list and click Refresh to confirm that the interface has obtained the expected address.
Manually configure IPv4
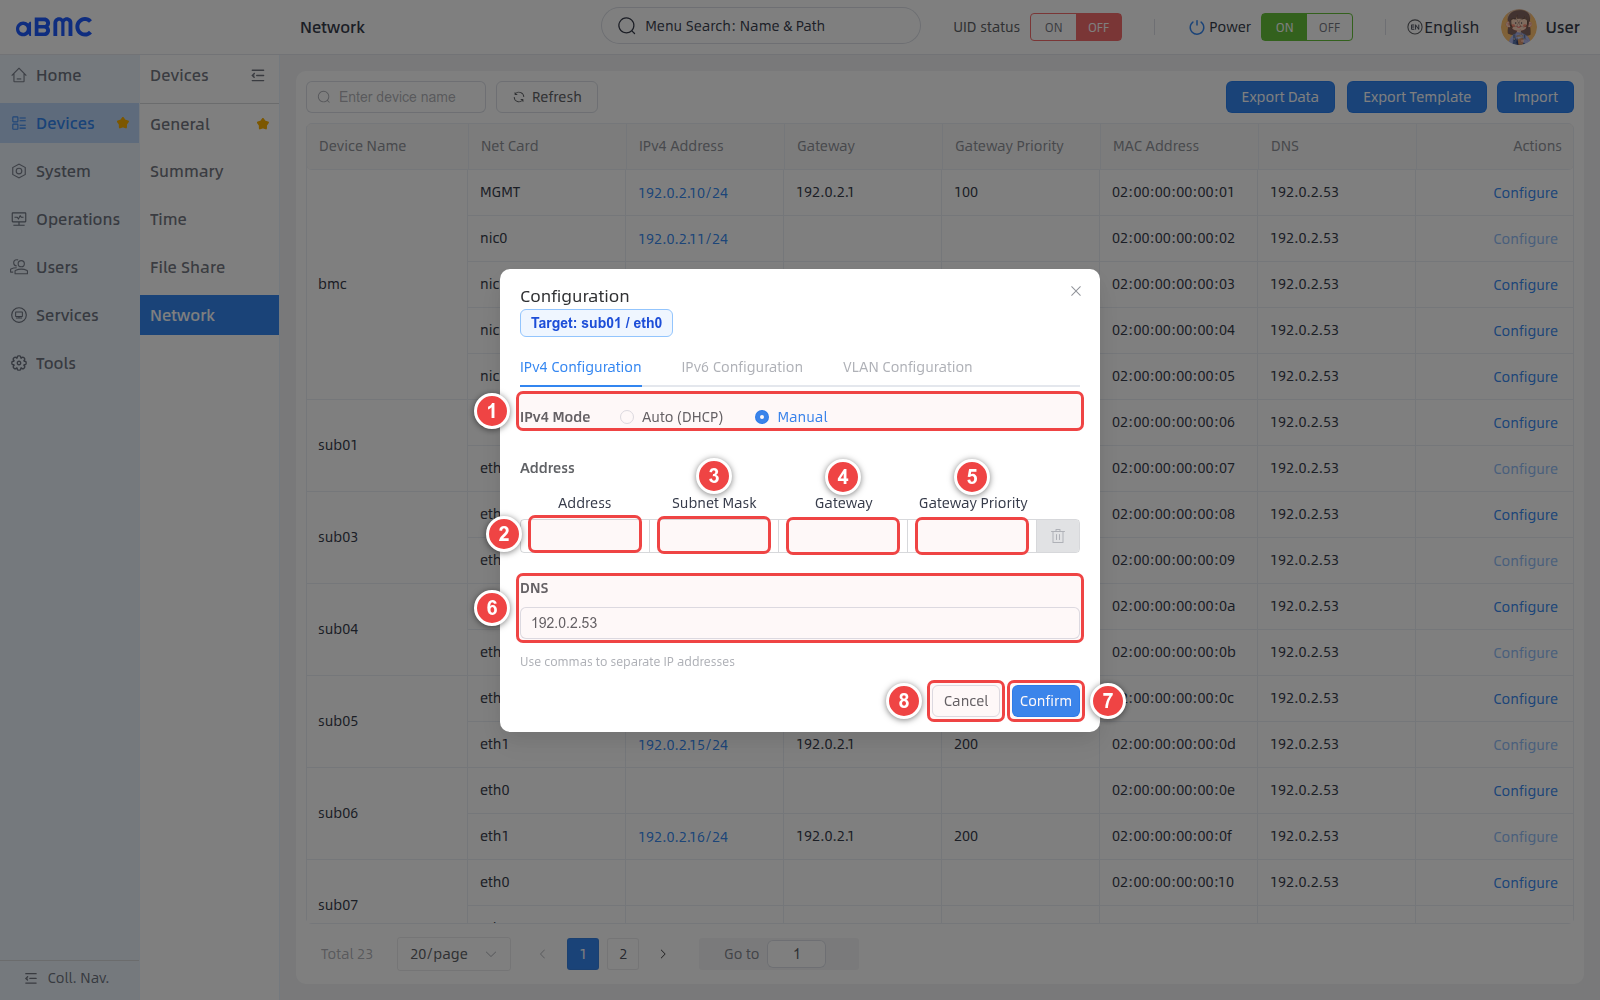
First click Configure in the Actions column of the target interface to open the Configuration window, and then operate as shown below:
- Select Manual in IPv4 Mode.
- Enter the static IPv4 address in Address.
- Enter the corresponding subnet mask in Subnet Mask. After filling in a line of addresses, a blank line will automatically be added to the page, and you can continue to add other addresses.
- If you need to configure the default route, enter the gateway address in Gateway.
- When filling in the gateway, enter a positive integer priority in Gateway Priority.
- If you need to configure DNS, enter the DNS server in DNS; separate multiple addresses with commas.
- After checking that the parameters are correct, click Confirm to save the configuration.
- If you do not want to save this modification, click Cancel.
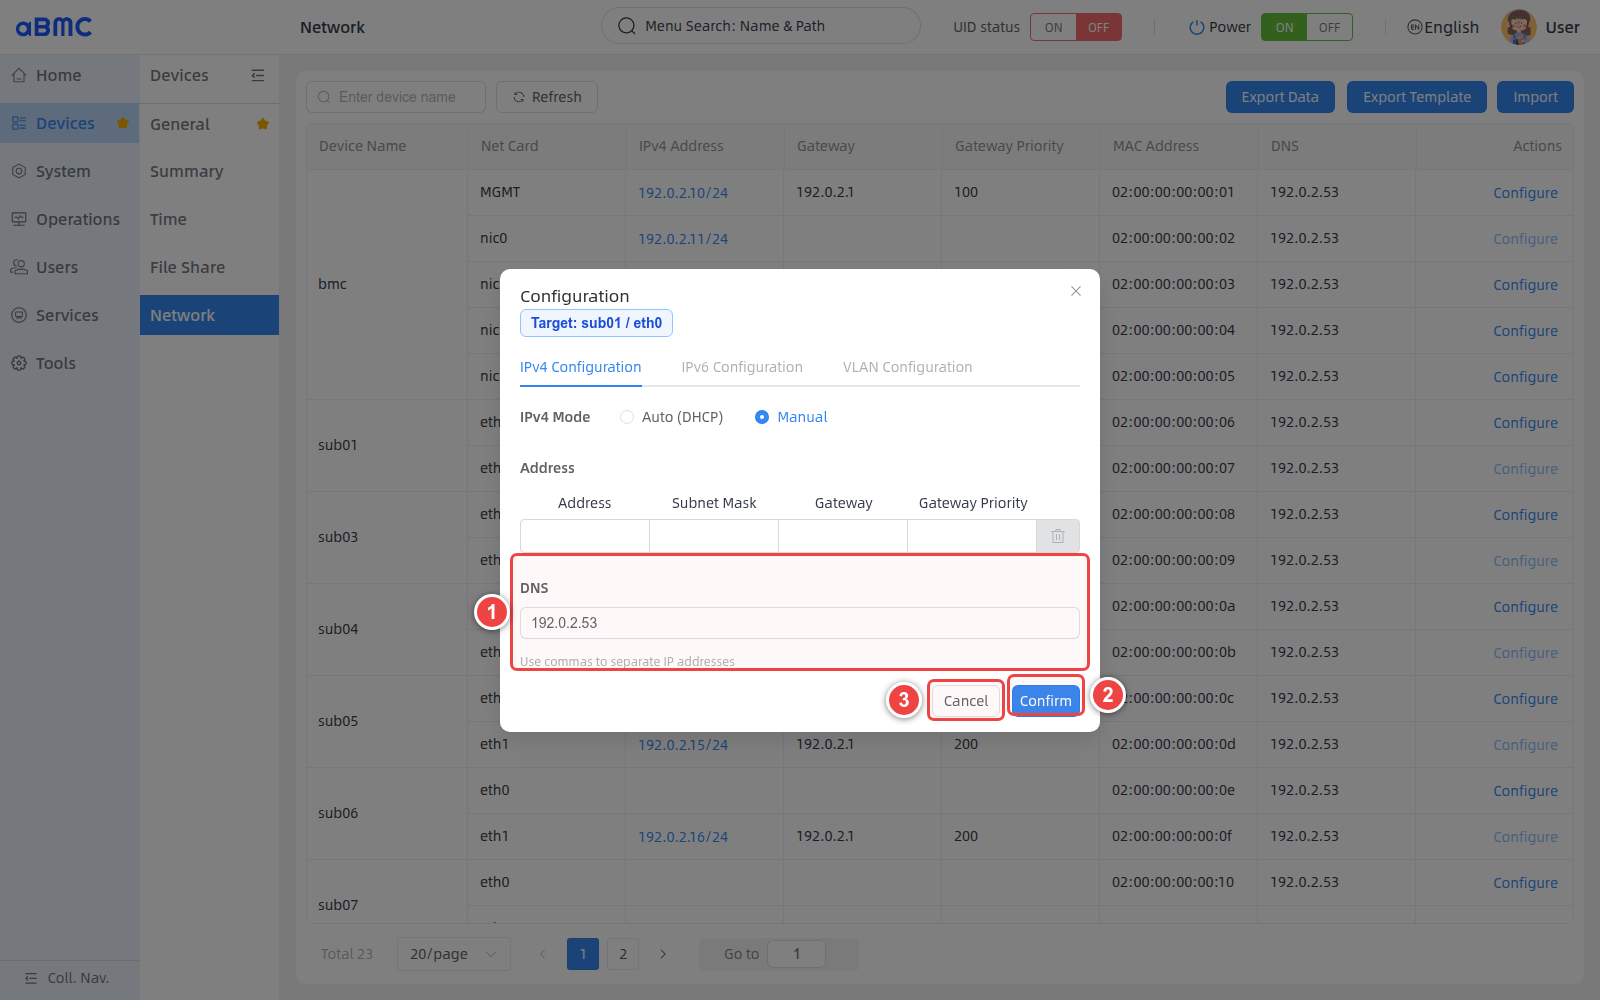
Modify DNS
First open the Configuration window of the target interface and keep the current IPv4 mode, address and gateway parameters unchanged, and then operate as shown below:
- Modify the server address in DNS. Use commas to separate multiple addresses, such as
192.0.2.53,192.0.2.54. - Click Confirm to save changes.
- If you do not want to save this modification, click Cancel.
Configuration rules
| Configuration items | Rules |
|---|---|
| Auto (DHCP) | IPv4 addresses are assigned by a DHCP service. The static address and gateway should no longer be filled in when submitting. |
| Address | Manual mode fills in at least one valid IPv4 address; supports configuring multiple addresses for the same interface. |
| Subnet Mask | Each static address must be filled with a valid subnet mask. |
| Gateway | Optional; Gateway Priority must be filled in when filling in the gateway. |
| Gateway Priority | Must be a positive integer. The same gateway and priority combination cannot be repeated with other network cards or VLANs. |
| DNS | Optional; must be a valid IP address, multiple addresses separated by commas. |
Current page capabilities
The current version only opens IPv4 Configuration. The IPv6 Configuration and VLAN Configuration tags are disabled.
Verify configuration results
- Return to the Network list and click Refresh.
- Find the device and network card you just configured.
- Confirm that the IPv4 Address, Gateway, Gateway Priority, and DNS are updated.
- Verify address connectivity, default route, and domain name resolution from the corresponding network segment.
Network Change Risk
Modifying the address, subnet mask, or default gateway in use may cause the device to immediately lose contact. Before operation, the original configuration should be recorded and a serial port or other independent recovery channel should be prepared. The address in the screenshot is only used to illustrate the page location.
Import and export network configuration
Open the batch operation entrance
You can use the following operations in the upper right corner of the Network page:
- Export Data: Export network information within the current query range.
- Export Template: Export the network configuration template of the Linux device.
- Import: Import the completed
.xlsor.xlsxfile. - Move the mouse pointer to Import to view the import restrictions: currently only Linux devices are supported, and Android sub-boards are not supported.
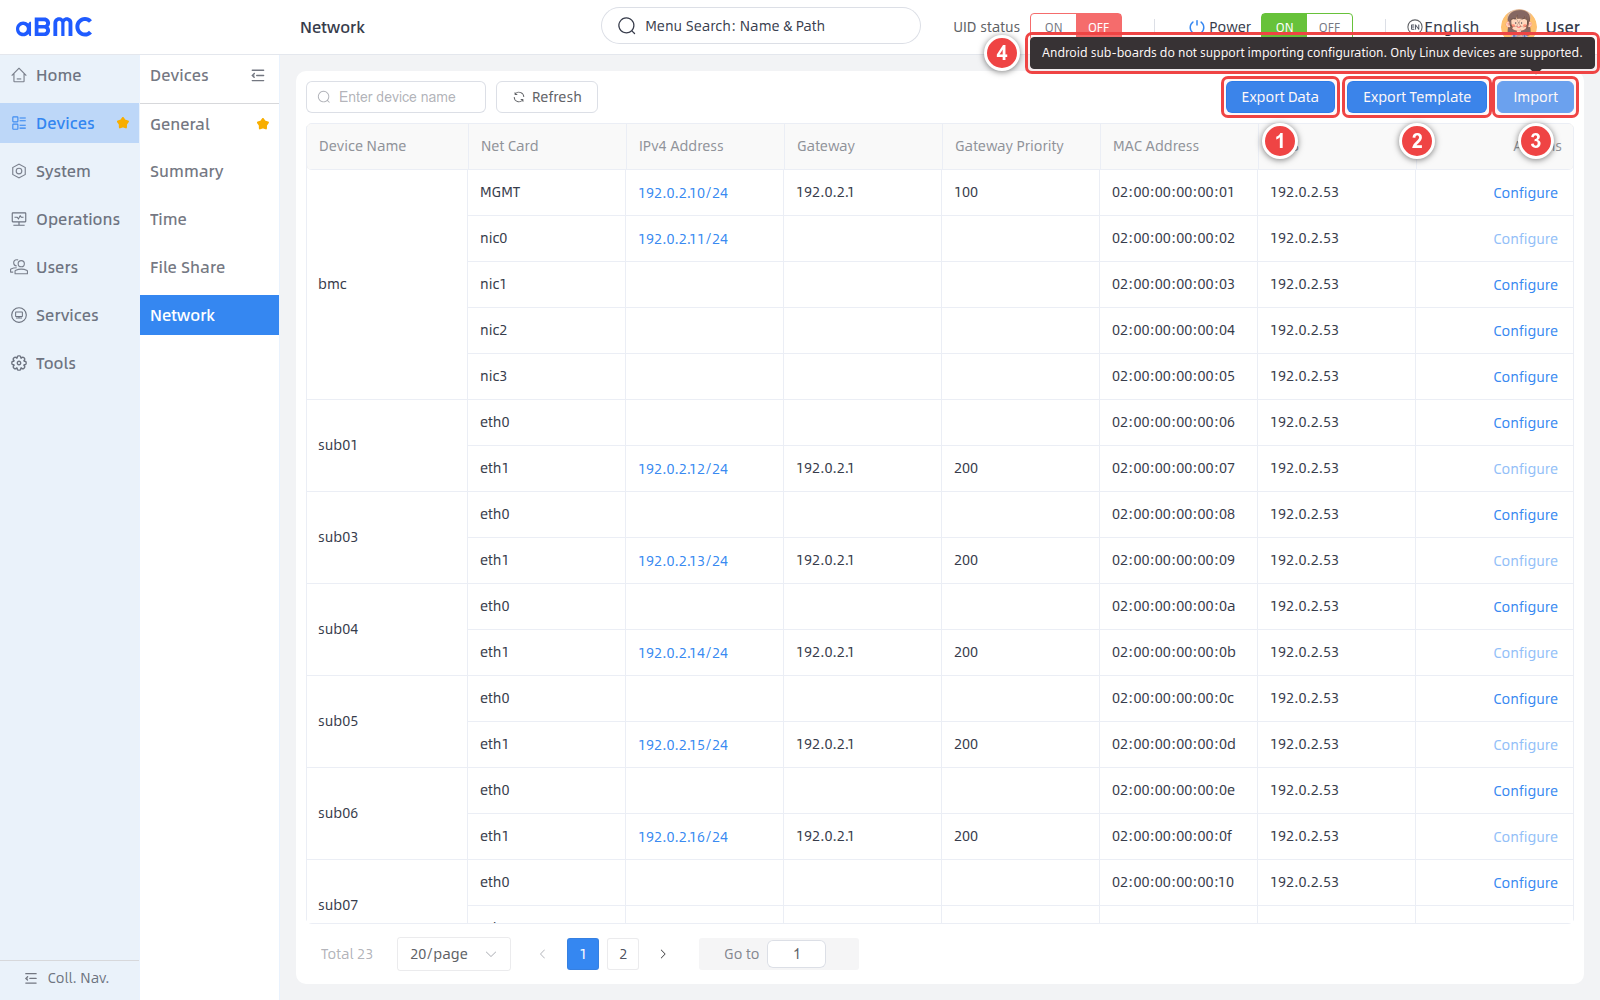
Export current network data
- If you need to restrict exported devices, first enter the device name in Enter device name.
- Click Export Data.
- Open the exported Excel file and verify that it contains the device name, network card, IPv4 address, gateway, gateway priority, MAC address, and DNS.
Export Data Exports all data matching the current search conditions, regardless of page paging restrictions.
Export and fill in the configuration template
- If you need to limit the devices in the template, first search by device name.
- Click Export Template.
- Keep the header of the first row and the original column order, and fill in the configuration in the first worksheet of the template.
| Template column | Required | Filling instructions |
|---|---|---|
| Device Name | Yes | The target node name, for example, sub01. Must be consistent with the device name on the page. |
| Net Card | Yes | The target network card name, such as eth0; lo will not be imported. |
| IPv4 Address | Manual mode is required | Use the IPv4/prefix-length format, such as 192.0.2.10/24; separate multiple addresses with commas. |
| Gateway | No | IPv4 default gateway. |
| Dhcp4 | It is recommended to fill in | It is recommended to fill in yes or no. yes, true or 1 represents DHCP; when left blank or filled in with other values, press Manual. |
| Gateway Priority | No | Gateway routing priority, fill in the number. |
| DNS | No | DNS server; separate multiple addresses with commas. |
Number of template lines
When the file contains a header, a maximum of 100 rows are allowed, that is, a maximum of 99 pieces of configuration data are allowed. The page only reads the first worksheet.
Import network configuration
- Confirm that the device and network card in the template exist, and delete the lines that do not need to be modified.
- Click Import and select the completed Excel file.
- Wait for the success or failure prompt for each
device/network card. The page can handle up to5configuration requests at the same time. - After the import is completed, the page will re-obtain network information.
Import processing rules
| Rules | Processing |
|---|---|
| The device name or network card name is empty | File verification failed and the import will not start. |
The network card is lo | File verification failed. |
| The device or network card does not exist in the current list | Skip this line. |
| The configuration content is empty | Skip this line. |
| Configuration consistent with current values | Skip this line. |
| Linux devices | Support for import. |
| Android sub-board | The current version does not support import. |
Verify import results
- Click Refresh after the import is complete.
- Verify the IPv4 address, gateway, gateway priority, and DNS of the affected interface.
- Verify the target device’s network connectivity and domain name resolution.
Batch import risk
Batch import will directly modify the network configuration of multiple devices. You should use Export Data to back up current information before importing, and ensure that all target devices have independent recovery channels.
FAQ
Target device not found
Clear or modify the search conditions in Enter device name, click Refresh and search again.
2.Configure is not available
This interface may be a separate private network card used by the BMC to communicate with the sub-board. Check the page prompt; if it is confirmed to be a private network card, it cannot be modified by the user.
3.IPv6 Configuration or VLAN Configuration cannot be selected
These two configuration tags are not yet open in the current interface. Please use the currently available IPv4 Configuration and do not treat the disabled label as a supported feature.
How to fill in multiple DNS addresses
According to the page prompt Use commas to separate IP addresses, use English commas to separate multiple addresses. Do not use Chinese commas.
5.Import cannot import Android sub-board
This is a feature limitation of the current version. Import only supports Linux devices, and Android sub-boards do not support importing network configurations.