



File Share
Introduction
File Share is an array file sharing group control system designed by aBMC for array servers. The Servers page supports externally providing shared directories through NFS and CIFS; the Clients page supports mounting NFS, CIFS or SSHFS remote resources to the target device.
- NFS is suitable for Linux/Unix clients and supports setting allowed clients, read and write modes, and NFS export options.
- CIFS is suitable for clients that require Samba/SMB compatible access and supports share users, share names, read-write modes, and access lists.
- SSHFS is only used for client mounting. The remote directory is mounted to the local path of the device through the SSH account.
Development Vision
- Provide a unified shared service and directory management entrance for multi-device environments.
- Reduce the risk of shared directories being mistakenly written or accessed without authorization through minimum permissions, client scope, and read-write mode configuration.
Feature Usage
Open the file sharing server page
Enter Server page
- Select Devices in the left navigation bar.
- Select File Share in the secondary navigation bar.
- Select Servers at the top of the page.
- Select NFS or CIFS in Protocol.
- Use search, status filters, Reset, Expand all and the share actions on the right side of the page.
- View the device status, service status, and configured shared directories in the list.
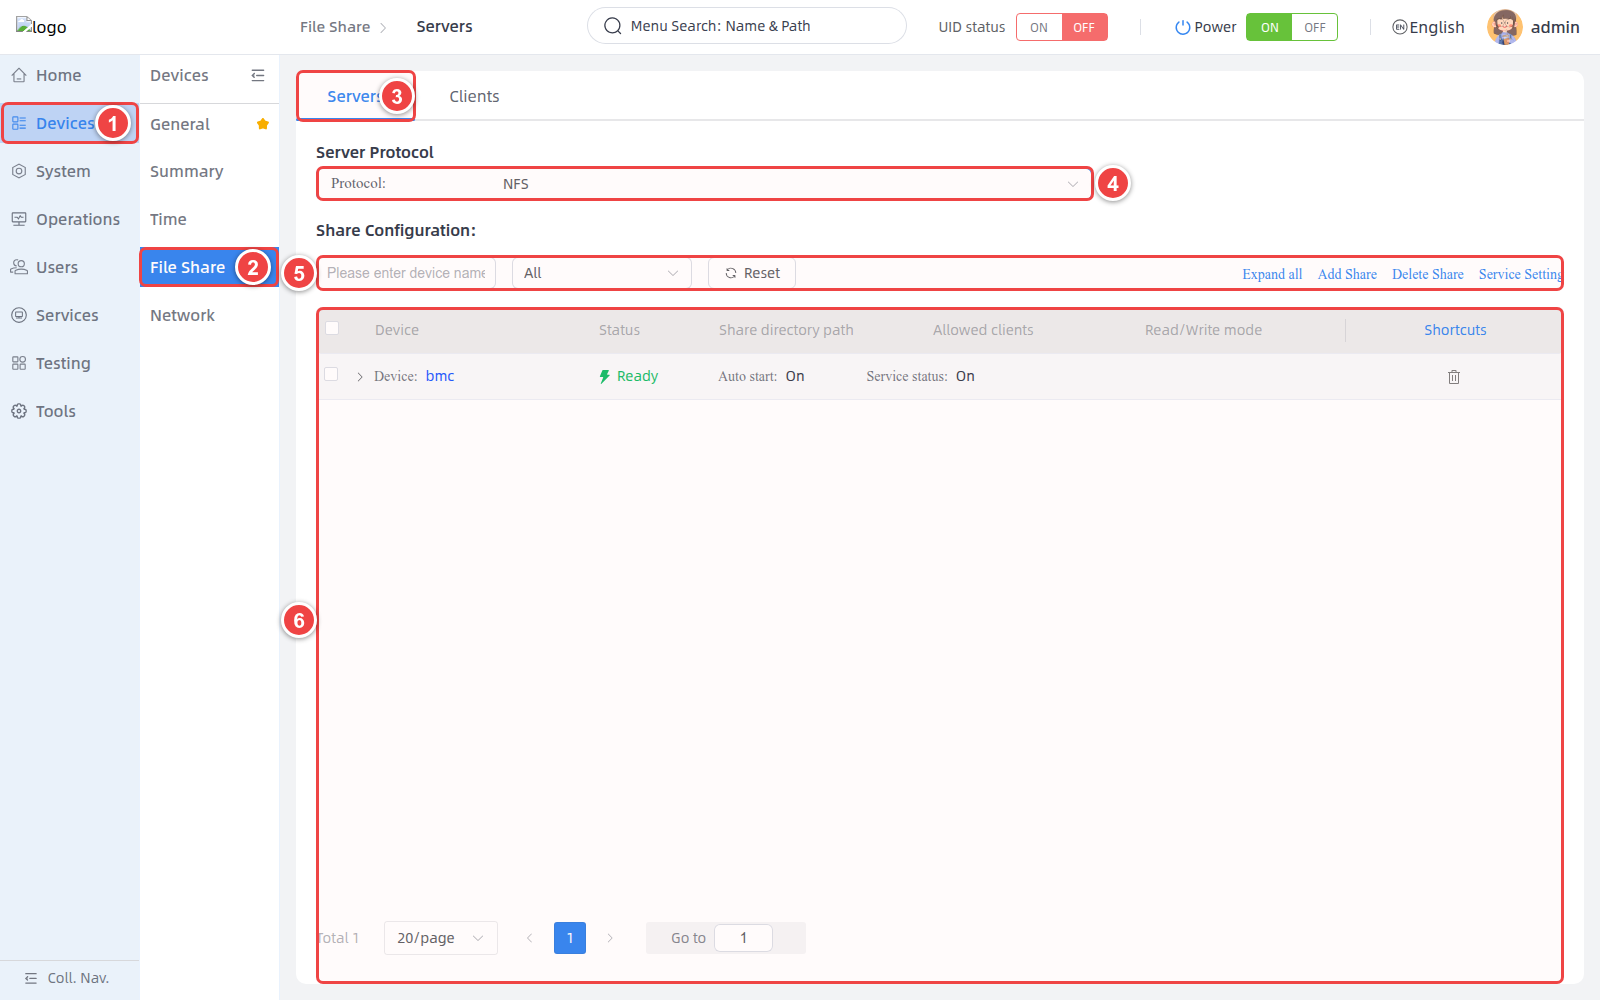
Page operation instructions
| Operations | Description |
|---|---|
| All / Online / Offline | Filter the list by device online status. |
| Reset | Clear search and filter criteria. |
| Expand all / Collapse all | Expand or collapse the shared directory details of all devices. |
| Add Share | Adds a new NFS or CIFS share on the selected device. |
| Delete Share | Delete the checked shared directory. |
| Service Setting | Set the auto-start, running status and port of the shared service. |
Status description
A device showing Ready simply means the device is available. Auto start indicates whether the shared service starts with the system, and Service status indicates whether the service is currently running.
Manage NFS shares
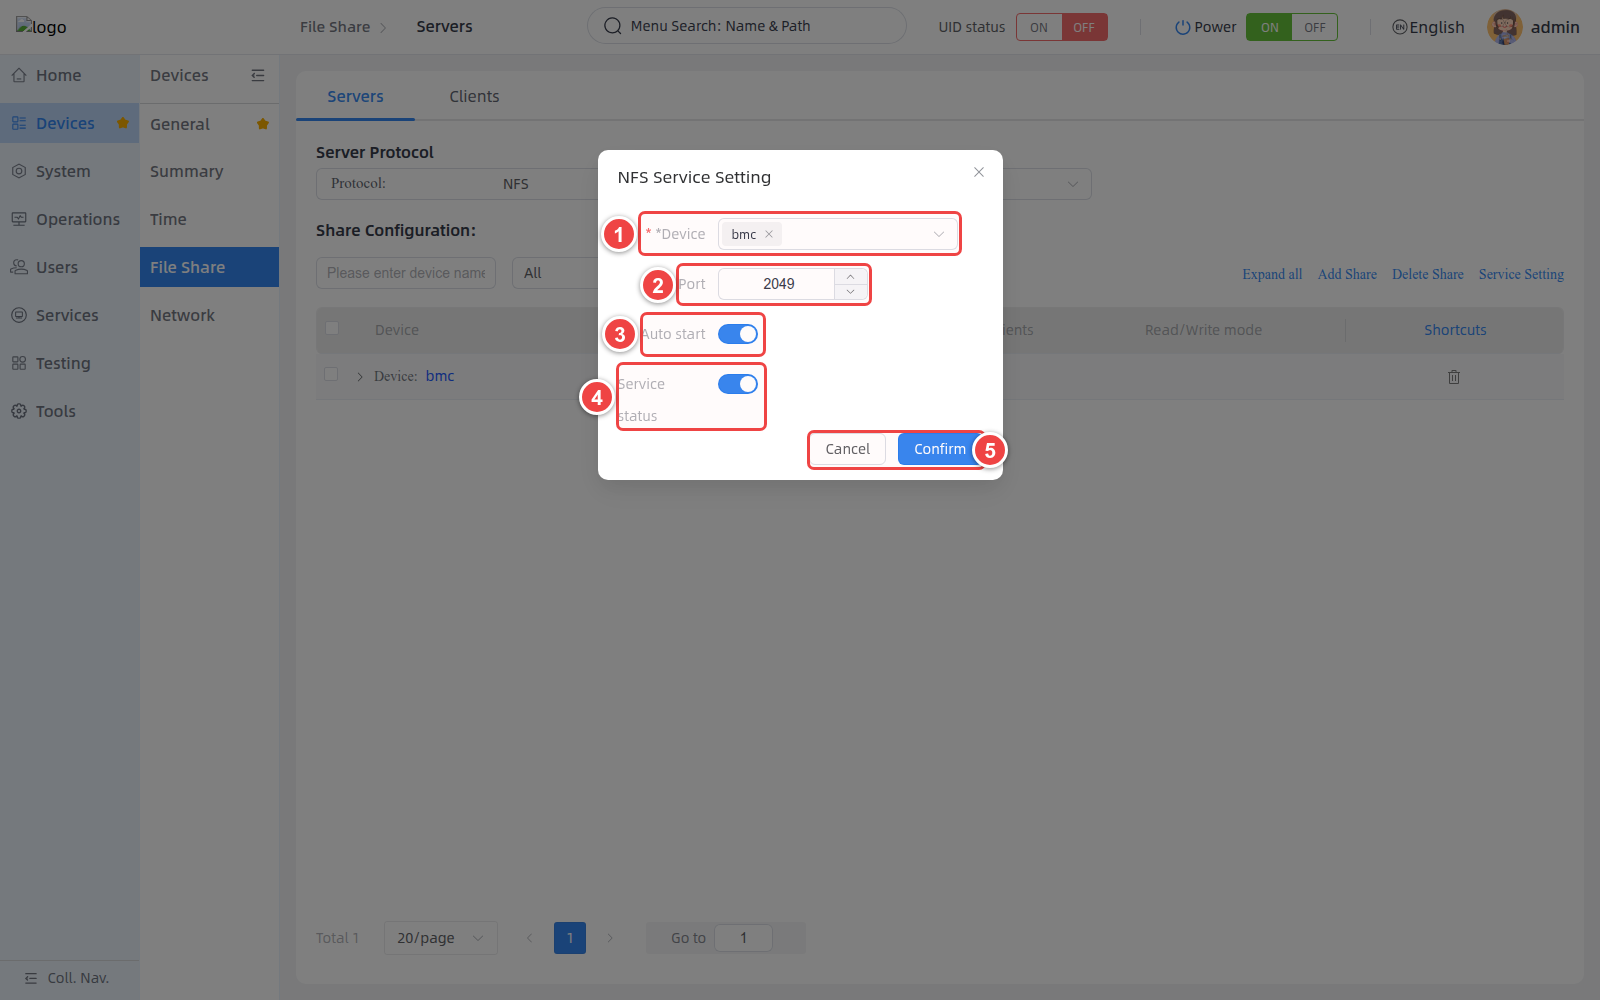
Set up NFS service
- Set Protocol to NFS.
- Click Service Setting.
- Select one or more devices in Device.
- Set the NFS service port in Port. The port value range is
1–65535, and the default port is2049. - Use Auto start to set whether the service starts with the system.
- Use Service status to start or stop the current service.
- After checking that the configuration is correct, click Confirm.
Add NFS share
- Click Add Share to open the Add NFS Share window.
- Select one or more target devices in Device. Android devices do not support NFS share configuration here.
- Enter the shared directory path to be exported in SDP, such as
/home/bmc/share. - Enter the client address or network segment that is allowed to access in Allowed clients.
*means all clients are allowed. - Select
rworroin Read/Write. - Set Sync write (sync) and Advanced options as needed.
- Check the advanced options and access scope, and click Confirm.
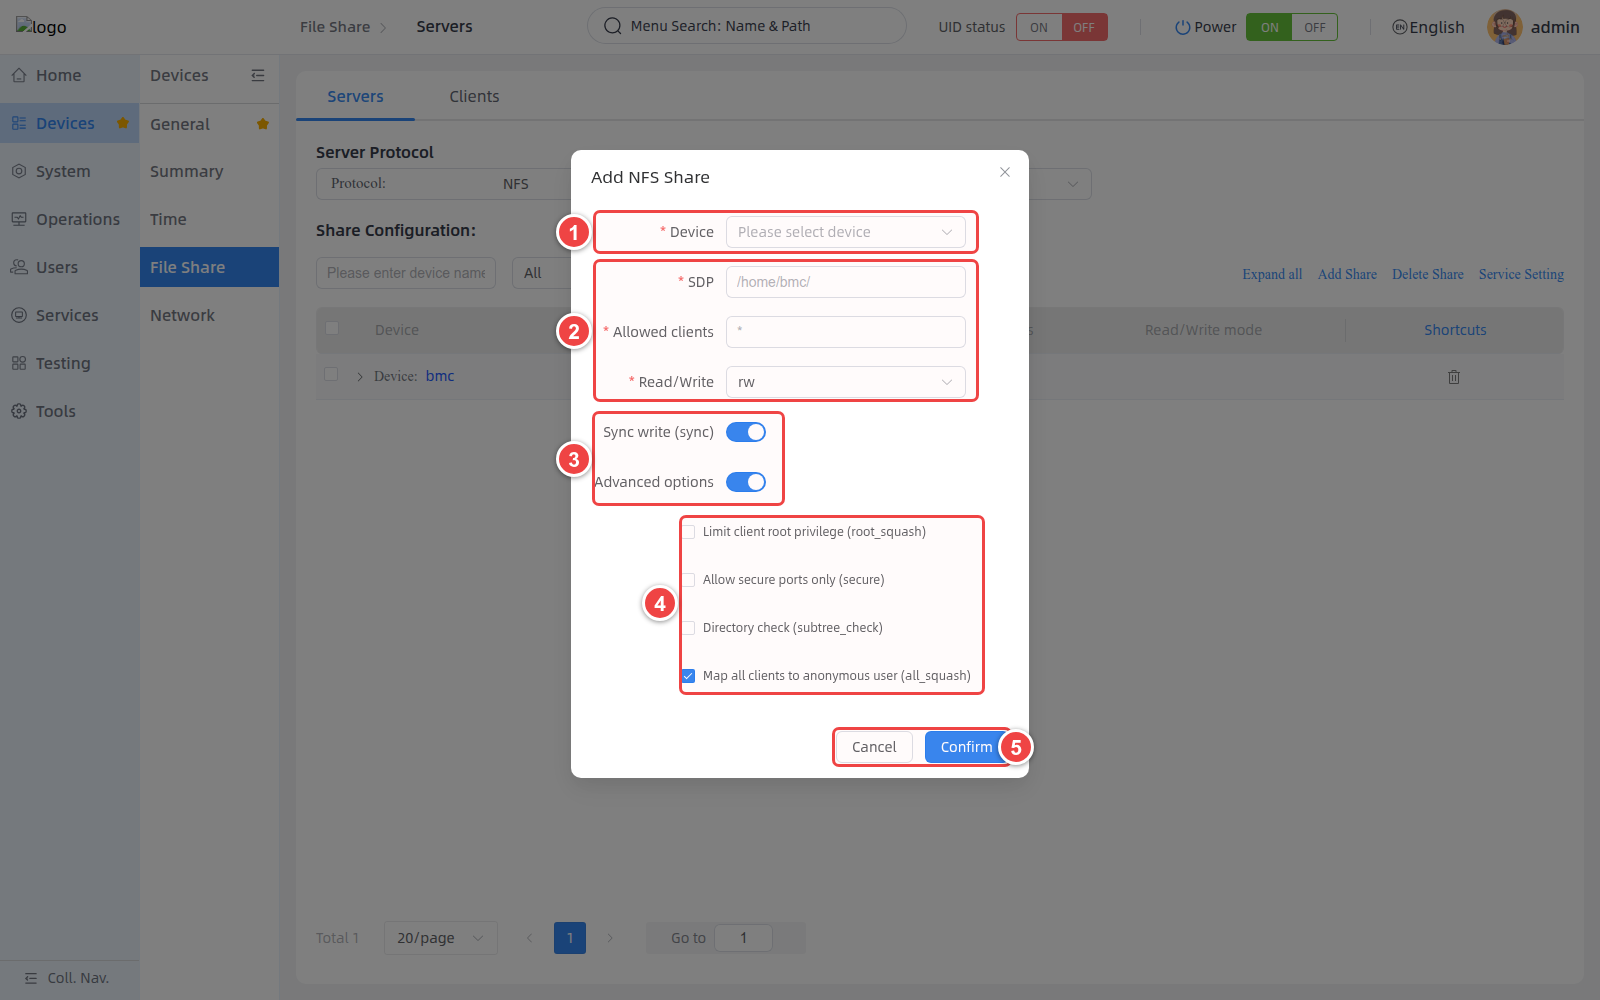
NFS share parameter description
| Parameters | Description | Configuration recommendations |
|---|---|---|
| Device | The target device for application configuration, supports multiple selection. | Before batch configuring multiple devices, confirm that the directory is as expected on each device. |
| SDP | The local directory path to be exported via NFS. | Use absolute paths and confirm that the directory and its permissions are correct. |
| Allowed clients | Client addresses, hosts or network segments that are allowed to access. | Prioritize specifying trusted network segments; only use * in isolated networks. |
| rw / ro | rw allows reading and writing, ro only allows reading. | Use ro when the client does not need to modify the content. |
| sync | Synchronous writing, the server returns after completing the actual writing. | It is recommended to turn it on when data consistency is a priority. |
| root_squash | Maps the client root user to a low-privileged user. | It is recommended to turn this on unless the need for root access has been clearly assessed. |
| secure | Allows client access only using privileged source ports. | Make sure the client supports this restriction before enabling it. |
| subtree_check | Check whether the file accessed by the client is located in the export subtree. | Set according to directory structure and compatibility requirements. |
| all_squash | Map all client users to anonymous users. | Useful for shares where you do not want to retain the identity of the client user. |
Default Options
The WEB window uses rw by default, turns on sync and advanced options, and selects all_squash by default. It should be rechecked against the actual permissions policy before submission.
View and delete NFS shares
- Expand the target device in the NFS list and view Share directory path, Allowed clients, and Read/Write mode.
- To delete a share, check the corresponding directory and click Delete Share, or use the delete icon in that row.
- When confirming object deletion, also check the share path and allowed clients.
Deletion Impact
Deleting an NFS share cancels the directory export and connected clients may immediately lose access. Please first confirm that there are no critical reading and writing tasks.
Manage CIFS shares
Switch to CIFS share
- Select CIFS in Protocol.
- Use the page operation area to search, filter, expand, add, delete shares or set services.
- Check the list for Share directory path, Share name, Read/Write mode, root access, Blacklist, and Whitelist.
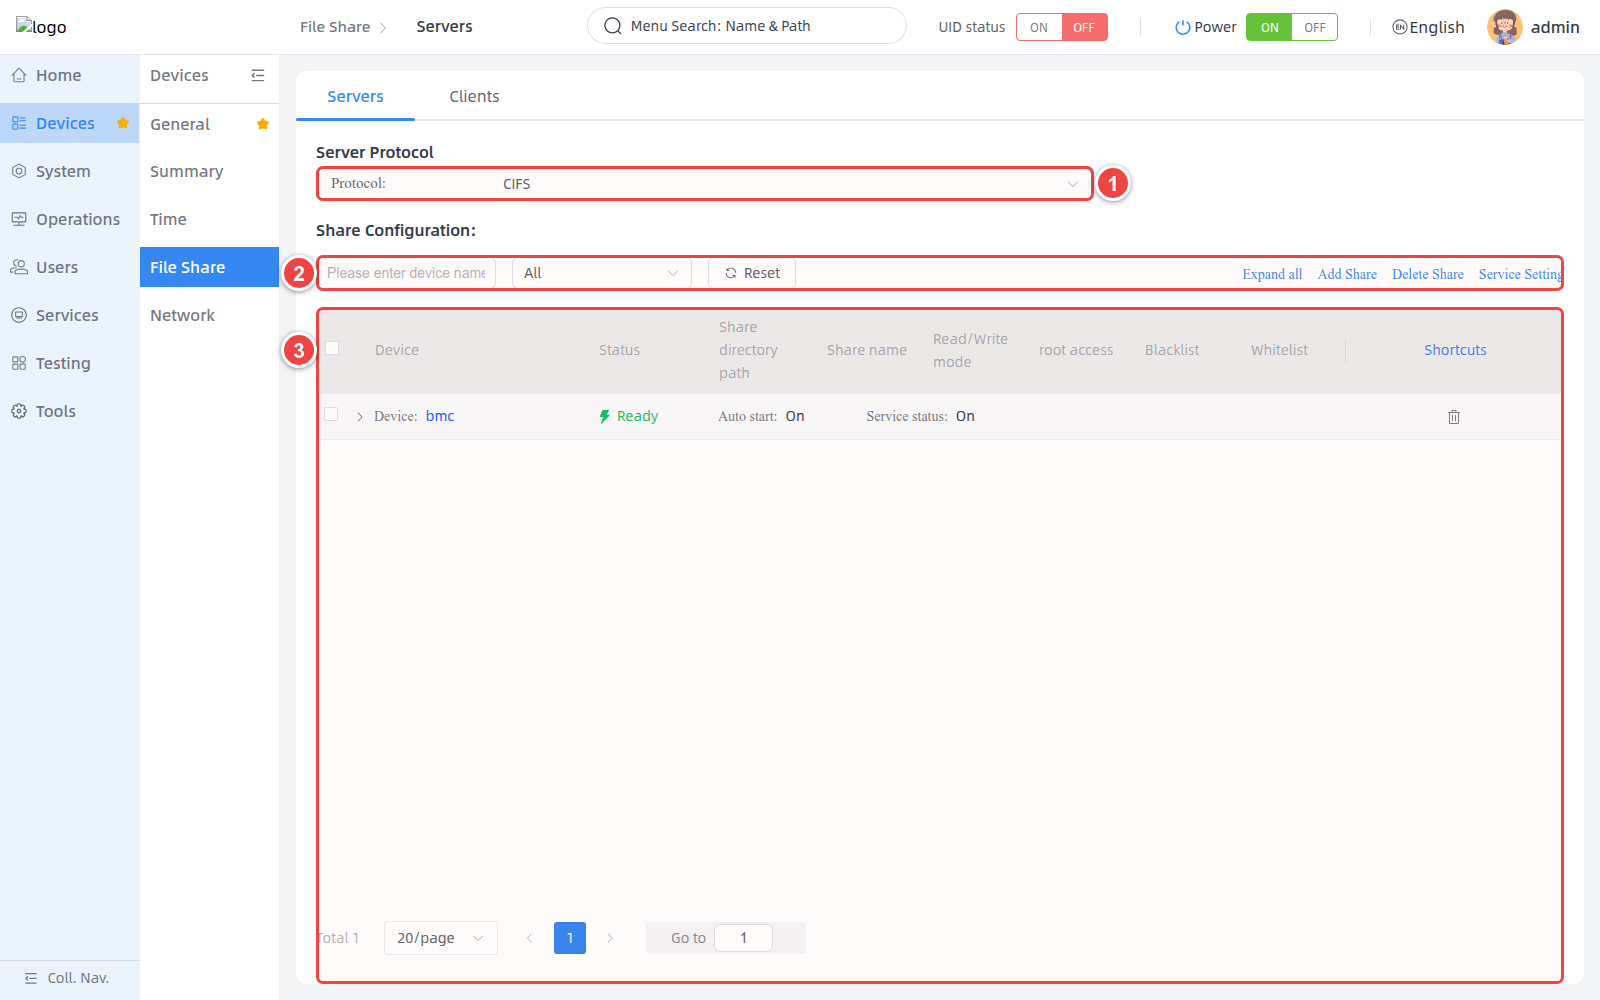
Set up CIFS service
- Click Service Setting.
- Select the target device and check the service port, Auto start and Service status.
- The default service port of CIFS is
445, and the port value range is1–65535. - After checking that the configuration is correct, click Confirm.
Port Compatibility
Before modifying the CIFS service port, please confirm that both the server and client support the custom port. If there is no clear requirement, it is recommended to keep the default port 445.
Add CIFS share
- Click Add Share to open the Add CIFS Share window.
- Select the target device in Device.
- Select an existing user in CIFS user. If no user is available, select the device and then click Create user.
- Select Read/Write or Read Only in Read/Write mode.
- Enter Share path and Share name.
- Based on the access policy settings Blacklist and Whitelist, the list items must be valid IPv4 addresses.
- To map all client access to root, enable Allow all clients to access as root.
- After checking that the configuration is correct, click Confirm.
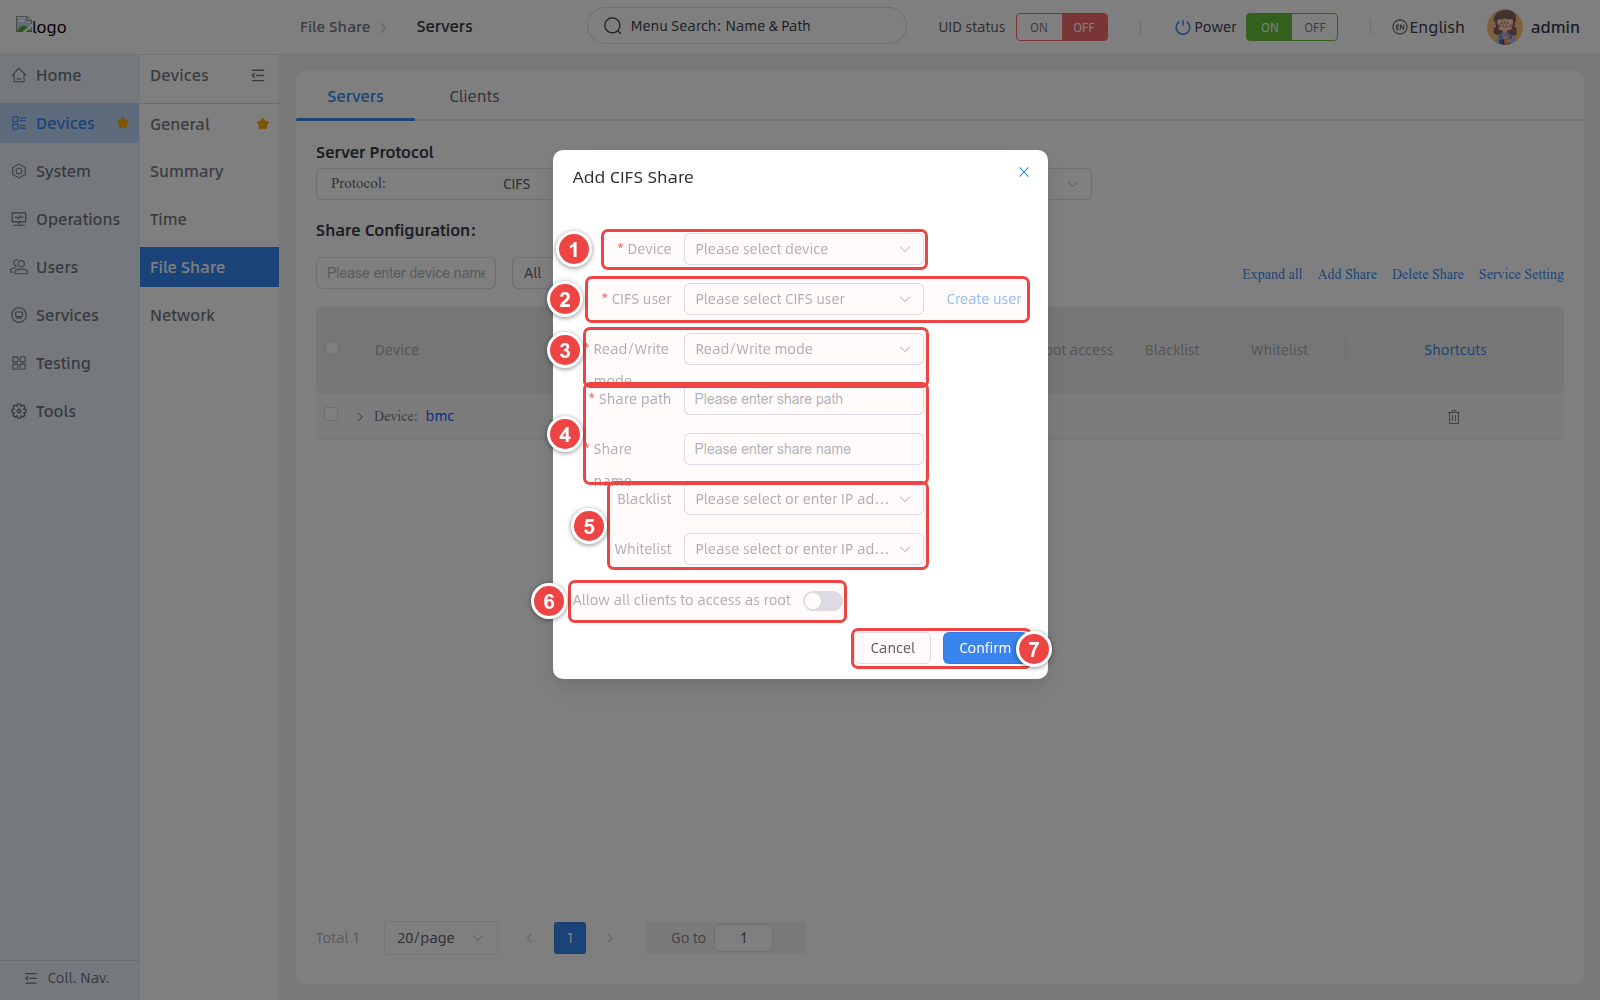
CIFS shared parameter description
| Parameters | Description | Configuration recommendations |
|---|---|---|
| Device | The target device to which the configuration is applied. | The system cannot load the CIFS user of a device until the device is selected. |
| CIFS user | Samba user allowed to access the share. | Use dedicated low-privilege users and do not share administrator accounts. |
| Read/Write mode | Set the share to be read-write or read-only. | Select read-only when there is no need to upload or modify the file. |
| Share path | The path to the local directory to export. | Use absolute paths and confirm that directory permissions are correct. |
| Share name | The name used by clients to access the CIFS share. | Use a unique and easily identifiable name on the same device. |
| Blacklist | List of blocked IPv4 addresses. | Do not put the same address into both the blacklist and the whitelist. |
| Whitelist | A list of IPv4 addresses that are allowed to be accessed. | Prioritize whitelisting for shares with clear access sources. |
| root access | Force client access to be mapped to root. | This option significantly expands permissions and remains off by default. |
Create CIFS user
- First select Device in the Add CIFS Share window.
- Click Create user.
- Enter the username and password, confirm and return to the sharing configuration window to select a new user.
| Fields | Requirements |
|---|---|
| Username | 4–16 digits, only English letters and numbers are supported. |
| Password | 6–20 digits must contain lowercase letters, uppercase letters and numbers. Special characters are not supported. |
CIFS user load failed
If getting the CIFS user list fails, Create user and Confirm may not be available. Please confirm that the device has been selected first, and then check the device online status and CIFS service status.
Delete CIFS share
- Expand the target device and verify the share path, share name, and current access configuration.
- Check the corresponding share and click Delete Share, or use the delete icon in the row.
- When confirming to delete the object, focus on checking Share name.
Manage client mount points
Open Clients page
- Select Devices in the left navigation bar.
- Select File Share in the secondary navigation bar.
- Select Clients at the top of the page.
- Select NFS, CIFS or SSHFS in Protocol.
- Use search, status filter, Reset, Expand all, Refresh List and mount point operations.
- View the device, remote path, local path, mount status and read-only status in the list.
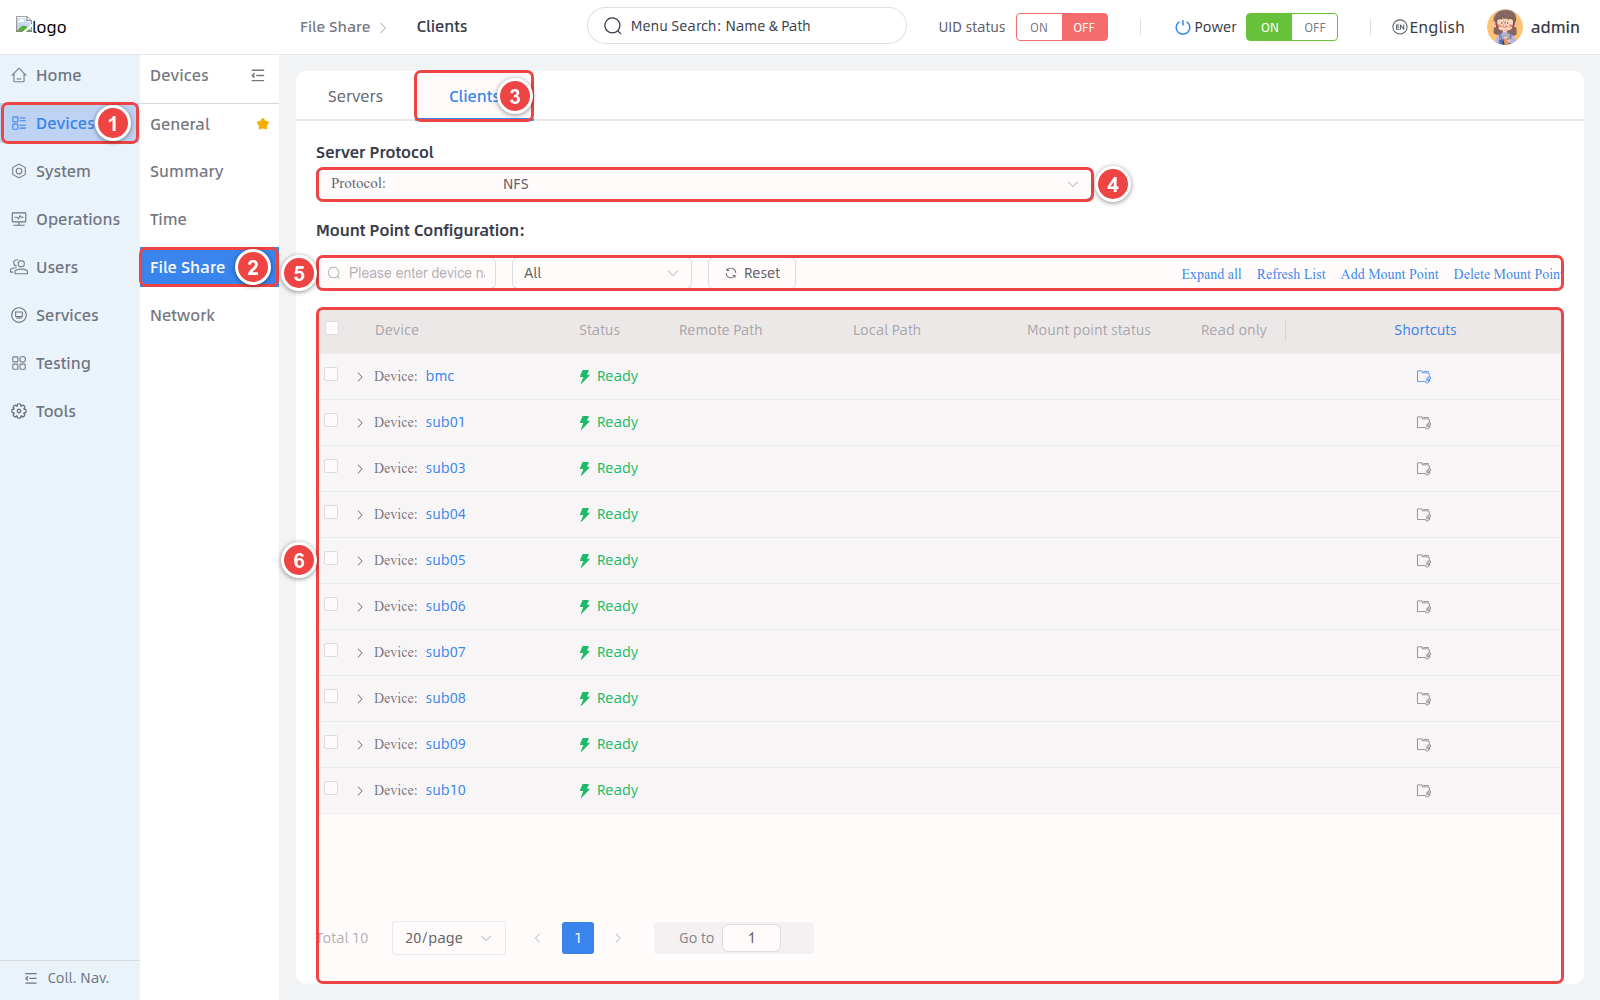
Clients page operation instructions
| Operations | Description |
|---|---|
| All / Online / Offline | Filter the list by device online status. |
| Reset | Clear search and status filters. |
| Expand all / Collapse all | Expand or collapse the mount point details of all devices. |
| Refresh List | Reacquire mount points and mount status. |
| Add Mount Point | Add a mount point of the current protocol to the target device. |
| Delete Mount Point | Delete the checked mount point. |
| Shortcuts | Use the mount icon on the right side of the device row to directly add a mount point to the device. |
Device scope
Clients list does not show Android devices. If the mount shortcut icon on the right side of the device row is not available, please first check the device status and the service status of the current protocol.
Add NFS mount point
- Set Protocol to NFS and click Add Mount Point.
- Select the target device to be mounted in Device.
- Enter the IPv4 address of the NFS server in Remote Addr.
- Enter the exported directory of the NFS server in Remote Path and enter the local mount path of the target device in Local Path.
- If only remote content is allowed to be read, enable Read only.
- After checking that the configuration is correct, click Confirm.
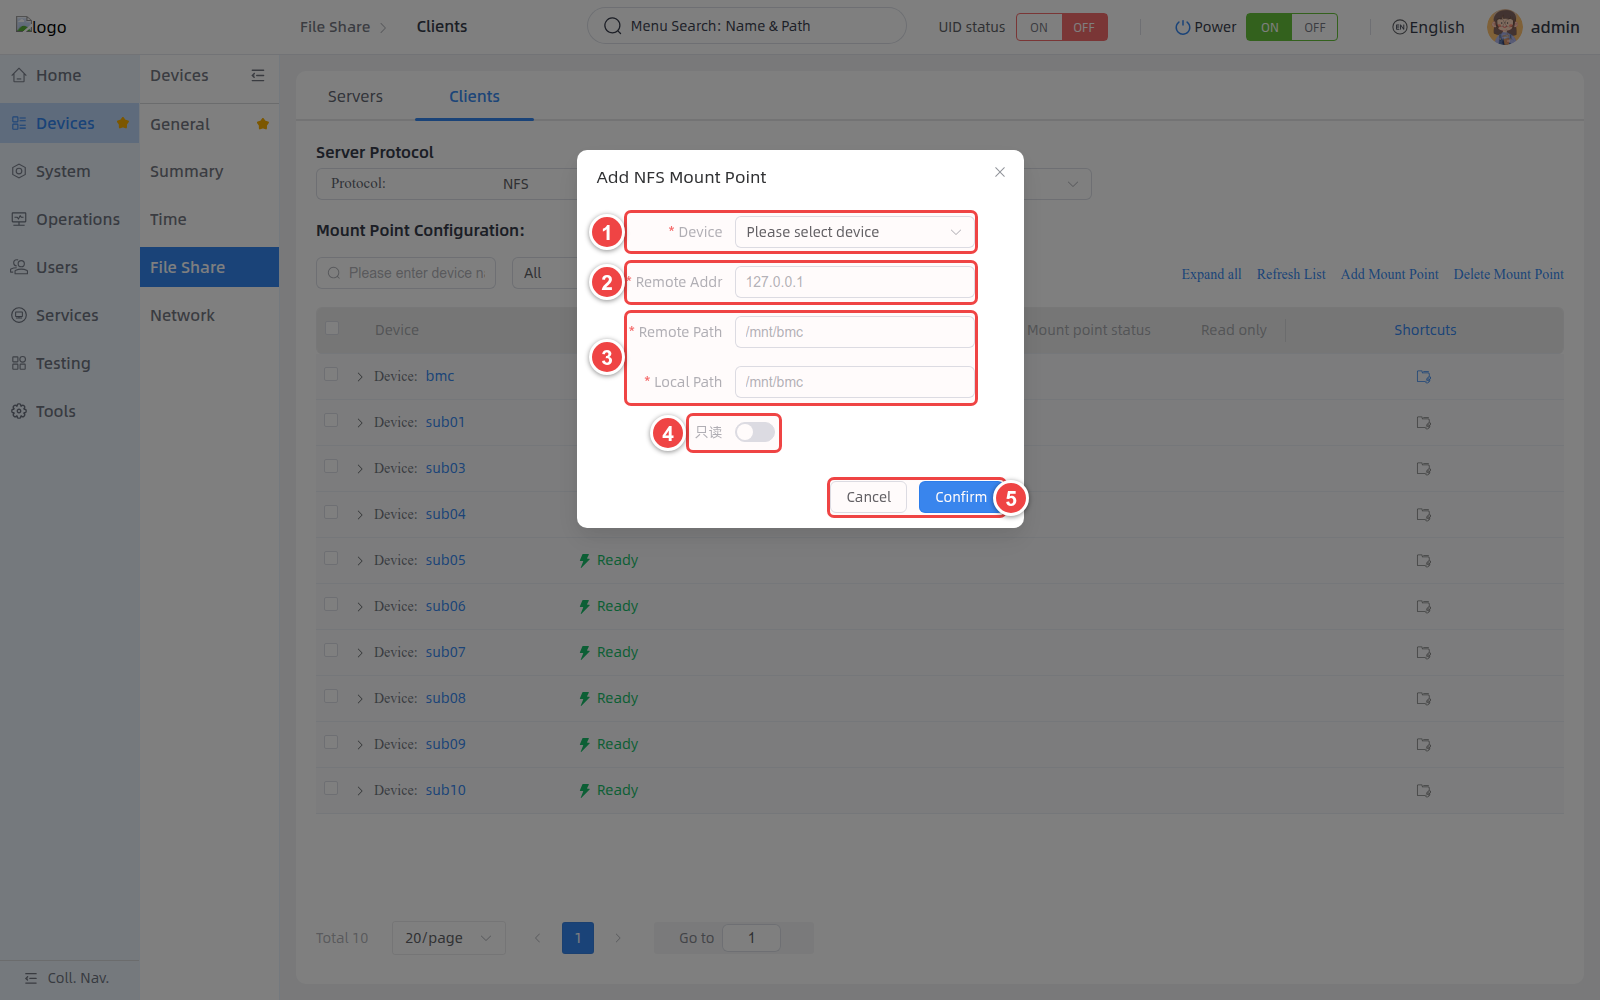
| Parameters | Description | Requirements |
|---|---|---|
| Device | The target device to perform the mount. | The device should be in a usable state. |
| Remote Addr | NFS server address. | Must be a valid IPv4 address. |
| Remote Path | The export directory of the NFS server. | Must be an absolute Unix path without spaces. |
| Local Path | The local mount point of the target device. | Must be an absolute Unix path without spaces. |
| Read only | Set the mount to read-only. | Off by default. |
Add CIFS mount point
- Set Protocol to CIFS and click Add Mount Point.
- Select Device and enter the Username and Password of the remote CIFS server.
- Select
auto,SMB1,SMB2orSMB3in Protocol version. - Enter the IPv4 address of the CIFS server in Remote Addr.
- Enter the server’s share name in Remote directory name and the local mount path in Local Path.
- After checking that the configuration is correct, click Confirm.
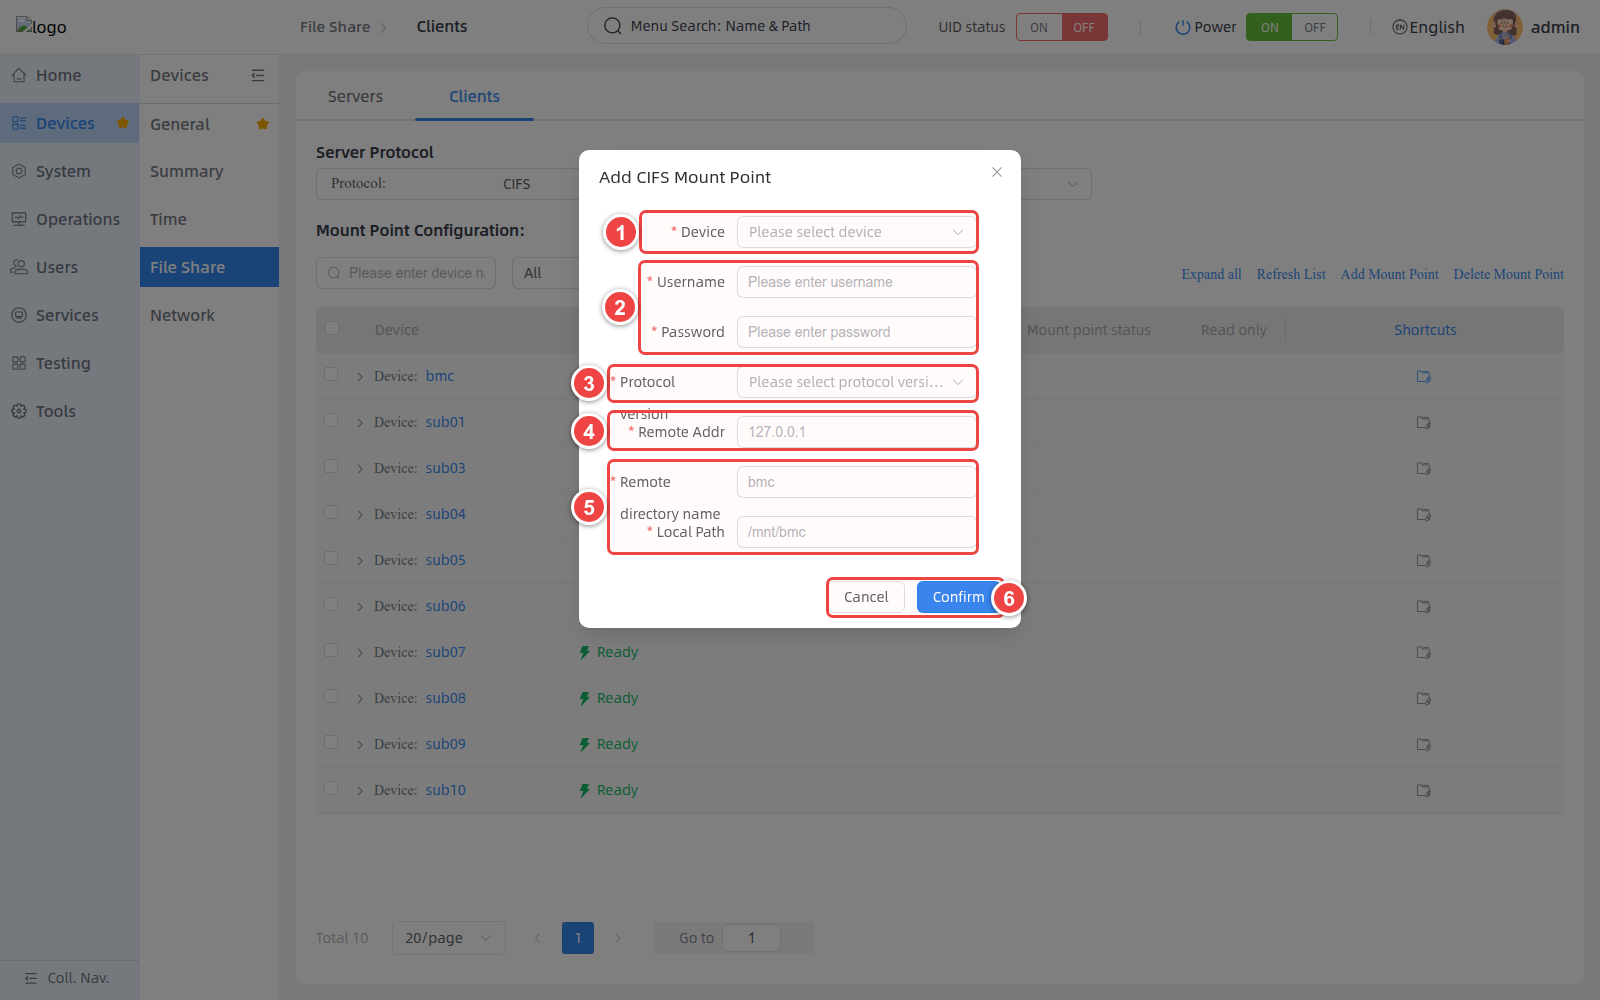
| Parameters | Description | Requirements |
|---|---|---|
| Device | The target device to perform the mount. | The device should be in a usable state. |
| Username / Password | Access credentials for the remote CIFS server. | The user must have access to the target share. |
| Protocol version | SMB protocol version. | Priority is given to using auto or a newer version supported by the server. |
| Remote Addr | CIFS server address. | Must be a valid IPv4 address. |
| Remote directory name | The share name of the CIFS server. | Enter the share name, do not enter the local file system path. |
| Local Path | The local mount point of the target device. | Must be an absolute Unix path without spaces. |
| Version | Description | Usage Recommendations |
|---|---|---|
| auto | Automatically negotiate versions supported by both parties. | General scenarios are preferred. |
| SMB1 | Older SMB version. | Less secure, only used when compatibility with older servers is necessary. |
| SMB2 | Better compatibility and performance. | For use in environments that do not support SMB3. |
| SMB3 | Newer SMB version. | Priority will be given when the server and network environment support it. |
Add SSHFS mount point
- Set Protocol to SSHFS and click Add Mount Point.
- Select Device and enter the Username and Password of the remote SSH server.
- Enter the IPv4 address of the remote server in Remote Addr and the SSH port in Port. The default port is
22. - Enter the remote directory in Remote Path and the local mount path of the target device in Local Path.
- After checking that the configuration is correct, click Confirm.
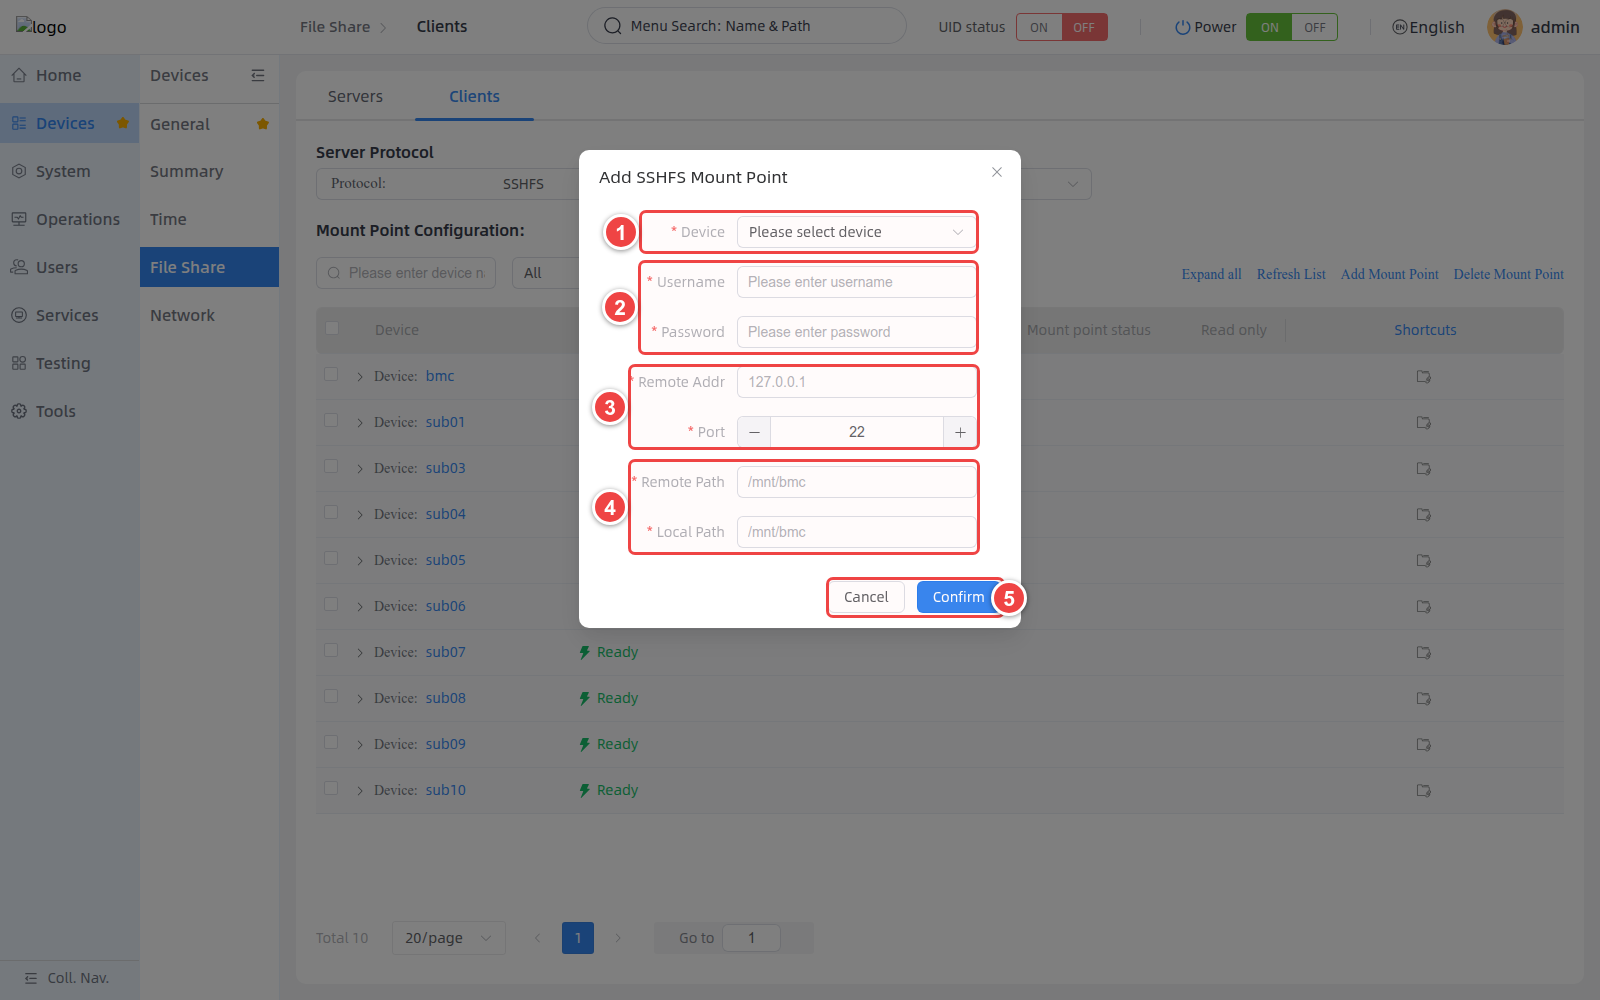
| Parameters | Description | Requirements |
|---|---|---|
| Device | The target device to perform the mount. | The device should be in a usable state. |
| Username / Password | Remote SSH account credentials. | The account must have access to the remote directory. |
| Remote Addr | SSH server address. | Must be a valid IPv4 address. |
| Port | SSH server port. | The value range is 1–65535, and the default is 22. |
| Remote Path | A remote directory on the SSH server. | Must be an absolute Unix path without spaces. |
| Local Path | The local mount point of the target device. | Must be an absolute Unix path without spaces. |
View, refresh and delete mount points
- Select the target protocol and expand the device row to view Remote Path, Local Path, Mount point status and Read only.
- Click Refresh List to reacquire the mounting status.
- To delete a mount point, check the mount point in the expanded list and click Delete Mount Point, or use the delete icon on the right side of the mount point row.
- Verify the protocol, target device, and local mount path before deleting.
Deletion Impact
Deleting a mount point unmounts the remote resource on the target device and cleans up the mount configuration. Please stop the process using this directory first and confirm that there are no unfinished read and write tasks.
FAQ
The device shows Ready, but there is no shared directory
Ready only means that the device is available, not that the share has been configured. Please expand the device inspection directory details and confirm that Service status is turned on.
NFS client cannot access the share
Check the NFS service status and port, confirm that Allowed clients contains the client address, and check that the network firewall, directory permissions, and options such as secure, root_squash match the client.
The CIFS user list is empty or fails to load.
First select the target device in Device. If it still fails, check the device online status, CIFS service status, and Redfish interface connectivity.
The client cannot connect after modifying the service port.
Confirm that the port is within the 1–65535 range and is not occupied by other services, and update the firewall and client connection configurations. NFS uses 2049 by default, and CIFS uses 445 by default.
After deleting the share, the client still displays the mount point.
The server-side deletion operation only cancels the directory export. The client may still retain the original mount record, and the corresponding mount point needs to be uninstalled or cleared on the client.
The mount point status display is abnormal.
Click Refresh List to re-fetch the status. If the problem persists, check the remote server address, service port, share name or remote path, access credentials, network connectivity, and local mount point permissions.
CIFS mount prompts protocol version mismatch
Preferably set Protocol version to auto. If the server only supports a specific version, select SMB2 or SMB3 according to the server configuration. Use SMB1 only if compatibility with older servers is necessary.
The local path or remote path cannot pass the verification
Remote paths to NFS and SSHFS and all local mount paths must be Unix absolute paths, starting with / and containing no spaces. The Remote directory name of CIFS should be filled in with the share name, not the local directory path.