



Firmware Upgrade
Introduction
Firmware upgrade is a unified remote firmware operation and maintenance service provided by the array server to internal sub-nodes. It integrates the three core capabilities of firmware package upload, batch node upgrade, and full-process task monitoring, and supports sub-node firmware version iteration, downgrade rollback, and standardized batch deployment. Firmware upgrade.
- Firmware upload: Supports two interaction channels, the Web management interface and the CLI command line, to upload the firmware image package to the unified storage of the cluster management node.
- Batch upgrade: For scenarios such as the factory firmware version is old or business adaptation requires switching to specified firmware, users can obtain the standard firmware package from official channels, or compile customized firmware independently based on the open source SDK; after uploading the image, select the target sub-node to batch issue the upgrade, and flexibly complete firmware version switching, downgrade rollback operations.
- Upgrade task monitoring: Visually display the real-time status of all upgrade tasks, including single node upgrade progress, global success/failure node statistics, and retain all upgrade logs to facilitate fault tracing.
Development Vision
- Provide lightweight remote sub-node firmware delivery capabilities. Operation and maintenance personnel do not need to contact the physical server offline. They can complete firmware upload and batch deployment through Web pages or terminal commands, simplifying the underlying hardware operation and maintenance workload and allowing R&D and operation and maintenance personnel to focus on upper-level business development. Create a standardized, high-efficiency, and highly secure on-site business delivery link: It is recommended that users use the official original firmware package, supporting the official secondary packaging tool, integrating the self-developed business program with the underlying firmware to generate an integrated customized firmware image with built-in business applications; relying on the batch upgrade capability of the array server, all sub-nodes of the cluster can be deployed simultaneously at one time. The R&D side can complete full firmware debugging and verification in the laboratory before delivering it to the site for implementation. The core values are as follows: 1.1 Significantly shorten the on-site deployment cycle and reduce offline manual implementation costs; 1.2 Unify the laboratory debugging environment and the on-site production environment to eliminate adaptation failures caused by version inconsistencies; 1.3 Ensure customer business code security from the root: Under the traditional outsourcing delivery model, customers need to hand over business programs to equipment manufacturers. In order to prevent core code leakage, complex network/local key activation mechanisms are often additionally developed, which not only increases customer R&D costs, but also increases the complexity of the manufacturer's production process management and control. Through the official packaging tool, users can independently complete the integration of firmware and business software locally without exposing the core source code to third parties, completely avoiding the risk of business asset leakage.
Feature Usage
Upgrade array sub-node firmware
Please confirm before upgrading
Firmware upgrades rewrite the underlying software of the target array's subnodes and may trigger a device reboot. Before execution, you must confirm that the firmware package, firmware type, device model, and hardware version match, and ensure that the power supply and management network are stable. During the upgrade process, do not power off, restart the device, or submit tasks repeatedly.
Open the firmware upgrade page
- Select Operations in the main navigation on the left.
- Select Firmware in the secondary navigation.
- View the number of tasks in each status at the top of the page.
- View the upgrade tasks being processed in the Upgrade Queue.
- View the execution progress and final results in Upgrade Progress and Upgrade Result.
- Click Add Sub-board Firmware Upgrade to open the upgrade configuration window.
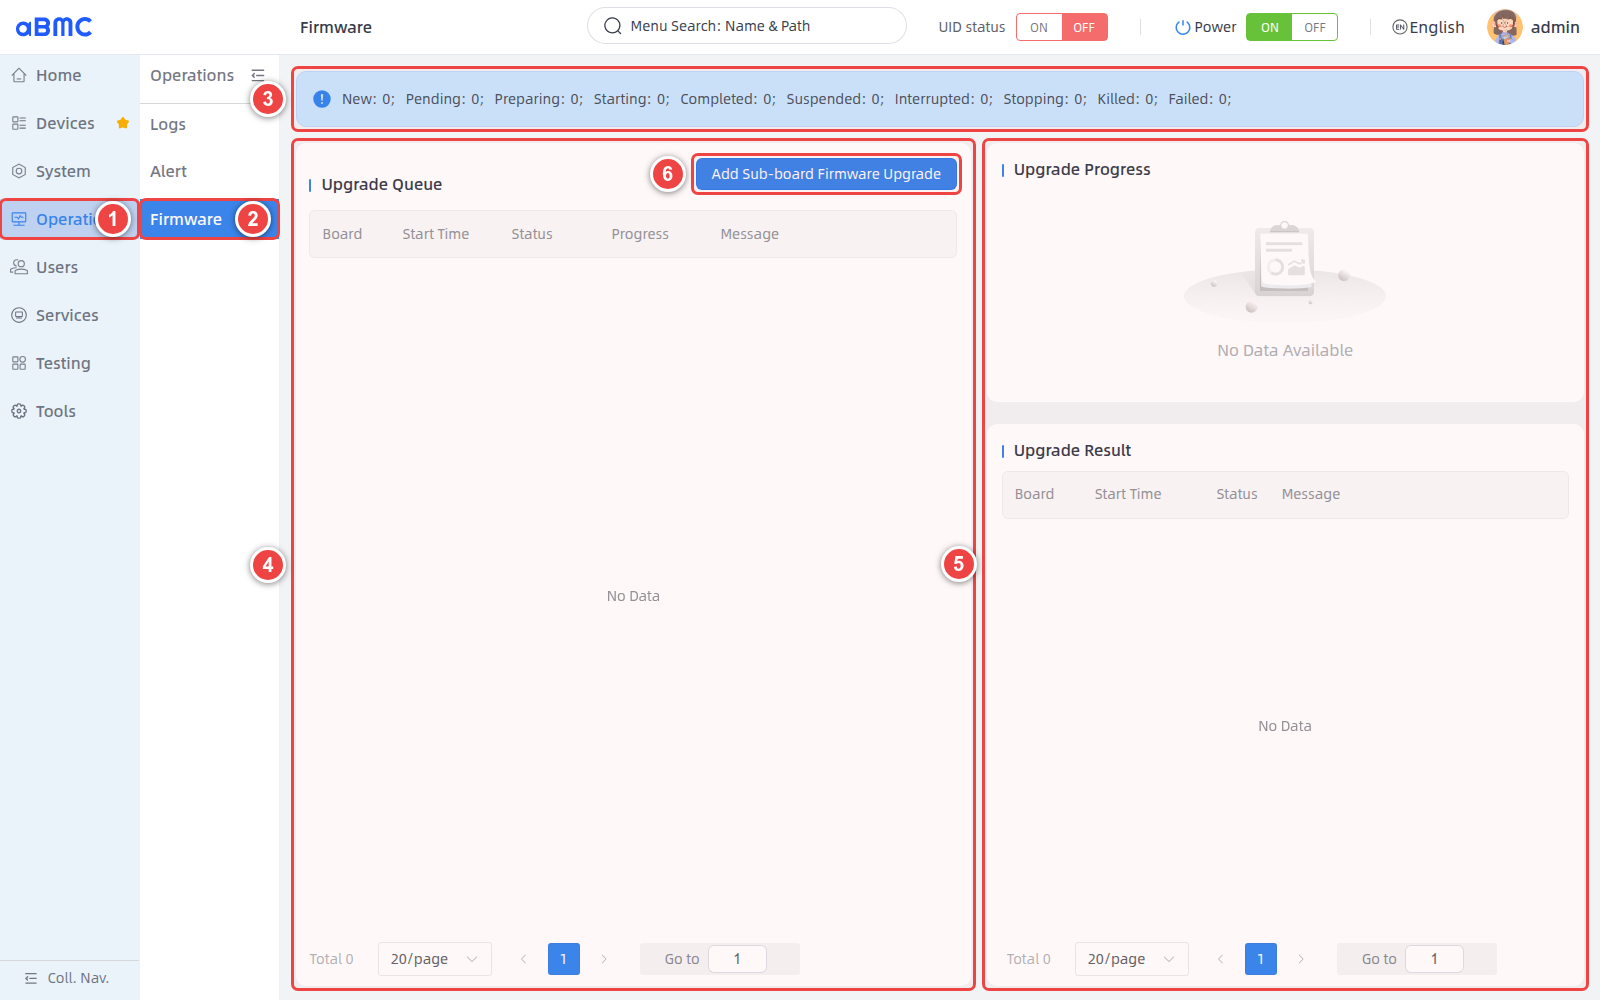
Empty list description
When the page displays No Data or No Data Available, it means that there is currently no corresponding queue, progress or result record, and it does not mean that the page has failed to load.
Configure upgrade task
- Select the firmware that matches the target device in Select Upgrade Firmware; when the required firmware is not in the list, click Upload Firmware to upload.
- Select the platform type corresponding to the firmware in Select Firmware Type.
- Check the target device in the device list on the left and use the right arrow to move it to the list on the right.
- Review the target devices one by one in Upgrade Devices and remove nodes that should not participate in the upgrade.
- After double-checking the firmware, type, and target device, click Confirm to submit the task.
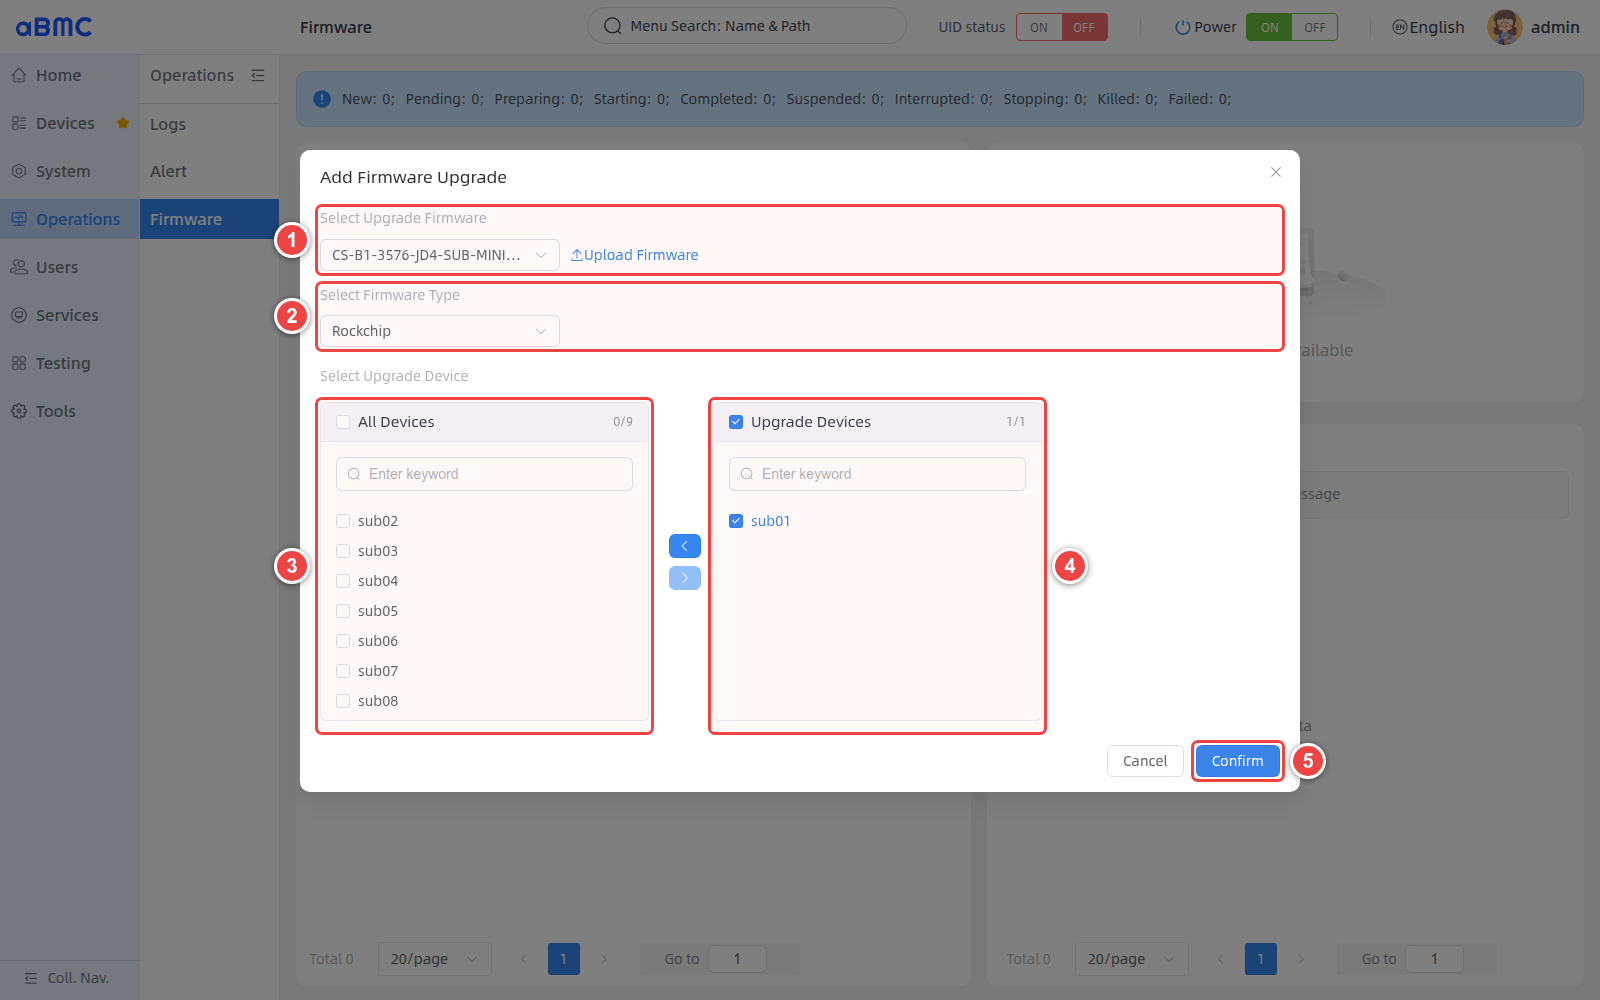
Real machine upgrade example
For this actual machine operation, select CS-B1-3576-JD4-SUB-MINIMAL_Debian_debug_250428.img, the firmware type is Rockchip, and the target device is only sub01. Before submission, the page displays Upgrade Devices 1/1, and no other sub-boards are selected.
Upgrade parameter description
| Parameter or area | Description | Usage requirements |
|---|---|---|
| Select Upgrade Firmware | Select the firmware image that has been uploaded to aBMC. | Must check complete file name, applicable model, hardware version and release notes. |
| Upload Firmware | Open the firmware upload window. | Only upload firmware from trusted sources and that pass integrity verification. |
| Select Firmware Type | Select the firmware type corresponding to the target hardware platform. | Must match firmware package and target device, e.g. Rockchip. |
| All Devices | Select all devices in the list on the left. | Only works if all devices have the same firmware. |
| Upgrade Devices | Displays the devices actually upgraded in this task. | The number and name of the equipment must be verified before submission. |
| Confirm | Create and execute upgrade tasks. | After clicking, the actual upgrade operation will occur. Do not submit repeatedly. |
Monitor the upgrade process
- Confirm that the task enters Preparing or Starting in the top status summary.
- Confirm in the Upgrade Queue that the Board is the device planned to be upgraded.
- Continue to observe Status, Progress and Message to confirm that the progress is increasing normally.
- Do not power off the device, restart the target device, or create the same task again during task execution.
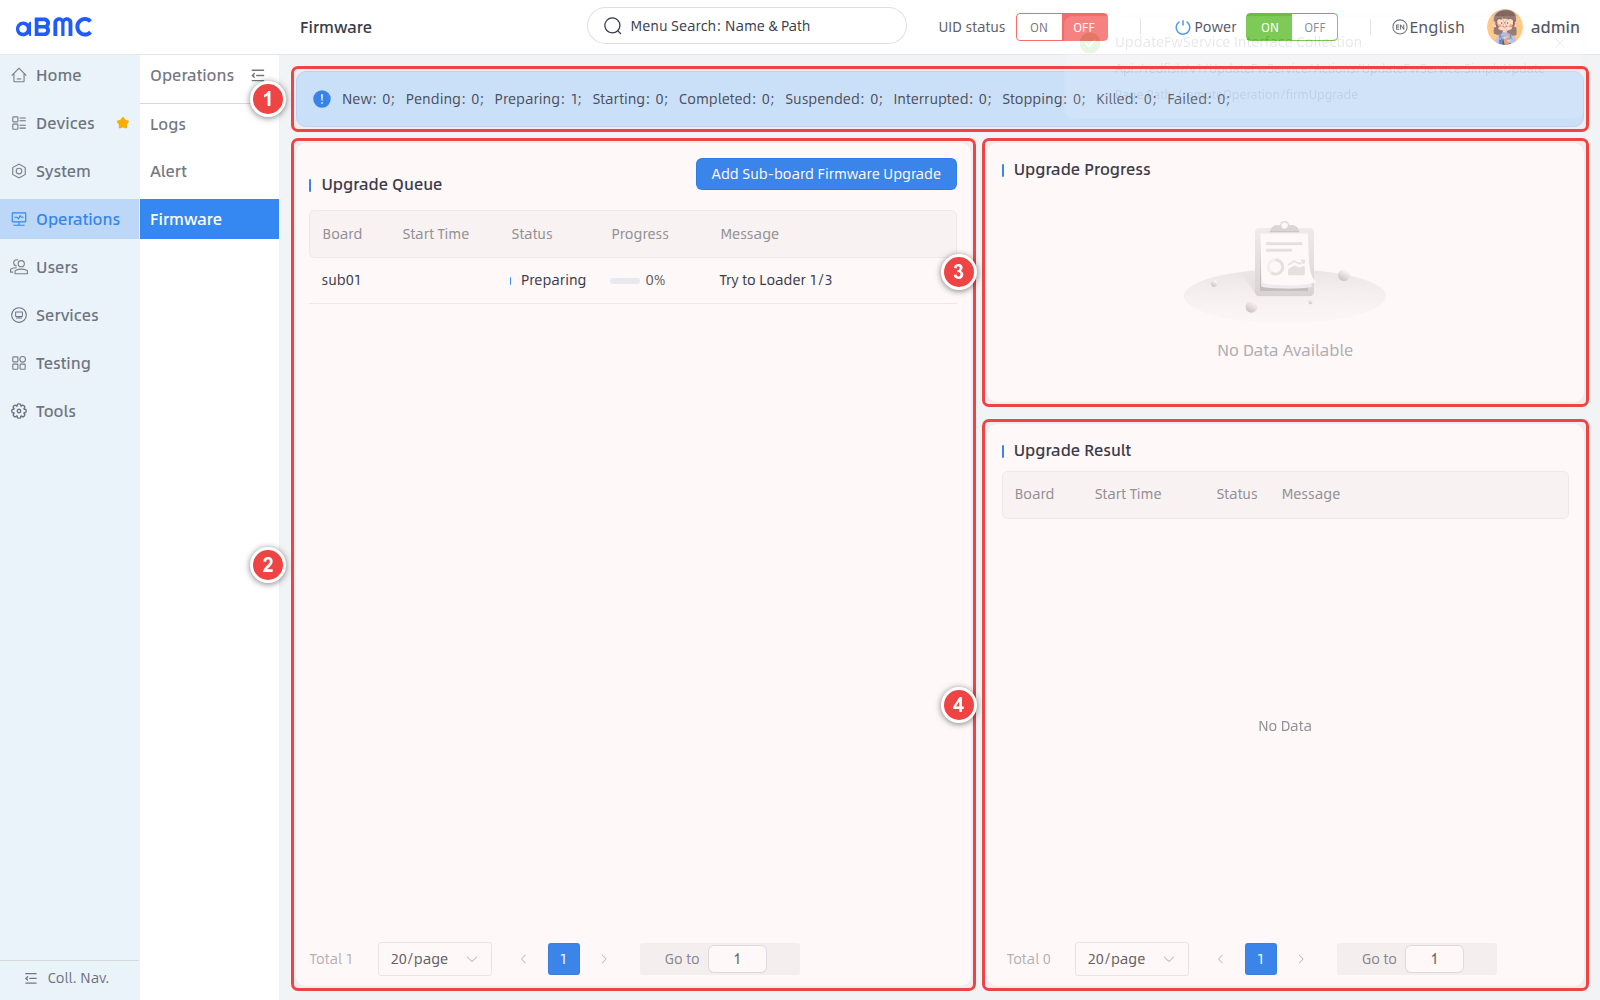
This actual machine upgrade goes through Preparing and Starting in sequence. When the task enters Preparing, the page displays Try to Loader 1/3; after entering Starting, the progress continues to increase from 0% to 96%, and then transfers to Completed.
Upgrade status description
| Status | Description | Processing Suggestions |
|---|---|---|
| New | The upgrade task has been created and will usually enter Pending soon. | Confirm that the target device and firmware information are correct. |
| Pending | The task has entered the scheduling queue and is waiting for execution or required resources. | Continue to wait; if there is no change for a long time, check other upgrade tasks and resource usage. |
| Preparing | Checking the firmware, preparing the upgrade environment, and putting the target device into upgrade mode. | Keep the power supply and network stable, and do not submit upgrade tasks repeatedly. |
| Starting | Flashing firmware to target device has started. | Continuously observe Progress and Message, do not restart or power off. |
| Completed | The firmware flashing process has ended successfully, and the task progress is 100%. | Continue to wait for the device to start and verify the online status, firmware information, alarms and business functions. |
| Failed | The upgrade task failed. | Check firmware compatibility, device status, network, power and error logs. |
Confirm upgrade result
- Confirm that the number of Completed at the top of the page has increased, and the number of Failed has not increased.
- Confirm the target Board, Start Time and Status in the Upgrade Result.
- Read the Message. If the page prompts you to wait for the system to start, you should continue to wait as prompted and do not immediately cut off the power or repeat the upgrade.
- After the device is restored, check the power status, system status, firmware version, alarms, logs, and key business functions.
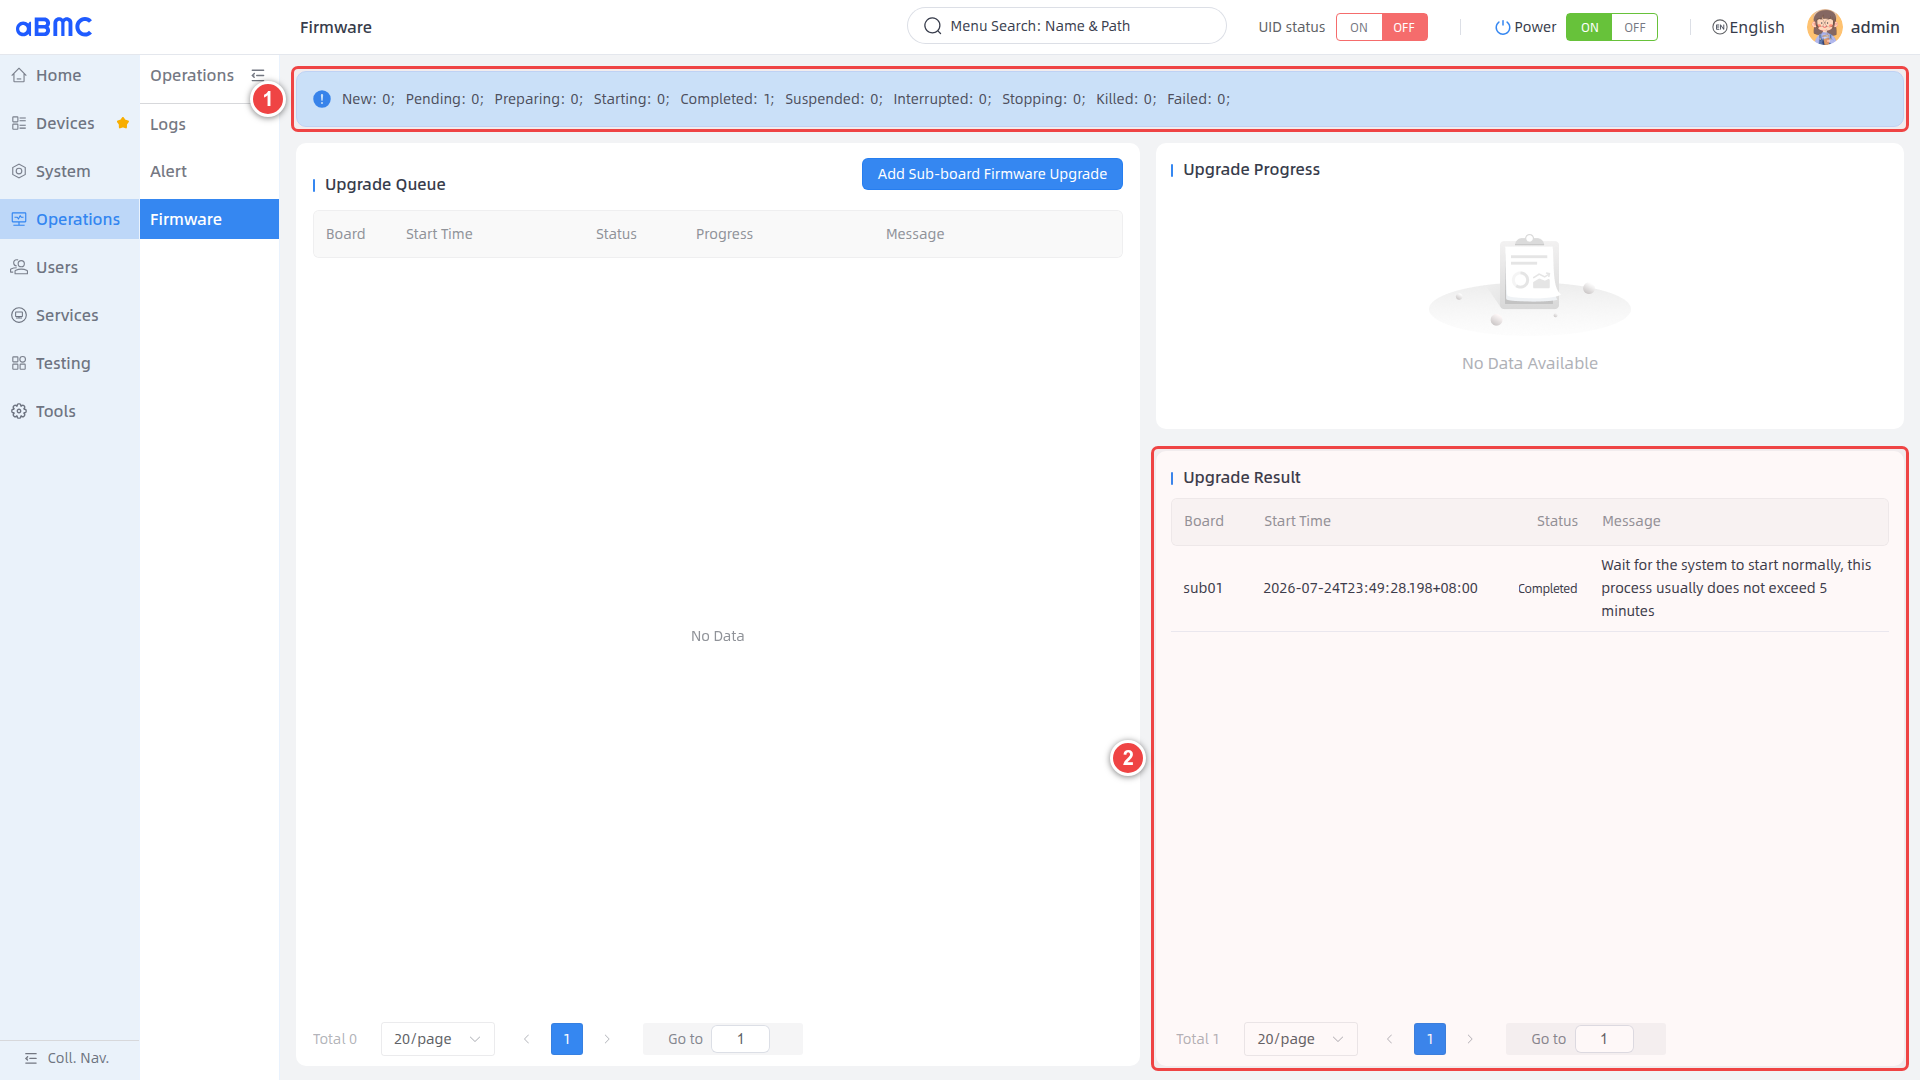
The results of this actual machine upgrade are as follows:
| Check items | Actual results |
|---|---|
| target device | sub01 |
| Task start time | 2026-07-24T23:49.198+08 |
| Final status | Completed |
| Result message | Wait for the system to start normally, this process usually does not exceed 5 minutes |
| PowerState | On |
| StateSoc | Ready |
| ComputerSystem Health | Critical |
| Operating System | Debian GNU/Linux 12 (bookworm) |
| KernelVersion | 6.1.84 |
| Firmware Date | 2025-04-28T12:44.000Z |
Device still needs to be verified after Completed
Completed means that the upgrade task process has ended, but it does not mean that the target device and business have been restored immediately. In this actual machine verification, sub01 has been restored to PowerState: On and StateSoc: Ready, but ComputerSystem Health is still Critical. You should continue to check device alarms and logs, and do not judge the overall health of the device solely based on task completion and system accessibility.
Batch upgrade equipment
- Only perform batch upgrades when the models, hardware versions, and target firmware of multiple devices are exactly the same.
- Use the search box to select devices one by one, or select All Devices when you confirm that all devices are available.
- After moving the devices into Upgrade Devices, check the number and names of the devices.
- After submission, check the status of each device in the queue and result area. Do not judge the success of all devices based solely on the overall progress.
It is recommended to verify with a single node first
Before batch upgrade, it is recommended to select a non-critical node for actual machine verification. After confirming that the firmware is compatible, the device can start normally, and the business verification is passed, expand the scope of the upgrade.
FAQ
There is no target firmware in Select Upgrade Firmware
Confirm whether the firmware has been uploaded and recognized by the page. When there is no available firmware, click Upload Firmware to upload an image from a trusted source that matches the device, and then reopen the upgrade window.
The task stays in Pending or Preparing for a long time
Check whether there are other tasks, whether the target device can enter upgrade mode, whether the management network is stable, and view Message and related logs. Do not submit again before the reason is confirmed.
Firmware preprocessing
firmware-kits is used to preprocess BM1684 and RK3588 firmware packages before official firmware upgrade. It can unpack the original firmware according to the specified process, adjust the size of ROOTFS/DATA/CUSTOM and other partitions, mount rootfs for manual modification of system content, and repackage it after the modification is completed to generate a firmware package that can be used for delivery or upgrade.
This tool is suitable for scenarios where you need to customize firmware content before upgrading, such as expanding partitions, preconfiguring files, adjusting rootfs configuration, and generating TFTP or SD card upgrade packages. Ordinary firmware upgrades should still give priority to using the upgrade management function mentioned earlier on this page; firmware-kits should be used only when the firmware needs to be modified or repackaged first.
Here are instructions on how to unpack, modify and repackage BM1684 and RK3588 firmware using firmware-kits. Please follow the steps strictly.
All commands are executed in the firmware-kits directory.
Preparation
1.1 Operating system requirements
It is recommended to use Ubuntu 20.04/22.04 x86_64 host.
1.2 Install dependencies
sudo apt-get update
sudo apt-get install -y u-boot-tools qemu-user-static p7zip-full unzip e2fsprogs
1.3 Check toolkit directory
Enter the toolkit directory:
cd firmware-kitsVerify that the directory has at least these contents:
firmware-kits
flow/
scripts/
tools/
bin/
Confirm that the main program can be executed:
./firmware-kits --helpFirmware processing performs mounting, chrooting, file system adjustments, and repackaging, so formal operations require the use of sudo.
Basic commands
Processing the firmware from scratch:
sudo ./firmware-kits run -l <flow-file> -f <firmware-file>To continue the process after it has been paused:
sudo ./firmware-kits resumeParameter description:
| Parameters | Description |
|---|---|
run | Execute a firmware processing flow from scratch |
resume | Resume execution from the last paused position |
-l | Specify the process file, such as flow/bm1684_tftp_data.yaml |
-f | Specify the original firmware file |
-o | Advanced parameters, appended to the processing script; do not use without special instructions |
When the tool reaches a position that requires manual processing, it will automatically pause and prompt what command to execute next. After the manual operation is completed, execute sudo ./firmware-kits resume to continue.
Important Notes
- Do not delete
out/,.firmware-kits_state.jsonortools/.envwhile the process is paused. - Do not shut down the host with rootfs mounted unless the uninstallation is confirmed to be complete.
- Only process one firmware process at a time. Do not open multiple terminals and run multiple
firmware-kits run/resumeat the same time. - The output directory is
out/. After confirming that the product is not needed, you can usesudo rm -rf out/to clear the space. - If the process prompts that there is an interruption record, execute
sudo ./firmware-kits resumefirst and do not directly restartrun.
BM1684 firmware operation
4.1 Input files
BM1684 uses zip firmware packages, for example:
Public-All-1684-Ubuntu2004-Sdk2309LTS_SP5-Build20260522.zipPlace the firmware file in the firmware-kits directory and execute subsequent commands.
4.2 Select output type and flow
BM1684 has multiple flows. The main differences between different flows are the output type, whether to process BOOT/DATA partitions, and whether to process CUSTOM partitions.
| flow file | applicable scenarios | output product | pause point | key parameters |
|---|---|---|---|---|
flow/bm1684.yaml | Basic SD card upgrade package; only handles ROOTFS | out/bm1684/ubuntu20/update/sdcard-YYYY-MM-DD.zip | ROOTFS partition size, rootfs content modification | Packaging parameters sdcard |
flow/bm1684_tftp.yaml | Basic TFTP upgrade package; only handles ROOTFS | out/bm1684/ubuntu20/update/tftp-YYYY-MM-DD.zip | ROOTFS partition size, rootfs content modification | Packaging parameters tftp |
flow/bm1684_sdcard_data.yaml | SD card upgrade package; processing ROOTFS, BOOT, DATA | out/bm1684/ubuntu20/update/sdcard-YYYY-MM-DD.zip | ROOTFS partition size, DATA partition size, rootfs content modification | Packaging parameters sdcard; BOOT automatic processing |
flow/bm1684_tftp_data.yaml | TFTP upgrade package; processing ROOTFS, BOOT, DATA | out/bm1684/ubuntu20/update/tftp-YYYY-MM-DD.zip | ROOTFS partition size, DATA partition size, rootfs content modification | Packaging parameters tftp; BOOT automatic processing |
flow/bm1684_custom_overlay.yaml | TFTP upgrade package; add or expand CUSTOM, and bind CUSTOM/DATA to rootfs | out/bm1684/ubuntu20/update/tftp-YYYY-MM-DD.zip | ROOTFS partition size, CUSTOM partition size, DATA partition size, rootfs content modification | The default size in the CUSTOM bind parameter is 20; packaging parameters tftp |
flow/bm1684_custom_ro.yaml | TFTP upgrade package; CUSTOM is processed according to the read-only scheme and BOOT/DATA is processed at the same time | out/bm1684/ubuntu20/update/tftp-YYYY-MM-DD.zip | ROOTFS partition size, DATA partition size, rootfs content modification | Packaging parameters tftp custom_ro; CUSTOM/BOOT is processed automatically |
Notes:
- The input firmware is all BM1684 zip package, such as
Public-All-1684-Ubuntu2004-Sdk2309LTS_SP5-Build20260522.zip. - At the
ROOTFS partition sizepause point, you can view or expand ROOTFS. - At the
DATA partition sizepause point, you can view or expand DATA. It appears only in flows containing_dataorcustom. - The
CUSTOM partition sizepause point appears only inbm1684_custom_overlay.yaml. - If you do not need to modify the content of a certain pause point, just execute
sudo ./firmware-kits resumedirectly.
Common command examples:
Generate TFTP upgrade package and process ROOTFS/BOOT/DATA:
sudo ./firmware-kits run -l flow/bm1684_tftp_data.yaml -f ./Public-All-1684-Ubuntu2004-Sdk2309LTS_SP5-Build20260522.zipGenerate SD card upgrade package and process ROOTFS/BOOT/DATA:
sudo ./firmware-kits run -l flow/bm1684_sdcard_data.yaml -f ./Public-All-1684-Ubuntu2004-Sdk2309LTS_SP5-Build20260522.zipOnly process ROOTFS and generate TFTP upgrade package:
sudo ./firmware-kits run -l flow/bm1684_tftp.yaml -f ./Public-All-1684-Ubuntu2004-Sdk2309LTS_SP5-Build20260522.zipOnly process ROOTFS and generate SD card upgrade package:
sudo ./firmware-kits run -l flow/bm1684.yaml -f ./Public-All-1684-Ubuntu2004-Sdk2309LTS_SP5-Build20260522.zipIf there are no special requirements, follow the flow specified by the delivery personnel.
4.3 First pause: Modify ROOTFS partition size
The program will display similar information:
[Step 3/13] Modify the root file system size
Firmware processing is paused. After completing the manual operation above, run `sudo ./firmware-kits resume` to continue.
Check the current size of ROOTFS:
sudo ./tools/chroot-p-bm1684.sh -p ROOTFS -rIf expansion is required, for example to 4000 MB:
sudo ./tools/chroot-p-bm1684.sh -p ROOTFS -w 4000If you do not need to modify the size, you can continue directly:
sudo ./firmware-kits resumeIf the size has been modified, also execute the same continue command:
sudo ./firmware-kits resume4.4 Second pause: Modify DATA partition size
The program will display similar information:
[Step 7/13] Modify the DATA partition size
Firmware processing is paused. After completing the manual operation above, run `sudo ./firmware-kits resume` to continue.
View the current size of DATA:
sudo ./tools/chroot-p-bm1684.sh -p DATA -rIf you need to expand the capacity, for example to 6000 MB:
sudo ./tools/chroot-p-bm1684.sh -p DATA -w 6000If you do not need to modify the size, you can continue directly:
sudo ./firmware-kits resume4.5 The third pause: modify rootfs content
The program will display similar information:
[Step 9/13] Modify the root file system contents
Firmware processing is paused. After completing the manual operation above, run `sudo ./firmware-kits resume` to continue.
Execute the command within rootfs:
sudo ./tools/chroot-e.sh 'apt-get update'Example of installing a package:
sudo ./tools/chroot-e.sh 'apt-get install -y figlet'Copy local files to rootfs, for example, copy a.txt in the current directory to /home/ in the target system:
sudo ./tools/chroot-c.sh -s ./a.txt -d /home/Notes:
| Operations | Command |
|---|---|
| Execute a command in rootfs | sudo ./tools/chroot-e.sh 'COMMAND' |
| Copy files or directories to rootfs | sudo ./tools/chroot-c.sh -s <local-path> -d <target-path-in-rootfs> |
Continue after modifications are completed:
sudo ./firmware-kits resumeAfterwards, the program will automatically uninstall DATA, BOOT, ROOTFS, and repackage the firmware.
4.6 BM1684 output file
TFTP flow output:
out/bm1684/ubuntu20/update/tftp-YYYY-MM-DD.zipSD card flow output:
out/bm1684/ubuntu20/update/sdcard-YYYY-MM-DD.zipActual verification example:
out/bm1684/ubuntu20/update/tftp-2026-07-28.zipOutput files may belong to the root user. If you have insufficient permissions to copy or delete, use sudo.
RK3588 firmware operation
5.1 Input files
RK3588 supports direct input of .7z, .zip or .img. For example:
CS-B1-N10-SUB-3588JD4_Debian12-Xfce-r1275_debug_260710.7zThe tool will automatically extract .img from .7z/.zip and continue processing.
5.2 Start processing
sudo ./firmware-kits run -l flow/rk3588.yaml -f ./CS-B1-N10-SUB-3588JD4_Debian12-Xfce-r1275_debug_260710.7z5.3 First pause: Modify ROOTFS partition size
The program will display similar information:
[Step 3/7] Modify the root file system size
Firmware processing is paused. After completing the manual operation above, run `sudo ./firmware-kits resume` to continue.
View the current size of rootfs:
sudo ./tools/chroot-p-rk3588.sh -p rootfs -rIf expansion is required, for example to 4000 MB:
sudo ./tools/chroot-p-rk3588.sh -p rootfs -w 4000If you do not need to modify the size, you can continue directly:
sudo ./firmware-kits resume5.4 Second pause: modify rootfs content
The program will display similar information:
[Step 5/7] Modify the root file system contents
Firmware processing is paused. After completing the manual operation above, run `sudo ./firmware-kits resume` to continue.
Execute the command within rootfs:
sudo ./tools/chroot-e.sh 'apt-get update'Copy files to rootfs:
sudo ./tools/chroot-c.sh -s ./a.txt -d /home/Continue after modifications are completed:
sudo ./firmware-kits resumeAfterwards, the program will automatically uninstall rootfs and repackage the RK3588 firmware.
5.5 RK3588 output file
Output file location:
out/rk3588/ubuntu20/update/rockdev/rk3588-YYYY-MM-DD.imgActual verification example:
out/rk3588/ubuntu20/update/rockdev/rk3588-2026-07-28.imgOutput files may belong to the root user. If you have insufficient permissions to copy or delete, use sudo.
Interruption recovery
If you see a similar prompt when executing run:
An interrupted run was found. Use `sudo ./firmware-kits resume` to continue.It means that the last process was not completed. Please execute:
sudo ./firmware-kits resumeIf you confirm that the last process is no longer needed, clean up the status and output:
sudo rm -f .firmware-kits_state.json tools/.env
sudo rm -rf out/
run can be re-executed after cleaning.
Execution records
Two actual execution records are provided with the package, which can be downloaded to view the complete operation process:
Only the firmware processing commands, terminal output, pause point operations, command execution demonstrations in rootfs, file copy demonstrations, final product paths and mount check results that customers care about are retained in the logs.
Firmware-kits FAQ
8.1 Prompt for insufficient permissions
Firmware processing involves mounting, chrooting, and root-owned files. Please confirm that the command uses sudo.
If deleting the output directory fails, execute:
sudo rm -rf out/8.2 Not sure what to do now
If the process is paused, the terminal usually prompts for the next command. Generally you only need:
- Follow the prompts to view or modify the partition size, or modify the rootfs content.
- Execute
sudo ./firmware-kits resumeafter completion.
8.3 What to do if you don’t need to modify the partition size?
At the partition size pause point, if no modification is needed, execute directly:
sudo ./firmware-kits resume8.4 What to do if there is no need to modify the rootfs content?
Modify the pause point in the rootfs content. If no modification is required, execute directly:
sudo ./firmware-kits resume8.5 Locale or /dev/pts warning appears in apt command
Some rootfs environments may display locale or /dev/pts related warnings. As long as the command is ultimately executed successfully, it generally does not affect firmware production.
8.6 How to confirm that there are no residual mounts
There are usually no remaining mounts after the normal process is completed. Execute when inspection is required:
mount | grep firmware-kits/outNo output means there are no residual mounts.
If there is output, please contact the delivery personnel for processing, and do not delete the directory being mounted at will.