



Casting
Introduction
Screen projection management is a centralized screen projection and operation and maintenance management function provided by aBMC for Android devices. This function consists of two modules: screen projection control and device auxiliary management.
- Screencasting control: Supports filtering Android devices connected by USB or Wi-Fi, starting screencasting, stopping screencasting, zooming in preview and multi-device control for single or multiple devices.
- Device assisted management: Supports sending files to selected devices, installing APKs, executing ADB Shell, scanning Wi-Fi devices and setting device groups.
Development Vision
- Provide a unified screen preview and control entrance for multiple Android devices, reducing the repetitive work of connecting, checking and operating devices one by one.
- Reduce the risk of mistakenly selecting devices during batch screencasting, application deployment, and remote debugging through device grouping, connection type, and online status filtering.
Feature Usage
Select a device and manage screencasting
Open the screen mirroring management page
- Select Services in the main navigation bar on the left.
- Select Casting in the secondary navigation bar.
- Check the function entrances such as Send File, Install APK, Adb shell, Scan Wi-Fi and Set Group.
- Wait for Device Management to load and confirm that the device label, UDID, and status are displayed.
- Check the projection area on the right. When there is currently no casting device, the page displays No Devices in Casting.
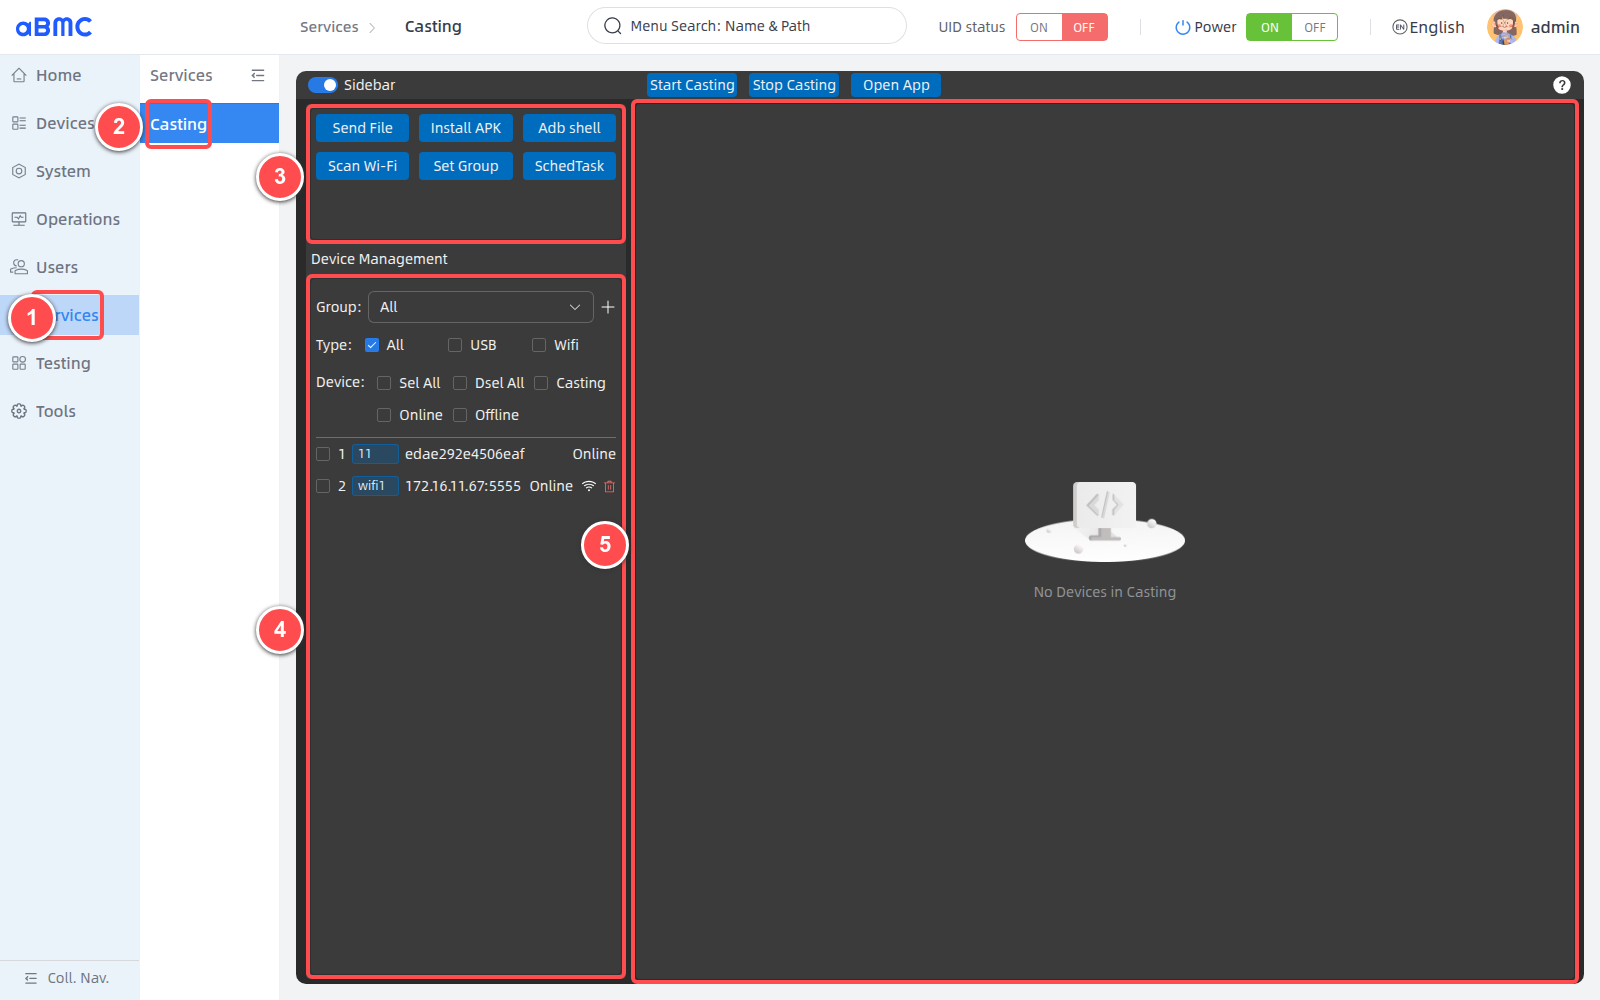
Only supported on Android devices
Mirroring management only supports Android devices. Before use, you should confirm that the device has developer options and USB or wireless debugging turned on, has completed debugging authorization, and has been correctly recognized by aBMC via USB or Wi-Fi.
Filter and select devices
- Select the target group in Group; select All to display all devices.
- Select All, USB or Wifi in Type. The three options are in a single-choice relationship, and only one connection range is displayed at a time.
- Use Sel All, Dsel All, Casting, Online or Offline to quickly change the selected device.
- Verify the label, UDID, and status in the device list, and then click the device row or checkbox to select the target device. USB devices usually display the device serial number, while Wi-Fi devices display
IP:port.
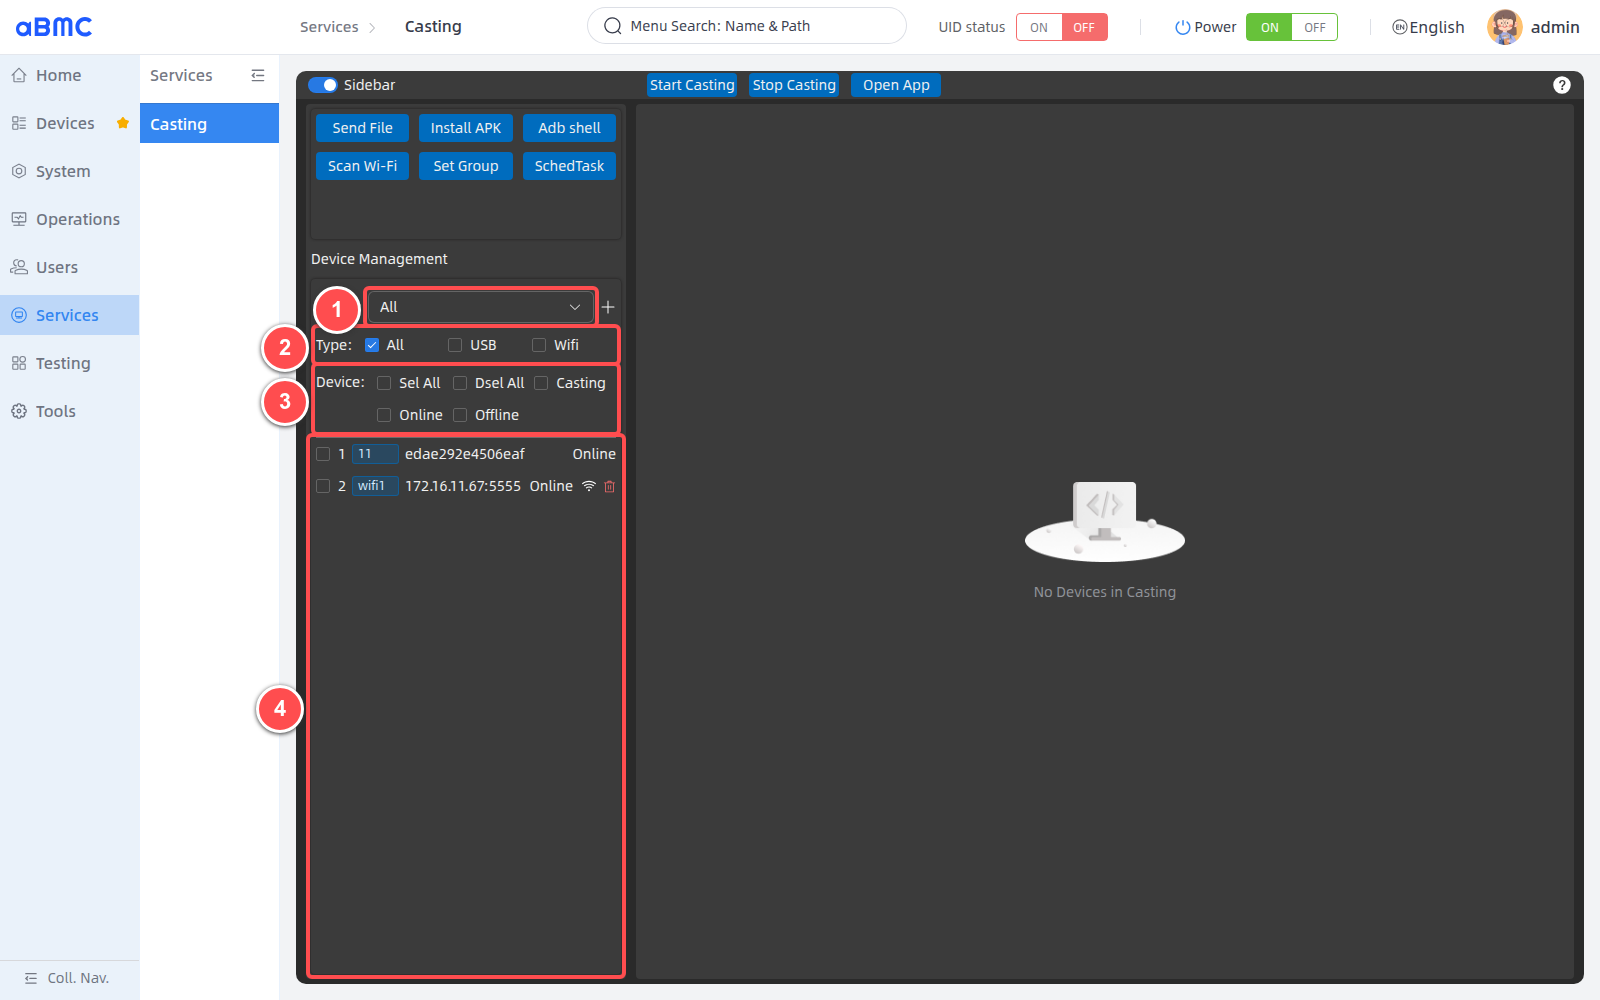
The shortcut items in the Device area are used to change the selected device and will not hide the device list.
| Shortcut items | Select results | Usage suggestions |
|---|---|---|
| Sel All | Select all devices within the current group and connection type. | Limit the Group and Type before batch operations to avoid expanding the scope of the operation. |
| Dsel All | Clear all current selections. | It is recommended to execute this once after completing the batch operation. |
| Casting | Select the device that is currently cast and online. | Suitable for batch screen projection or batch control. |
| Online | Select a device that is online but not yet cast. | Suitable for batch startup of screencasting. |
| Offline | Select devices whose connection status is not online. | The device row may show Unauthorized, the connection should be restored or authorization completed first. |
Device Identity Check
Device labels may be modified or duplicated. Before performing screencasting, file sending, APK installation or ADB Shell, you should check the device label and UDID at the same time. Do not judge the target device only based on the device serial number or list order.
Start and stop single screen mirroring
- Select a device with status Online.
- Click Start Casting.
- Confirm that the device status changes to Casting, and a preview card containing the serial number, UDID and real-time screen is generated on the right.
- To stop casting, keep the target device selected and click Stop Casting.
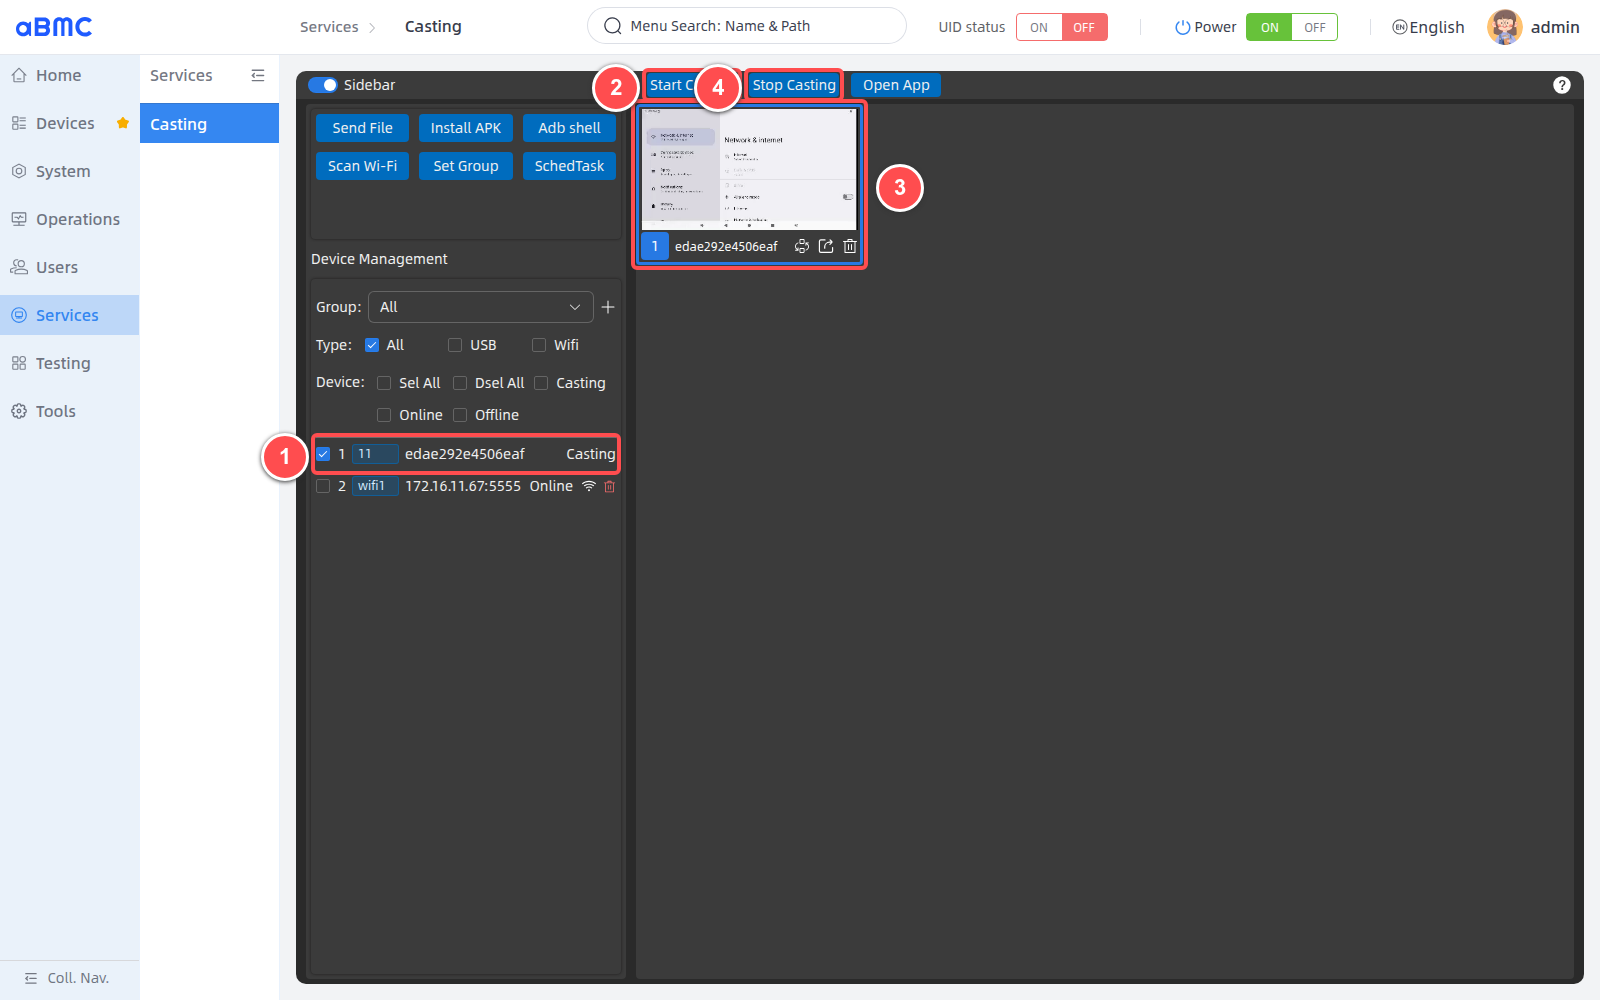
Screen casting success sign
You should also confirm that the device status displays Casting, a preview card appears on the right, and the screen can be continuously refreshed. Simply clicking Start Casting cannot be used as a basis for successful screen casting.
You can also click the stop icon in the lower right corner of the preview card to stop only the device corresponding to the preview card from mirroring.
Start and stop screen mirroring in batches
- Use Group and Type to limit the device range, and then select the target devices one by one, or use Online to quickly select devices that are online and have not yet cast their screen.
- After reviewing the device tag and UDID, click Start Casting.
- Confirm that all target devices display Casting, and check the preview screens one by one on the right.
- If you need to stop casting in batches, select the current casting device and click Stop Casting.
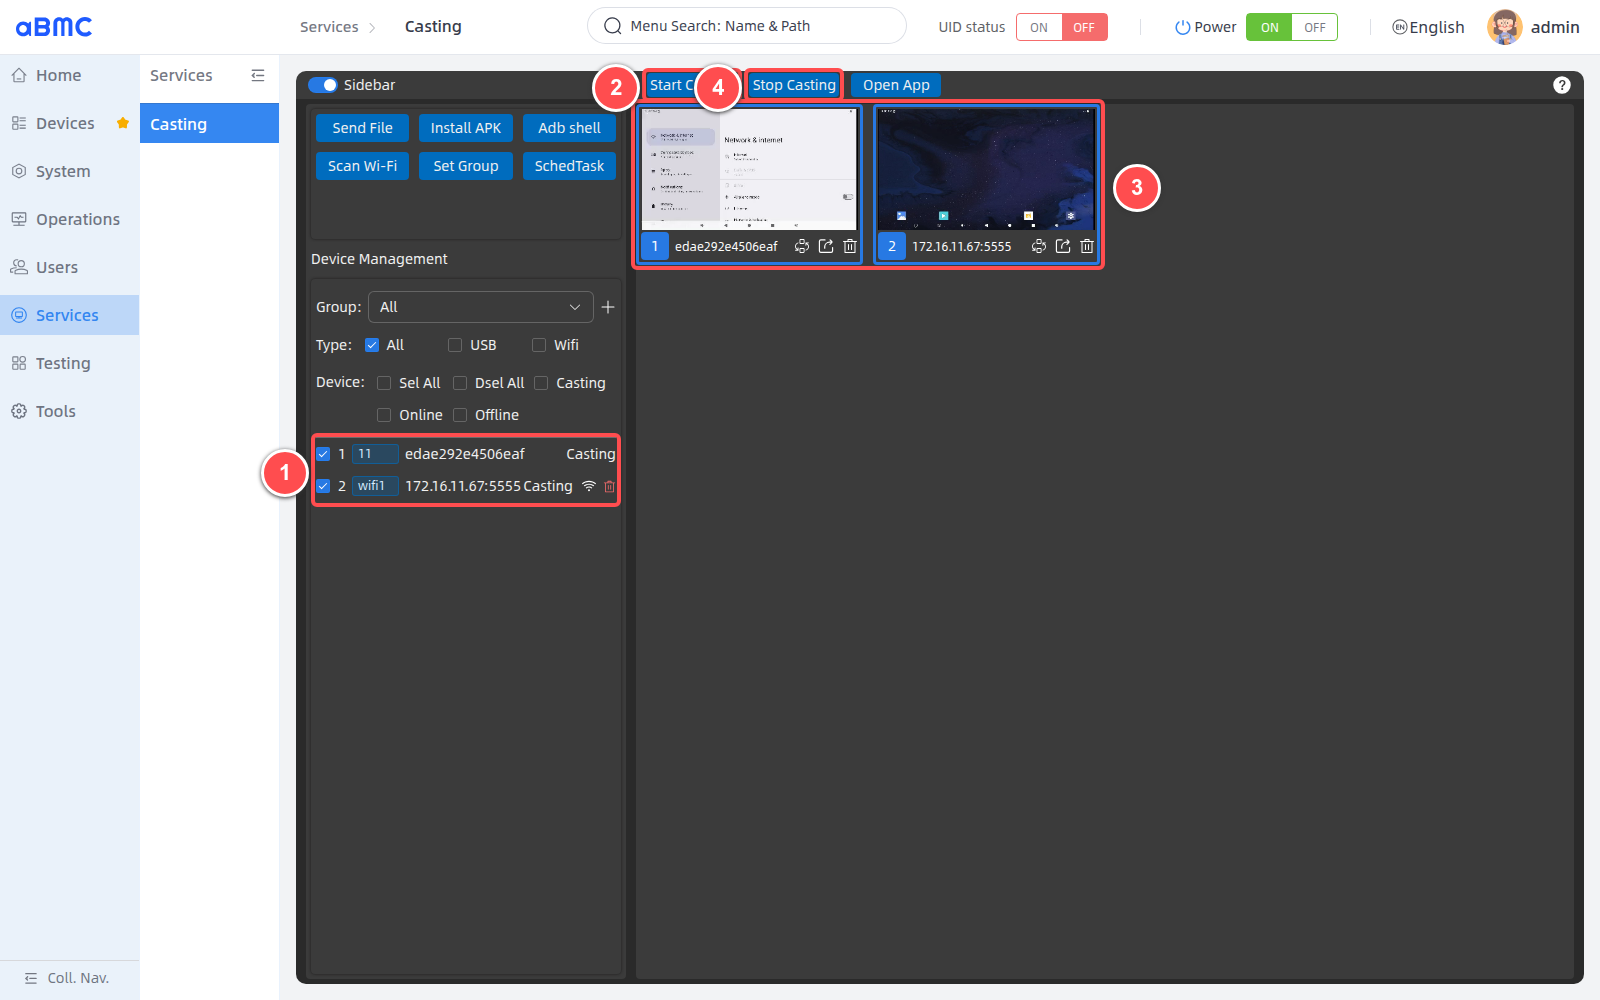
After the operation is completed, click Dsel All to prevent subsequent operations from using the original selection range.
Batch casting instructions
Batch casting will increase the usage of browser video decoding, aBMC processing capabilities and management network bandwidth. When using it for the first time, it is recommended to start with a small number of devices, and then gradually increase the number of devices after confirming that the screen and control are stable.
Use right-click shortcut operation
- Right-click on the device row.
- When a single device is selected, use Start Casting or Stop Casting.
- When multiple devices are selected, the right-click menu displays batch start or batch stop operations.
- After the operation, the results should still be confirmed through the device status and preview screen.
Preview and control Android devices
Use preview card
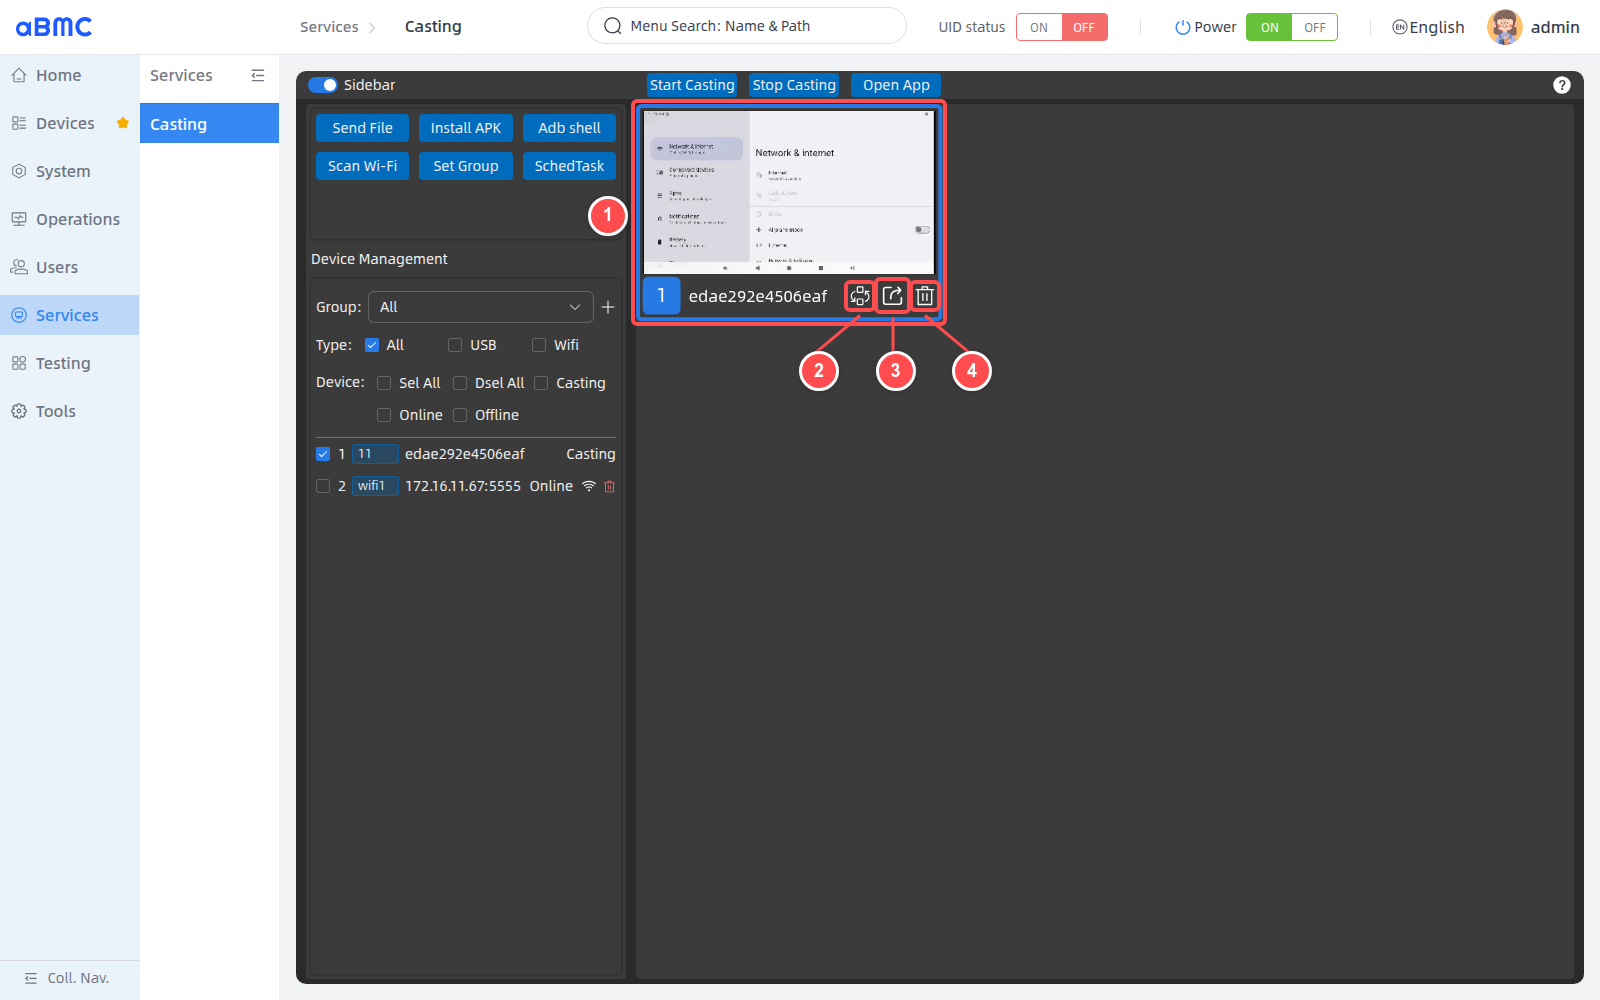
After the screen casting is successful, use the preview card as shown below:
- Check the live view, device serial number and UDID in the preview card; click the card to select or deselect the device.
- Click Multi Control to mark the device as a multi-control target; the icon turns red when enabled.
- Click Preview to open the enlarged preview, or double-click the preview card.
- Click Stop Casting to stop the device from casting and remove the preview card.
| Operations | Description |
|---|---|
| Select preview card | Click the preview card to select or deselect the corresponding device. The card border is highlighted when selected. |
| Multi Control | Mark this device as a multi-control target. The icon turns red when enabled. |
| Preview | Opens a magnified preview. You can also double-click the preview card to open it. |
| Stop Casting | Stops casting from this device and removes the preview card. |
Open enlarged preview
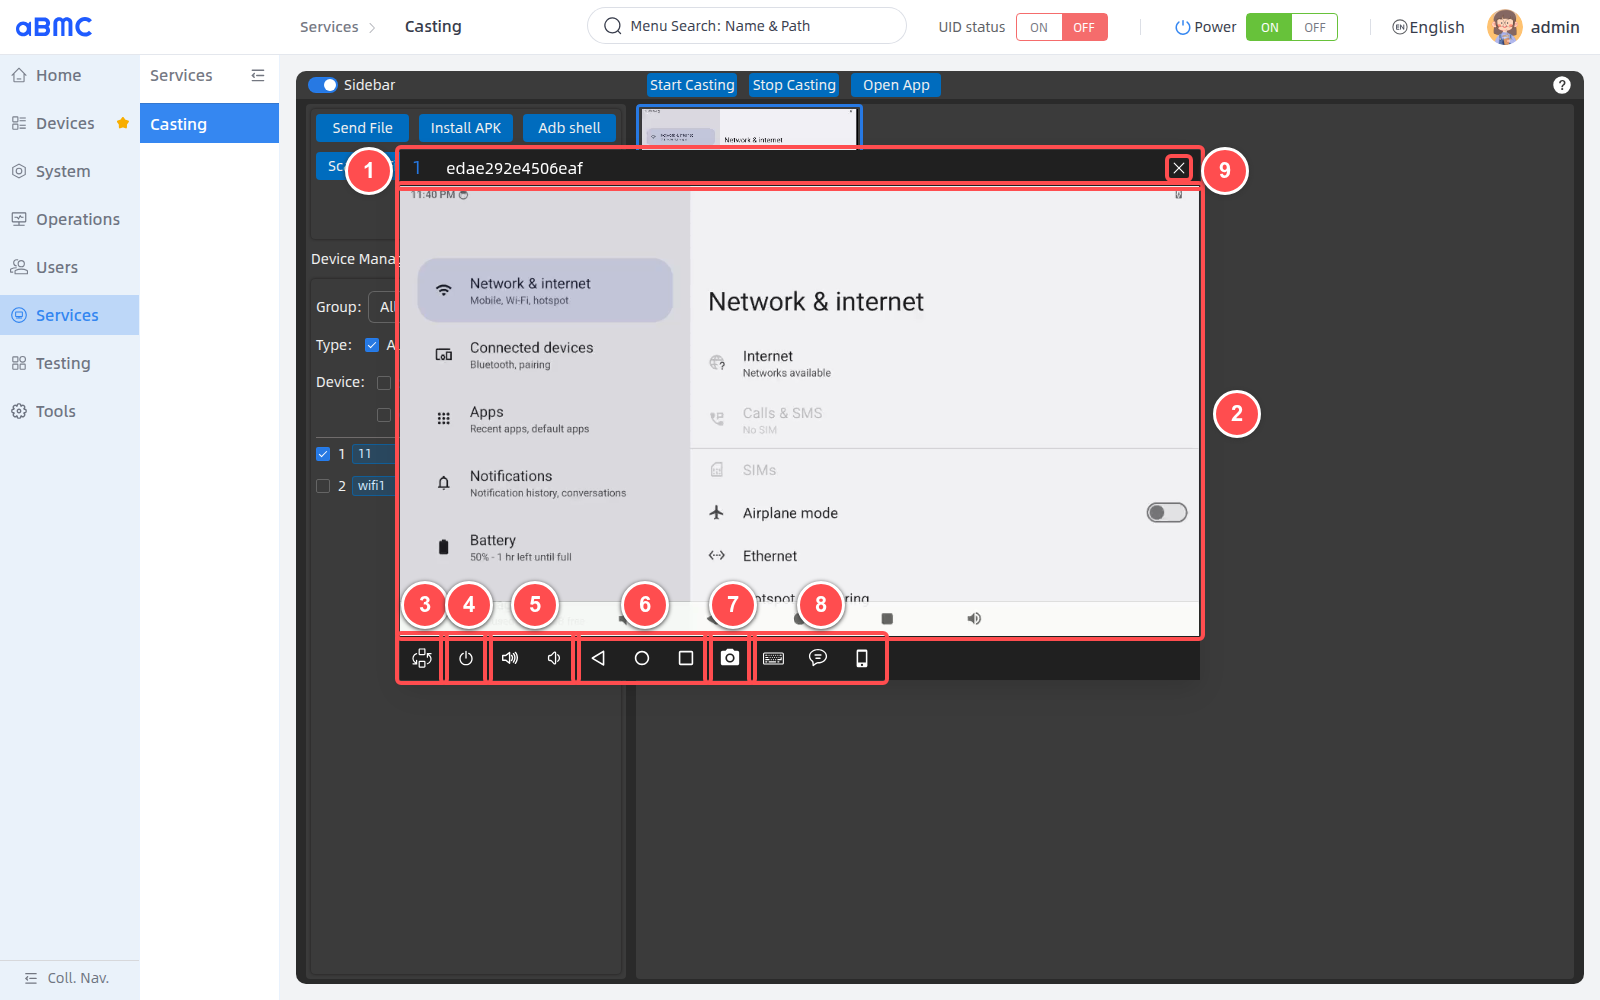
Click the Preview icon at the bottom of the preview card or double-click the preview card. After the window opens, follow the steps below:
- Verify the device serial number and UDID shown at the top of the window.
- Wait for the real-time image to finish loading, and then perform touch operations such as clicking and sliding with the mouse.
- Use Multi Control to turn on or off multi-control sending.
- Use Power to control Android device screen power.
- Use Volume Up and Volume Down to adjust the volume.
- Use Back, Home, and Overview to perform Android navigation operations.
- Use Screenshot to save the current device screen.
- Use Keyboard, Copy Content or Open App to perform input, clipboard or app operations.
- Click the close button in the upper right corner to exit the enlarged preview. Closing the window will not stop the original screencasting.
Use shortcut control
| Control | Function | Operation Instructions |
|---|---|---|
| Multi Control | Enable multi-control sending of the current magnified window. | Requires use with Multi Control tags from other preview cards. |
| Power | Send Android power key. | The screen may turn on, turn off, or wake up, depending on the current state of the device. |
| Volume Up / Volume Down | Increase or decrease the device volume. | Send a corresponding key event once for each operation. |
| Back / Home / Overview | Perform Android return, home screen or recent tasks actions. | The response result depends on the current page and system status of the device. |
| Screenshot | Save a screenshot of the current device screen. | Downloaded files are saved by the browser and should avoid containing sensitive information. |
| Keyboard | Turn on or off browser keyboard event forwarding. | When the icon is highlighted, keyboard input is sent to the Android device. |
| Copy Content | Writes the entered text to the Android clipboard. | Click Copy after entering text; click Cancel when finished to close the input box. |
| Open App | Display the device application list and open the specified application. | You should confirm that the application is installed and the current account has launch permission. |
Preview loading instructions
When zooming in to create a new video display area, the screen may briefly appear black before starting to refresh. Do not immediately judge that screencasting has failed during the initialization phase.
Batch control equipment
- Start mirroring for the control source device and all target devices, and confirm that the corresponding preview card is displayed on the right side.
- Click Multi Control on the preview card of the target device that needs to be synchronously received, and the confirmation icon turns red.
- Click Preview on the device preview card that is the control source.
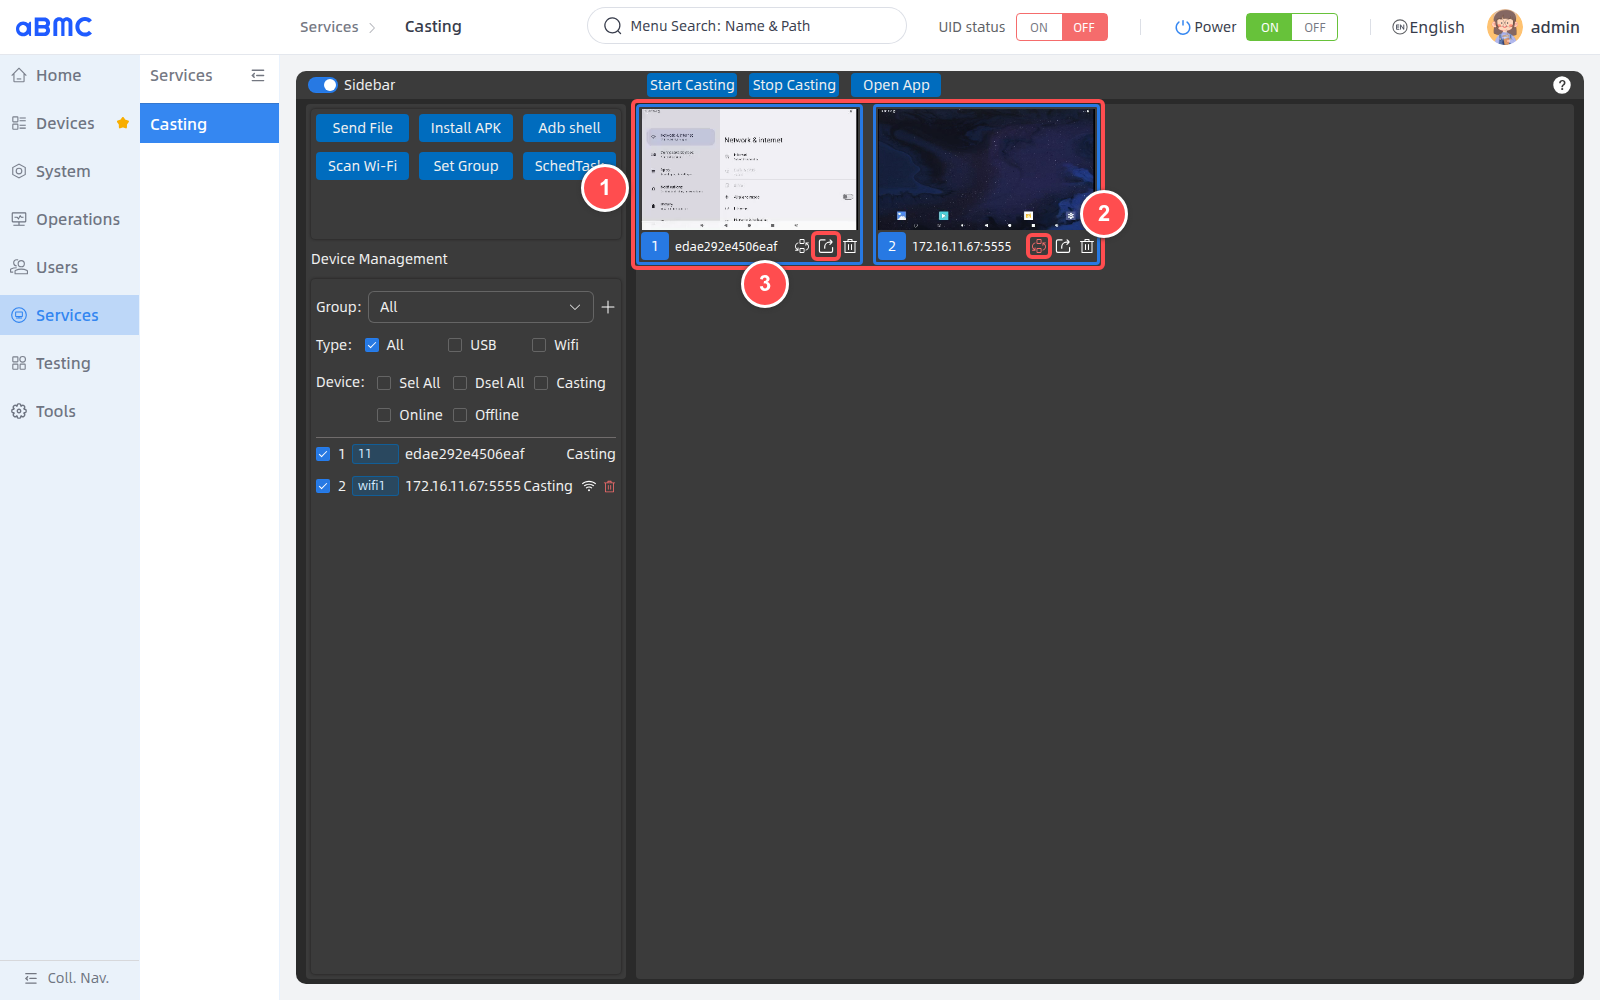
- Click Multi Control at the bottom of the magnified preview and the confirmation icon turns red.
- Perform touch, Android navigation or other shortcut operations on the control source screen.
- Observe whether the marked target devices respond synchronously, and confirm the execution results one by one.
- After the operation is completed, turn off Multi Control in the enlarged preview and cancel the Multi Control mark on the target preview card.
Multi Control usage scope
Multi Control only synchronizes operations to devices that have been cast and marked as multi-control targets. The resolution, system version, current page and response speed of different devices may be different. A small number of devices should be used for verification before batch operation. The results must be checked one by one after important operations.
Open applications in batches
- Confirm that the target device has entered the Casting state.
- Select one or more target devices in the device list on the left or the preview card on the right.
- Click Open App at the top of the page.
- Select the application to be started in the application list.
- Confirm whether the application is successfully opened one by one.
Application Consistency
Only the currently selected device that is casting will receive the open app operation. Before batch operations, you should confirm that the same application has been installed on all target devices; successful opening on one device does not mean successful opening on other devices.
Maintain Android devices in bulk
Send file
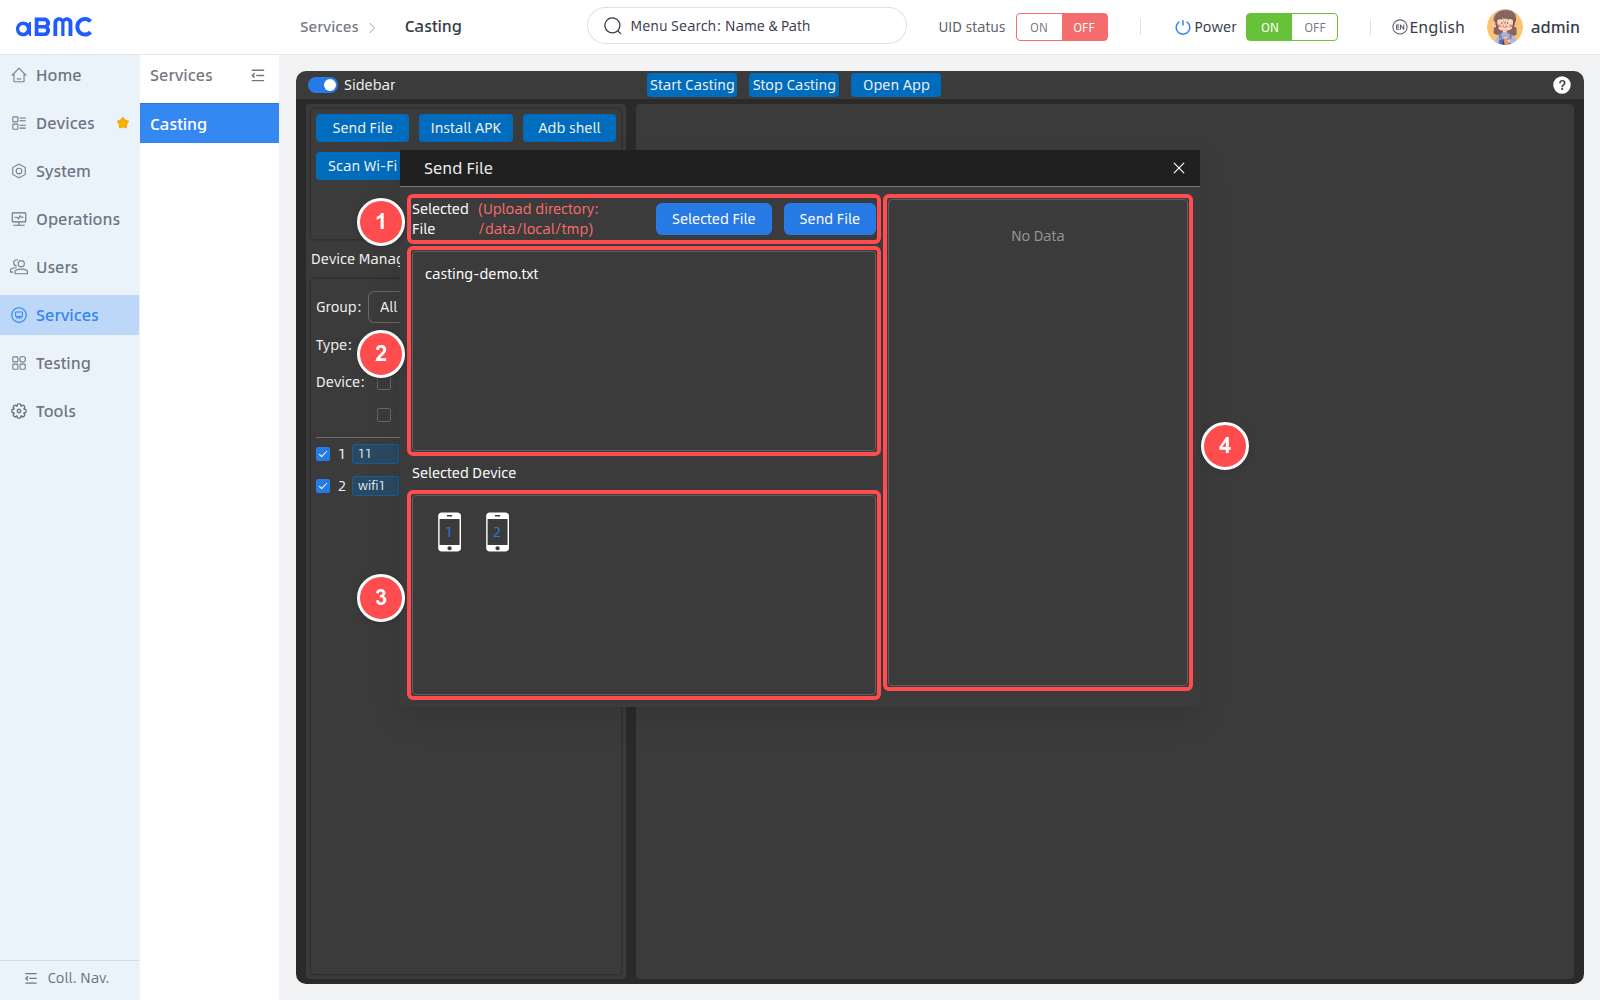
Select one or more target devices in the device list and click Send File. After the window opens, follow the steps below:
- Click Selected File to select a file; up to 5 files can be selected at a time. Click Send File after checking that everything is correct.
- Check the file names waiting to be sent in the file list.
- Review all target device serial numbers in Selected Device.
- View the processing status of each device and each file in the task tree on the right; when a task fails, you can retry a single failed item or all failed items.
Instructions for sending files
The file upload directory is /data/local/tmp. The sending operation will affect all selected devices. Please confirm the file content, file name, target device and remaining space before submitting. After closing the window, subsequent tasks that have not yet started will no longer be executed.
Install APK
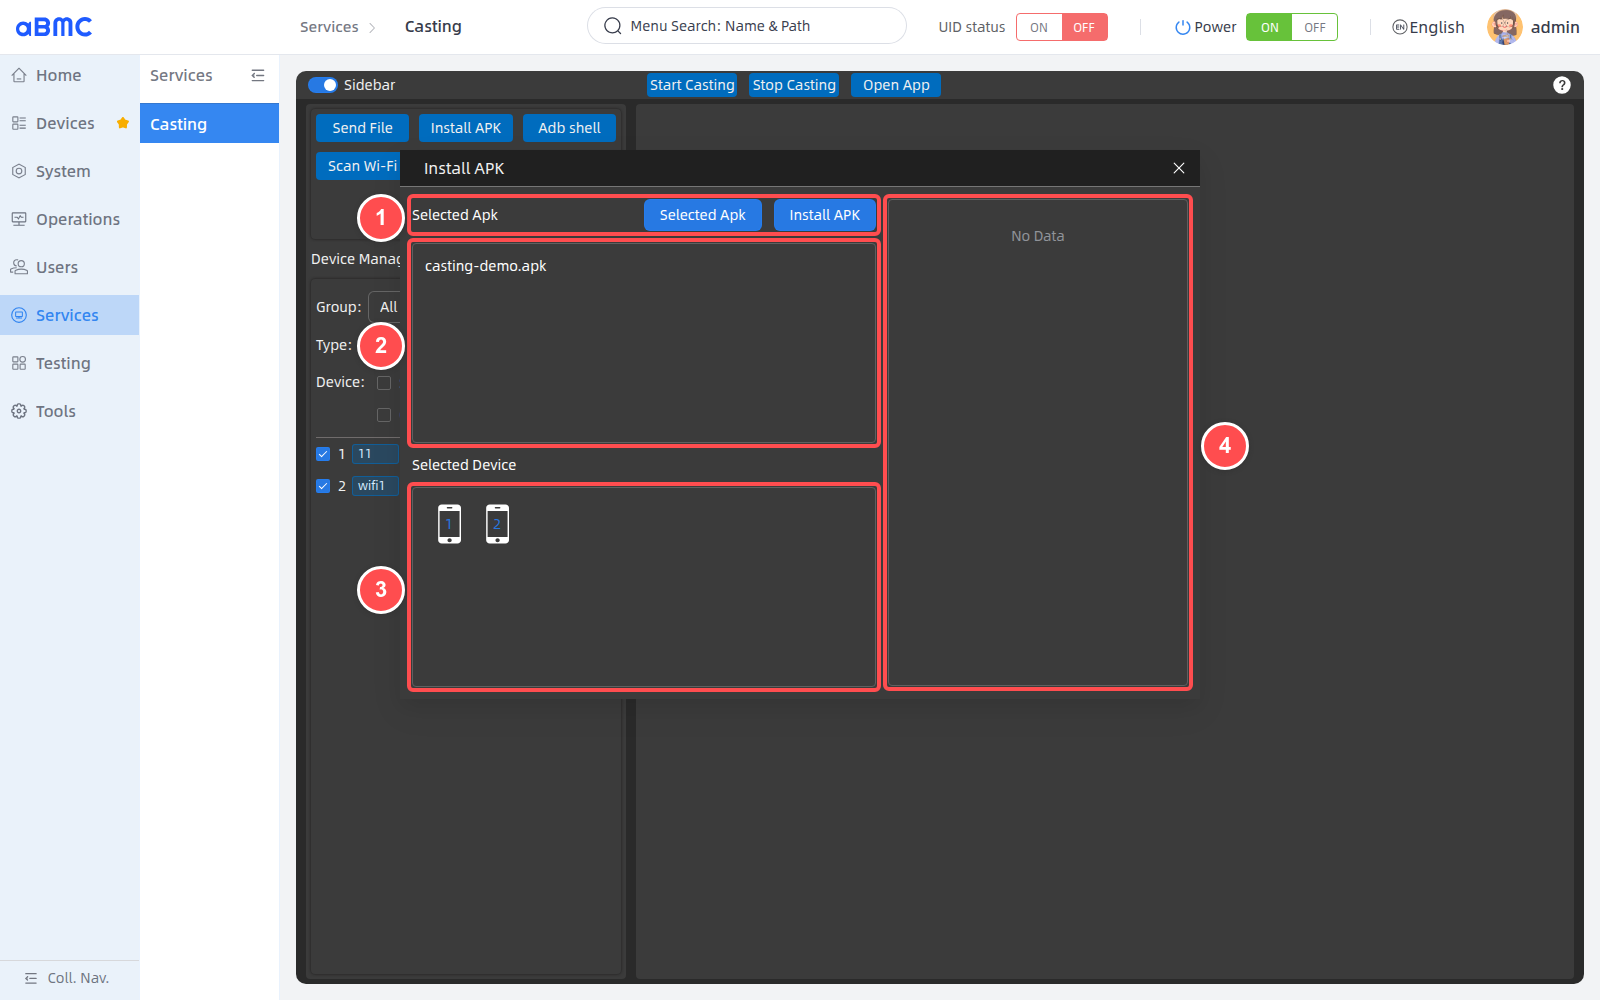
Select one or more target devices in the device list and click Install APK. After the window opens, follow the steps below:
- Click Selected Apk to select the installation package with the extension
.apk; up to 5 files can be selected at a time. Click Install APK after checking that everything is correct. - Check the name of the APK waiting to be installed in the file list.
- Review all target device serial numbers in Selected Device.
- Check the installation status of each device and each APK in the task tree on the right; if the installation fails, you can retry the failed task.
APK Installation Instructions
Before installation, you should confirm the source, package name, signature, Android version, processor architecture and upgrade coverage of the APK. Successful installation of one device does not mean successful installation of other devices.
Execute ADB Shell command
Select one or more target devices in the device list and click Adb shell. After the window opens, follow the steps below:
- Check all target device serial numbers in Selected Device.
- Select an existing shortcut command in the Command List.
- You can also enter the command directly and click Execute or press Enter to execute.
- Use Command Execution Result to expand or collapse the results, and use Clear to clear the records in this window.
- View the returned content of each device based on the timestamp and UDID.
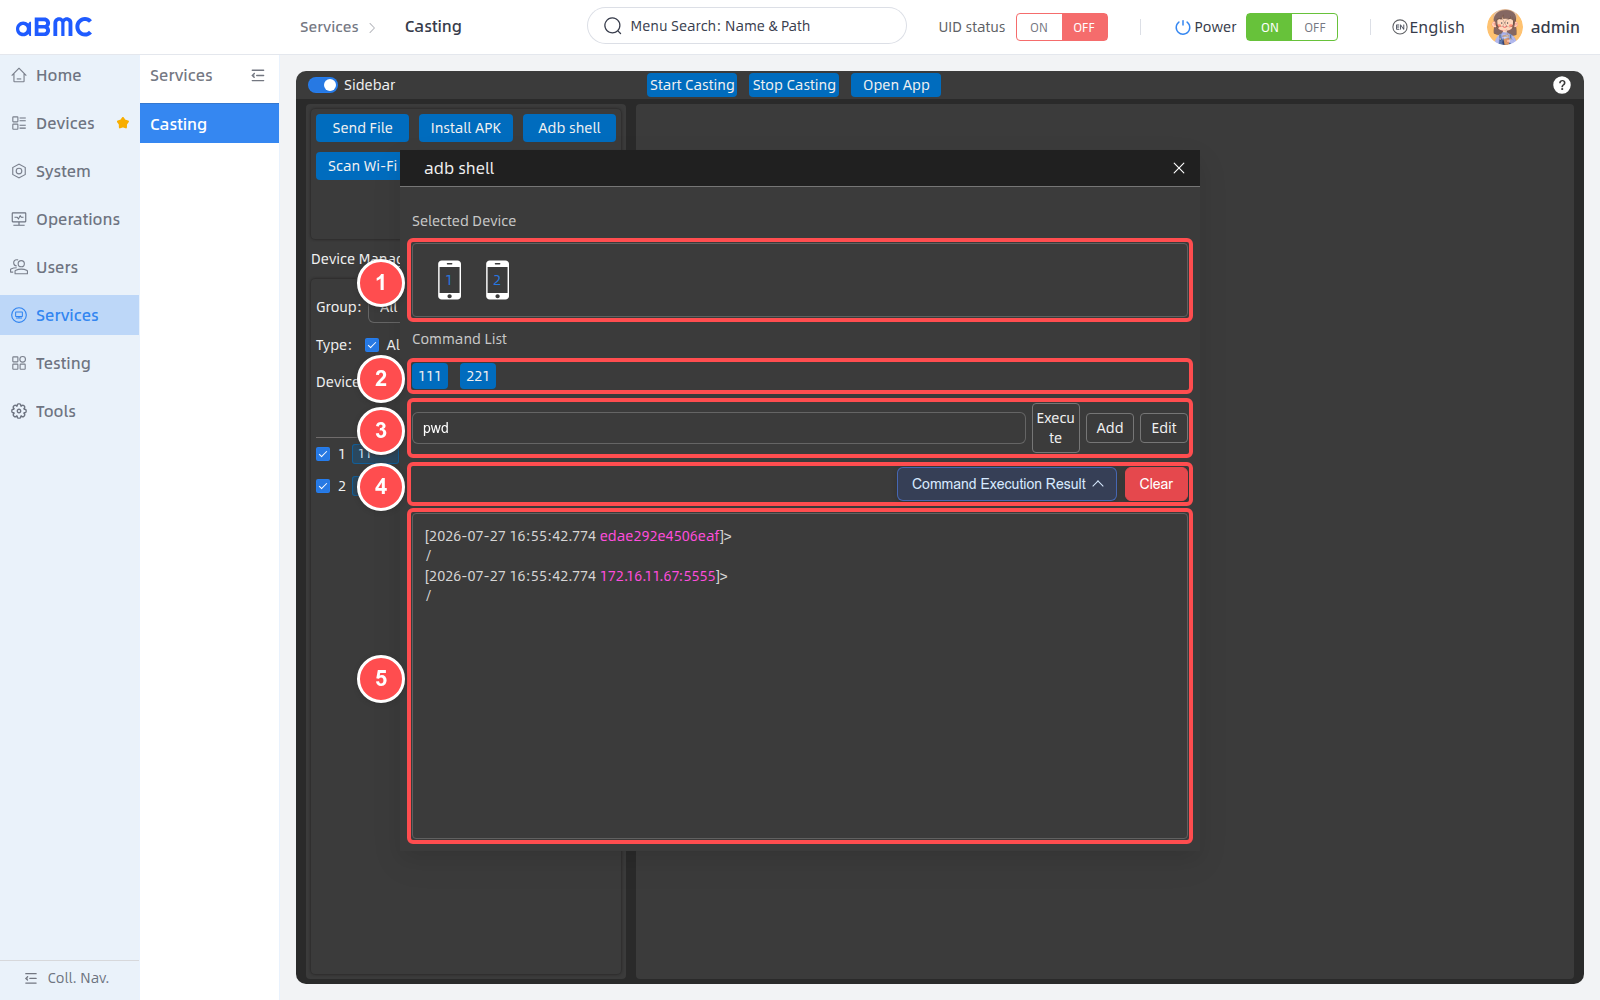
During actual verification, execute the read-only command pwd to the USB device and 172.16.11.67:5555 at the same time, and both devices return /.
Manage ADB shortcut commands
- Fill in the approved command in the command input box.
- Click Add, fill in the shortcut command name and command value, and then confirm to save.
- If you need batch maintenance shortcut commands, click Edit.
- Modify the name or command value in the editing window, and use the plus sign to add a new line and the minus sign to delete a line.
- Click Confirm to save changes.
ADB Shell command description
The same command is sent to all selected devices. ADB Shell commands may modify Android system configuration, application data or running status. Do not execute commands from unknown sources; it is recommended to first use read-only commands such as pwd and getprop to verify the target device and connection.
File and APK task status
| Status | Description | Handling suggestions |
|---|---|---|
| Waiting for Upload / Installation | The task has been created and is waiting to be processed. | Keep the window open and wait for the previous task to complete. |
| Uploading / Installing | File is being sent or APK is being installed. | Do not disconnect the device or refresh the page. |
| Upload Successful / Installation Successful | The current task on the current device has been completed. | Continue checking other equipment and file tasks. |
| Upload Failed / Installation Failed | The current task execution failed. | Check your connection, storage, APK compatibility, or device permissions and try again. |
Manage Wi-Fi devices and groups
Scan for Wi-Fi devices
Click Scan Wi-Fi to open the scan window and follow the image below:
- Fill in the scanning address range in Start IP and End IP. Fill in the same address when scanning a single device, such as
172.16.11.67. - Fill in the wireless ADB port range in Start Port and End Port. Fill in the same port when scanning a single port, for example
5555. - Click Scan and wait for the scan to complete. You can click Stop during the scanning process to abort the operation.
- Select the
IP:portto connect to in the scan results. - Click Link to enter the device label setting window.
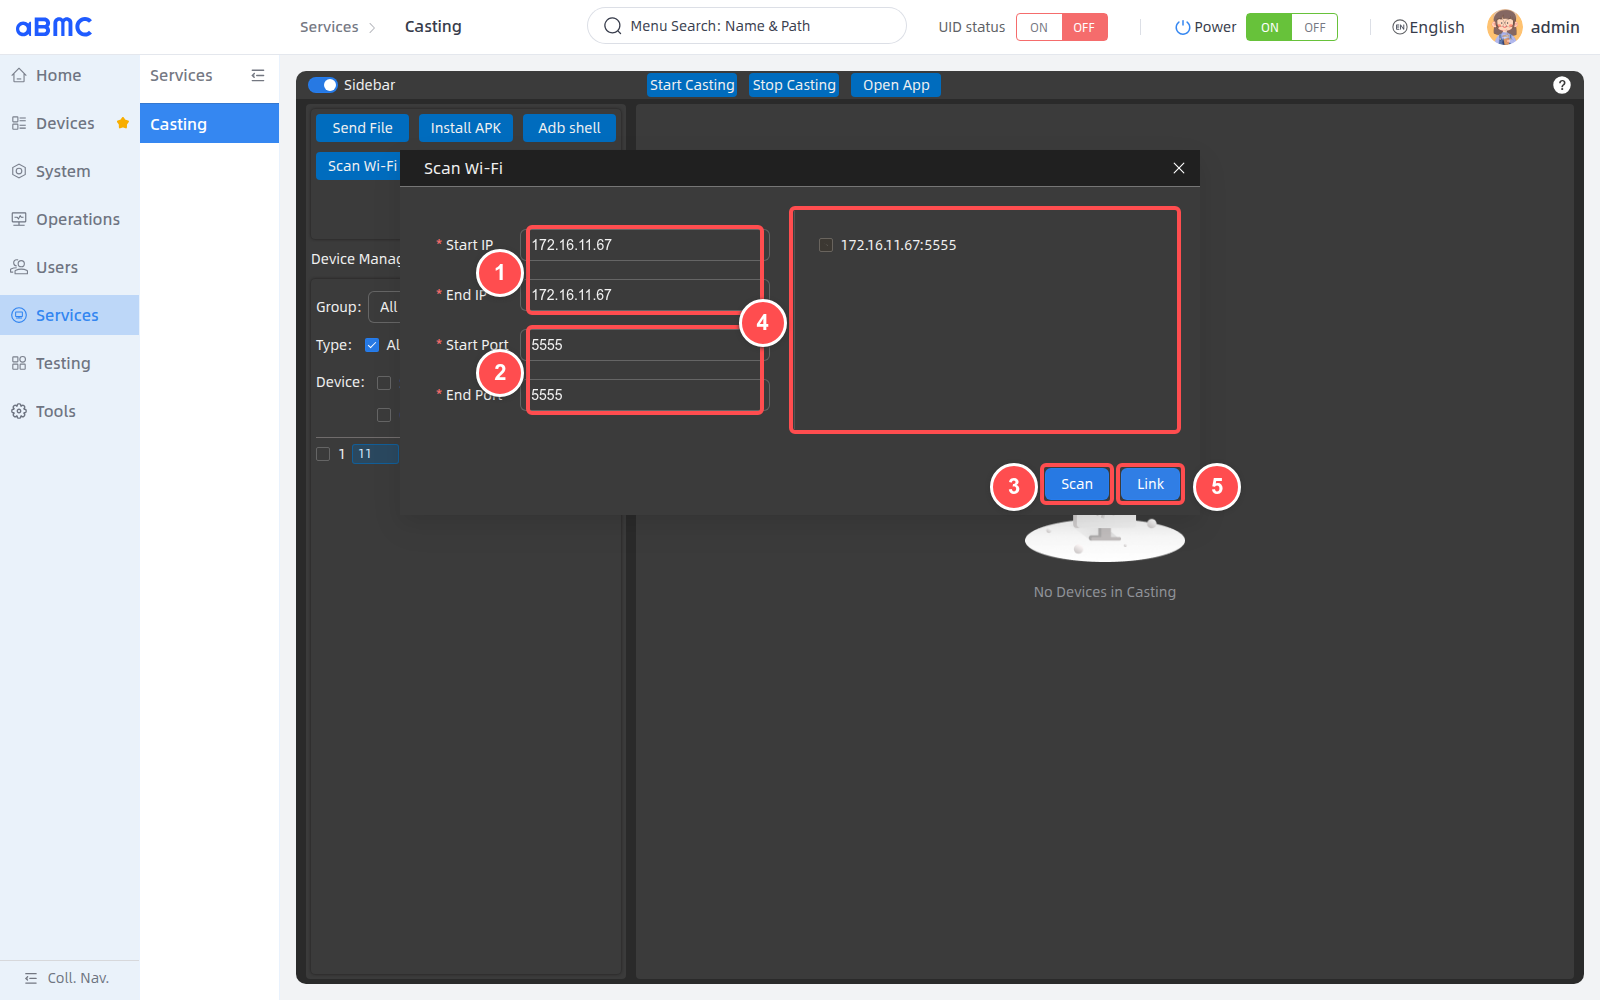
Connect to the scanned device
After opening the device label setting window, follow the steps below:
- Check the address of the device to be connected, such as
172.16.11.67:5555. - Fill in the label for the device for easy identification, such as
wifi1. - Confirm that the label meets the length and character requirements of the page prompts.
- Click Link and wait for the device to be added to the list.
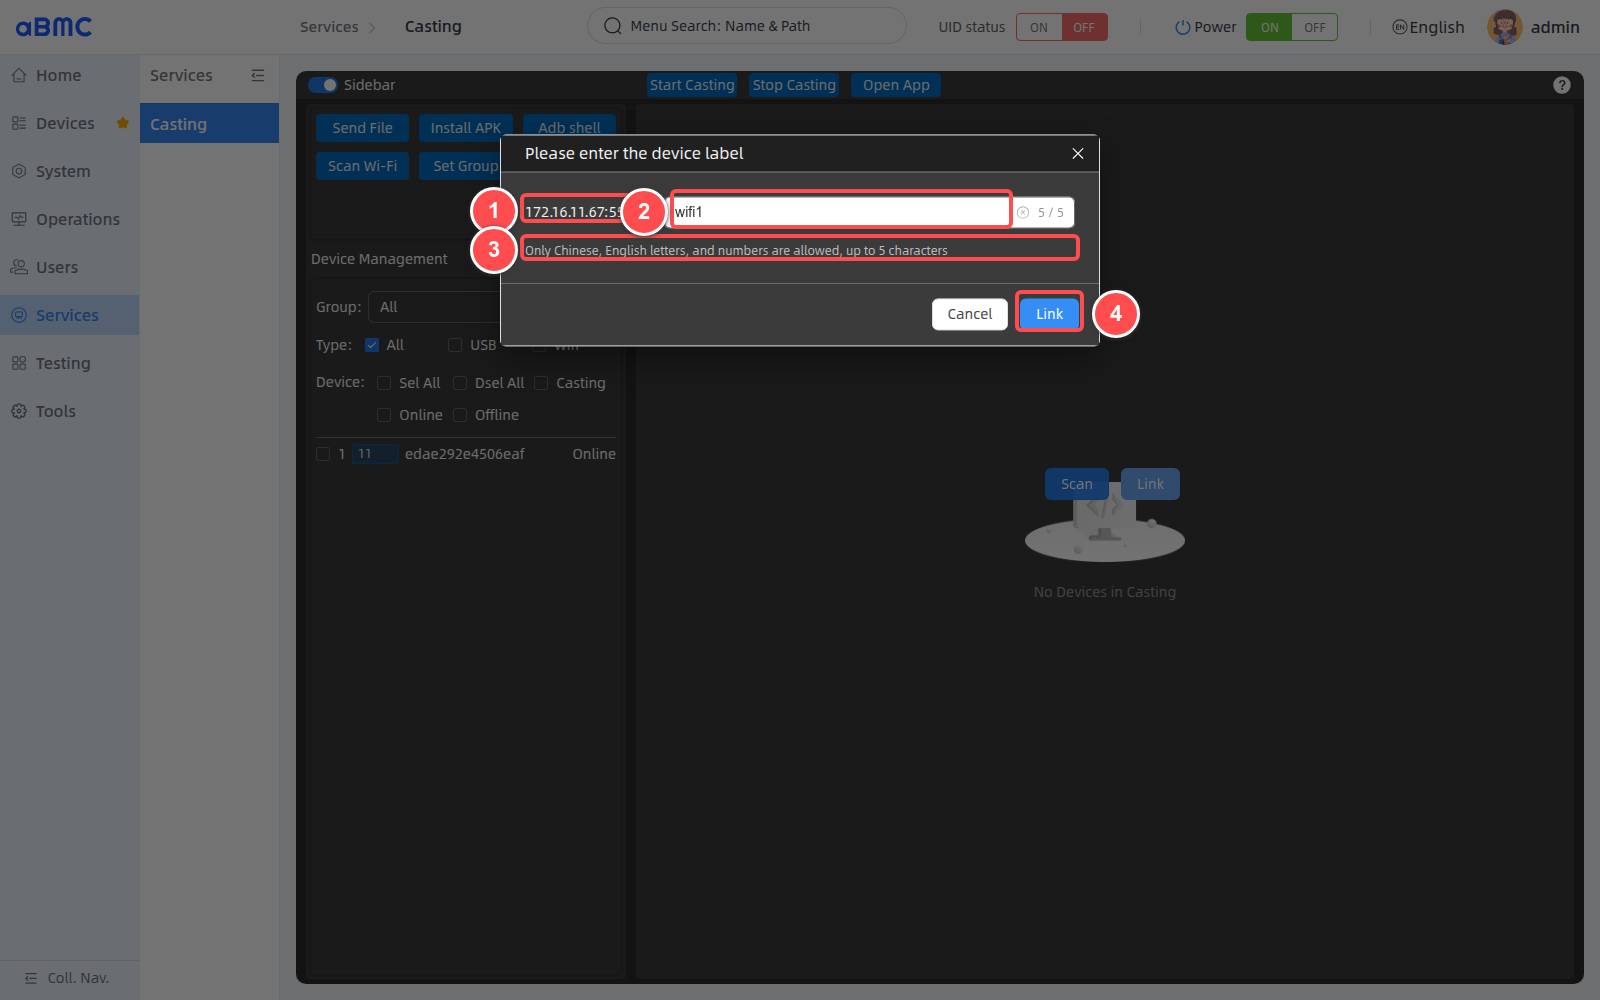
After the connection is complete, return to the device list and confirm that the device label, 172.16.11.67:5555, and Online status are all displayed.
Device tag rules
All four scan fields are required. Device labels are 1–5 characters long and can only use Chinese, English letters or numbers. The larger the scan range, the longer the completion time; it is recommended to narrow the IP and port range based on actual address planning.
Maintain Wi-Fi devices
A Wi-Fi device row displays IP:port, with a Wi-Fi icon and delete action on the right. Verify the device label and address before deletion. Deleting the row only removes the wireless ADB device record saved in aBMC; it does not change the wireless debugging configuration on the Android device.
Create device group
- Click the plus sign to the right of Group.
- Enter the group name in the Add Group window.
- Click Confirm to create the group.
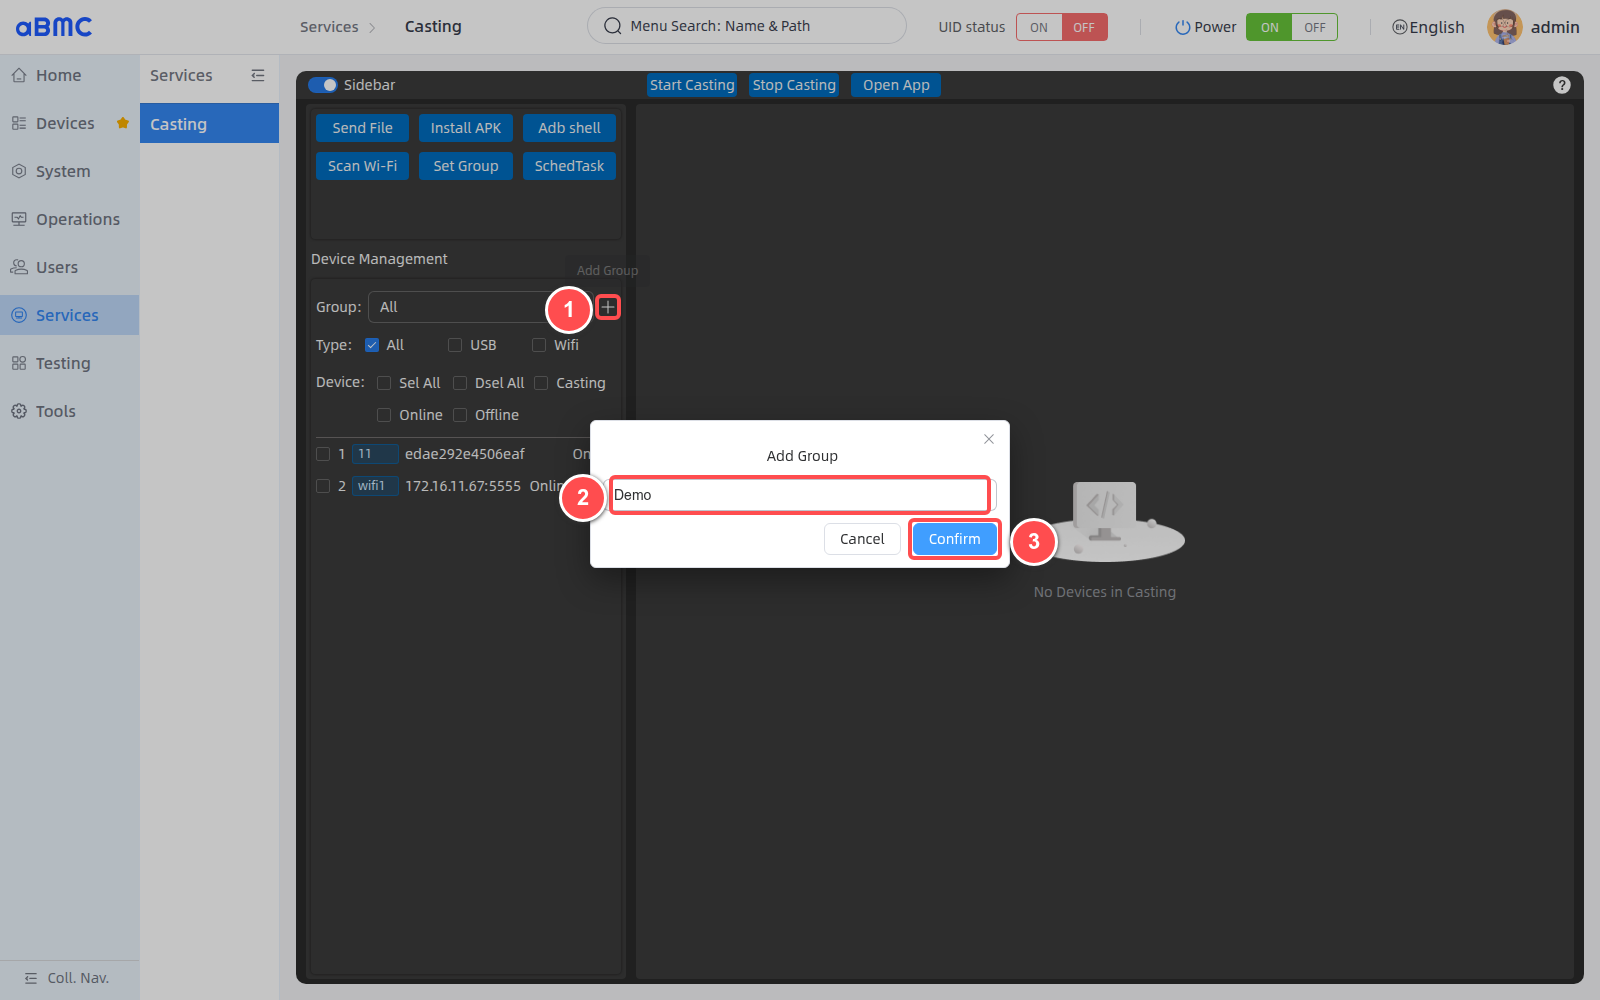
Modify or delete group
- Expand the Group drop-down list.
- Click the edit icon on the right side of the target group to modify the group name.
- When clicking the delete icon, confirm that the target group is correct before submitting the deletion.
- After changing the group, reselect the target group and confirm that the number of devices and the list range are correct.
Set group members
Click Set Group to open the group setting window, and then follow the image below:
- Select the group to be maintained at the top of the window.
- Select the device that needs to be added to the group in the Device List on the left.
- Use the middle arrow to add the device to the right, or to move the right device back to the left.
- Check the current group members in the group list on the right.
- Click Save to save the group membership.
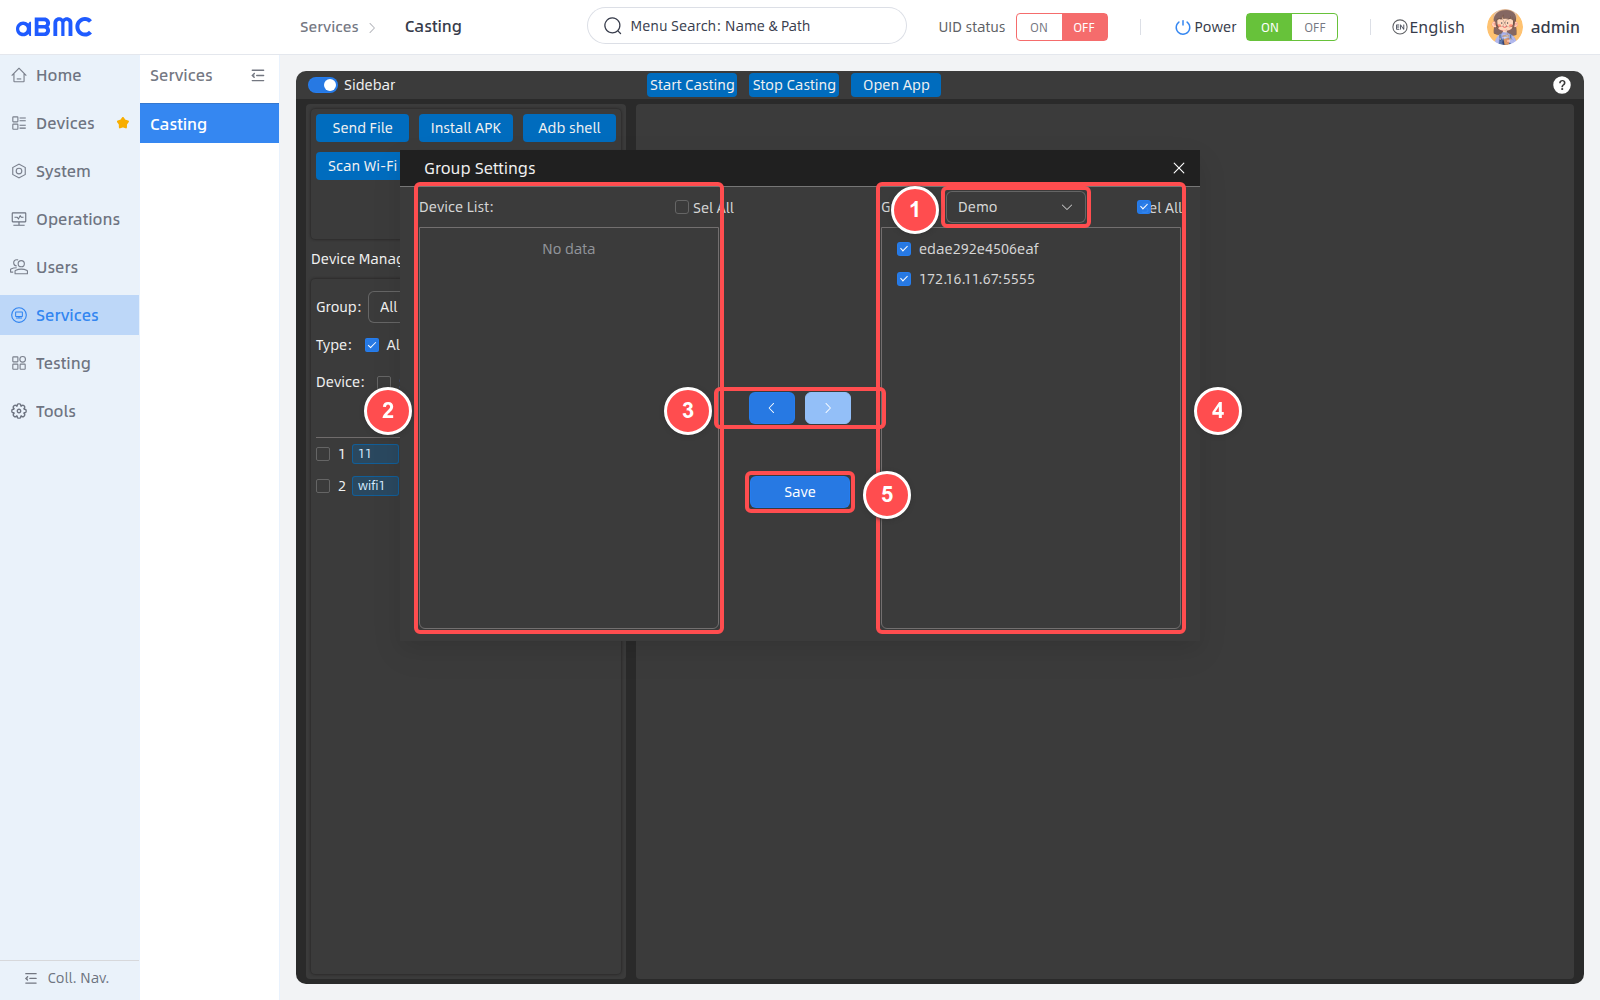
Group is empty
If the Set Group window displays No data or a group cannot be selected, first create a group using the plus sign to the right of Group. Grouping will affect the selection range of subsequent batch screencasting and device maintenance. After saving, you should return to the device list for review.
FAQ
1.Android device does not appear in the list
Check device power, USB or Wi-Fi connection, Android debugging settings, and authorization prompts. After confirming that the device can be recognized by aBMC, refresh the page.
The device displays Unauthorized
The device has been recognized, but the Android debugging authorization has not been completed or has expired. Check the authorization pop-up window on the device, reconnect the USB or wireless ADB, and confirm that the status returns to Online before casting the screen.
No preview after clicking Start Casting
Recheck the device selection and UDID, confirm the device is online, commissioning authorization is complete, and check the USB or Wi-Fi connection.
The preview screen turns black briefly
The video connection may be initializing, or the Android screen may be off or locked. Wait a few seconds and check the device screen and authorization pop-up window; if there is no screen for a long time, re-create the screencasting.
When casting in batches, only some devices will have a preview.
Click Casting to select the devices that have successfully cast, and click Online to check for devices that are still online but have not cast. Reduce the number of screens cast at a time and gradually increase the number after confirming that a small number of devices are stable.
6.Send File or Install APK is not available
First confirm that the target device has been selected, then open the corresponding window and click Selected File or Selected Apk to select the file. When no file is selected, the submit button remains disabled.
7.ADB Shell is not available
Check Android debugging authorization, ADB connection, device online status and current account permissions, and then execute the audited command after restoring the connection.
8.Scan Wi-Fi No results
Check IP and port ranges, wireless debugging configuration, and network connectivity. The target device must be selected after the scan is complete before Link becomes available.
9.Set Group shows No data
There may not be a group created yet, or there may be no devices that belong to the selected group. First use the plus sign on the right side of Group to create a group, then enter Set Group to select the device and save it.