



AgentForce
AgentForce is an AI digital employee management platform built on Hermes Agent and OpenClaw. It provides a visual web interface for creating, managing, and interacting with multiple AI digital employees. Each employee has an independent personality, memory, and skill set, along with autonomous learning and task execution capabilities.
Platform Support
| Platform & OS | Supported |
|---|---|
| K1 Buildroot | ❌ No |
| K1 OpenHarmony | ❌ No |
| K1 Bianbu LXQT/GNOME | ✅ Yes |
| K3 Buildroot | ❌ No |
| K3 OpenHarmony | ❌ No |
| K3 Bianbu LXQT/GNOME | ✅ Yes |
Key Features
- Digital Employee Management: Create, edit, and delete AI employees, each with an independent personality, memory, and skill set
- Seven Employee Templates: Product Manager, Code Documentarian, Schedule Manager, Security Engineer, Contract Reviewer, Meituan Coupon Assistant, and Competitive Intelligence Analyst
- Multi-Employee Parallelism: Manage multiple employees simultaneously with one-click switching
- Streaming Conversations: SSE-based real-time streaming responses with tool calling and approval workflows
- Multi-Model Support: Compatible with OpenAI, Anthropic, MiniMax, Kimi, OpenRouter, and custom endpoints
- Scheduled Tasks: Employees can run background cron jobs and push results
- File Management: Built-in workspace file browser with preview, editing, and upload capabilities
- Autonomous Learning: Employees automatically accumulate memories and skills across sessions
Architecture
AgentForce uses a frontend/backend separation architecture:
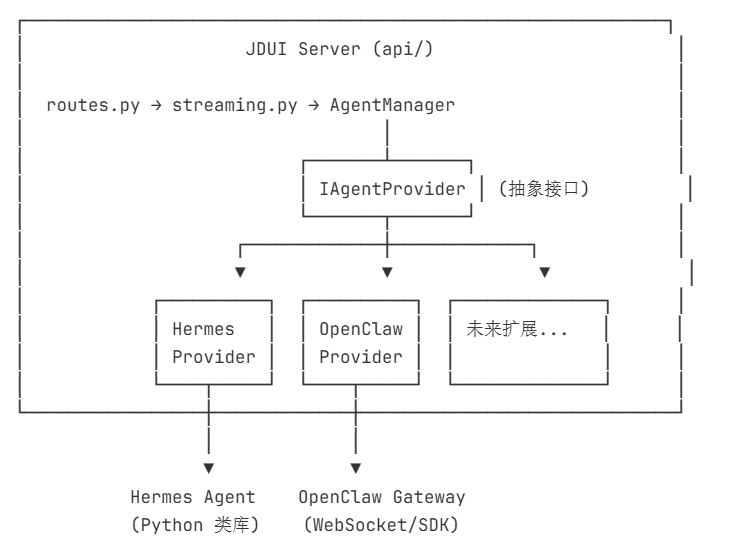
Browser (Vue 3 + Vite frontend)
    ↓ HTTP REST + SSE
Node.js Server (port 8881) — Static file serving + API proxy
    ↓ HTTP REST
Python Backend (port 8787) — AgentForce WebUI
    ↓ Python import
Hermes Agent / OpenClaw (AI Engine)
    ↓ API calls
LLM Providers (OpenAI / Anthropic / MiniMax / etc.)Backend: Python 3.12+, using the standard-library HTTPServer with no framework dependency; lightweight and efficient
Frontend: Vue 3 + Vite (TypeScript), with the Ant Design Vue component library
Communication: HTTP REST for CRUD operations and SSE for real-time streaming responses
Data Storage: Local JSON files; no database required
Installation
Option 1: apt Installation (Recommended)
Install directly through apt on Bianbu OS:
sudo apt update
sudo apt install bianbu-agentforce
The service starts automatically after installation. It is available in a browser at http://127.0.0.1:8881.
Option 2: Source Installation (For Developers)
This method is intended for users who need to modify the codebase or contribute to development.
Clone the Repository
git clone git@gitlab.dc.com:bianbu/ai/agentforce.git
cd agentforce
git checkout hermesClaw
Install Dependencies
pip3 install -r requirements.txtStart the Service
# Local access only
python3 server.py

# LAN access
HERMES_WEBUI_HOST=0.0.0.0 python3 server.py

# With access password
HERMES_WEBUI_HOST=0.0.0.0 HERMES_WEBUI_PASSWORD=your-secret python3 server.py
First-Time Setup: Installation Wizard
When http://127.0.0.1:8787 is opened for the first time, the AgentForce installation wizard launches automatically and guides the initial setup process:
- Agent Platform Selection — Select Hermes Agent or OpenClaw
- Environment Detection & Installation — Detect installation status automatically; install with a sudo password if needed
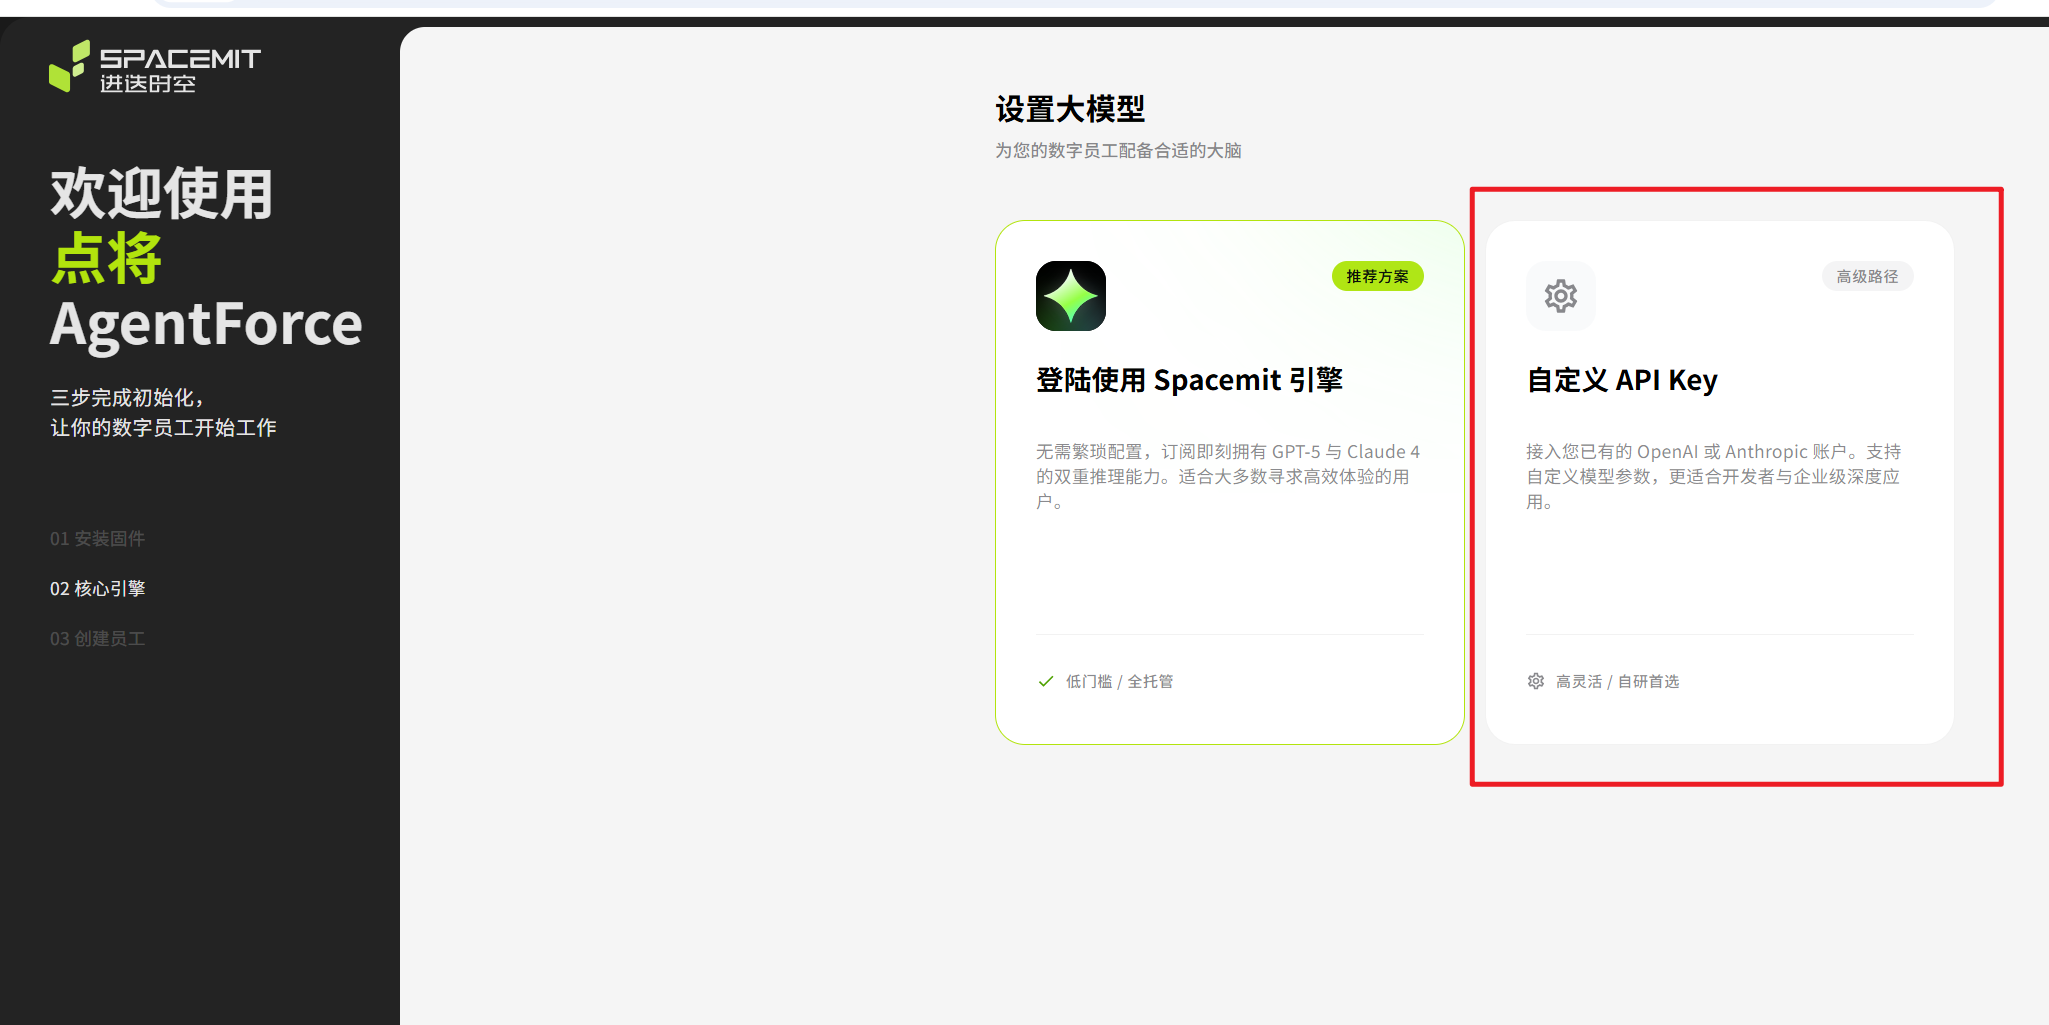
- Model Engine Configuration — Select SpacemiT Engine or a custom API
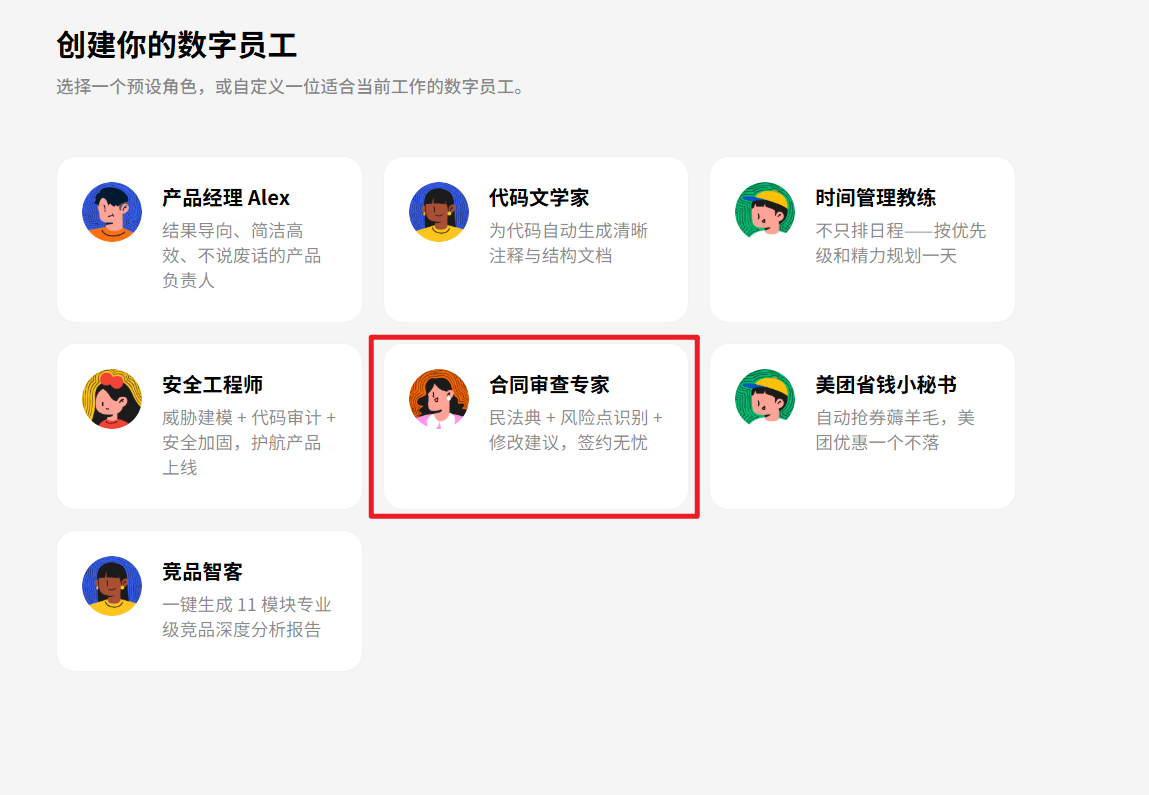
- Employee Template Selection — Select from seven preset templates
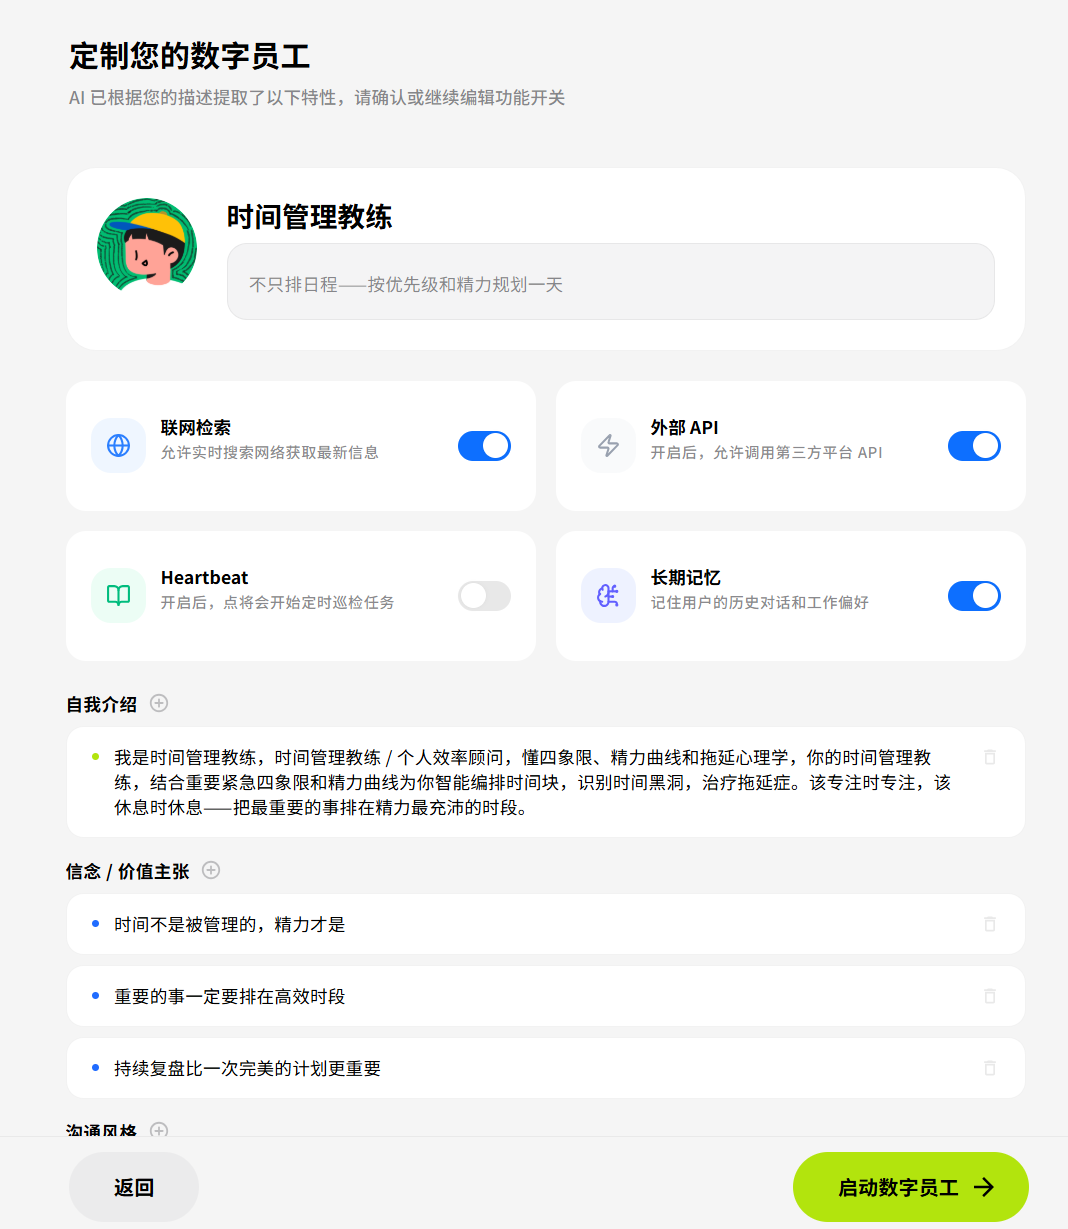
- Employee Customization — Edit name, description, and emoji avatar
- Configuration Review — View summary and toggle capability switches
- Complete — Automatically navigate to the employee chat page
Employee Templates
| Template | Avatar | Use Case |
|---|---|---|
| Product Manager | 🧑💼 | Requirements analysis, product planning, user research |
| Code Documentarian | 🧑💻 | Code comments, documentation generation, architecture explanation |
| Schedule Manager | 📅 | Schedule planning, reminders, time management |
| Security Engineer | 🔒 | Code audits, vulnerability detection, security recommendations |
| Contract Reviewer | 📄 | Contract clause analysis, risk identification |
| Meituan Coupon Assistant | 🍔 | Coupon information lookup and push notifications |
| Competitive Intelligence Analyst | 🔍 | Competitor analysis, market research |
Each employee can be customized with a name, description, avatar, and the following capability toggles:
| Capability | Description |
|---|---|
| Web Search | Access online information in real time |
| Long-term Memory | Retain user preferences and context across sessions |
| Autonomous Execution | Execute terminal commands (requires approval) |
| Knowledge Base Integration | Read and write workspace files |
Configuration
Environment Variables
| Variable | Default | Description |
|---|---|---|
HERMES_WEBUI_HOST | 127.0.0.1 | Bind address; use 0.0.0.0 for LAN access |
HERMES_WEBUI_PORT | 8787 | Backend port |
HERMES_WEBUI_PASSWORD | None | Access password (optional) |
HERMES_WEBUI_STATE_DIR | ~/.hermes/webui | Data storage directory |
HERMES_HOME | ~/.hermes | Hermes home directory |
Model Configuration
For Hermes Agent mode, edit ~/.hermes/profiles/emp-xxx/config.yaml:
model:
  default: MiniMax-M2.7-highspeed
  provider: custom
  base_url: https://api.minimaxi.com/v1
  api_mode: chat_completions

custom_providers:
- name: minimax-cn
  base_url: https://api.minimaxi.com/v1
  api_key: your_key_here
  api_mode: chat_completions
  model: MiniMax-M2.7-highspeed
Store API keys in the .env file in the same directory:
MINIMAX_CN_API_KEY=your_key_here
MINIMAX_CN_BASE_URL=https://api.minimaxi.com/v1
Supported LLM Providers
| Provider | Environment Variable |
|---|---|
| OpenAI | OPENAI_API_KEY |
| Anthropic | ANTHROPIC_API_KEY |
| MiniMax (Global) | MINIMAX_API_KEY |
| MiniMax (China) | MINIMAX_CN_API_KEY |
| Kimi / Moonshot | KIMI_API_KEY |
| OpenRouter | OPENROUTER_API_KEY |
| Custom OpenAI-compatible endpoint | Configure in config.yaml |
Main Interface
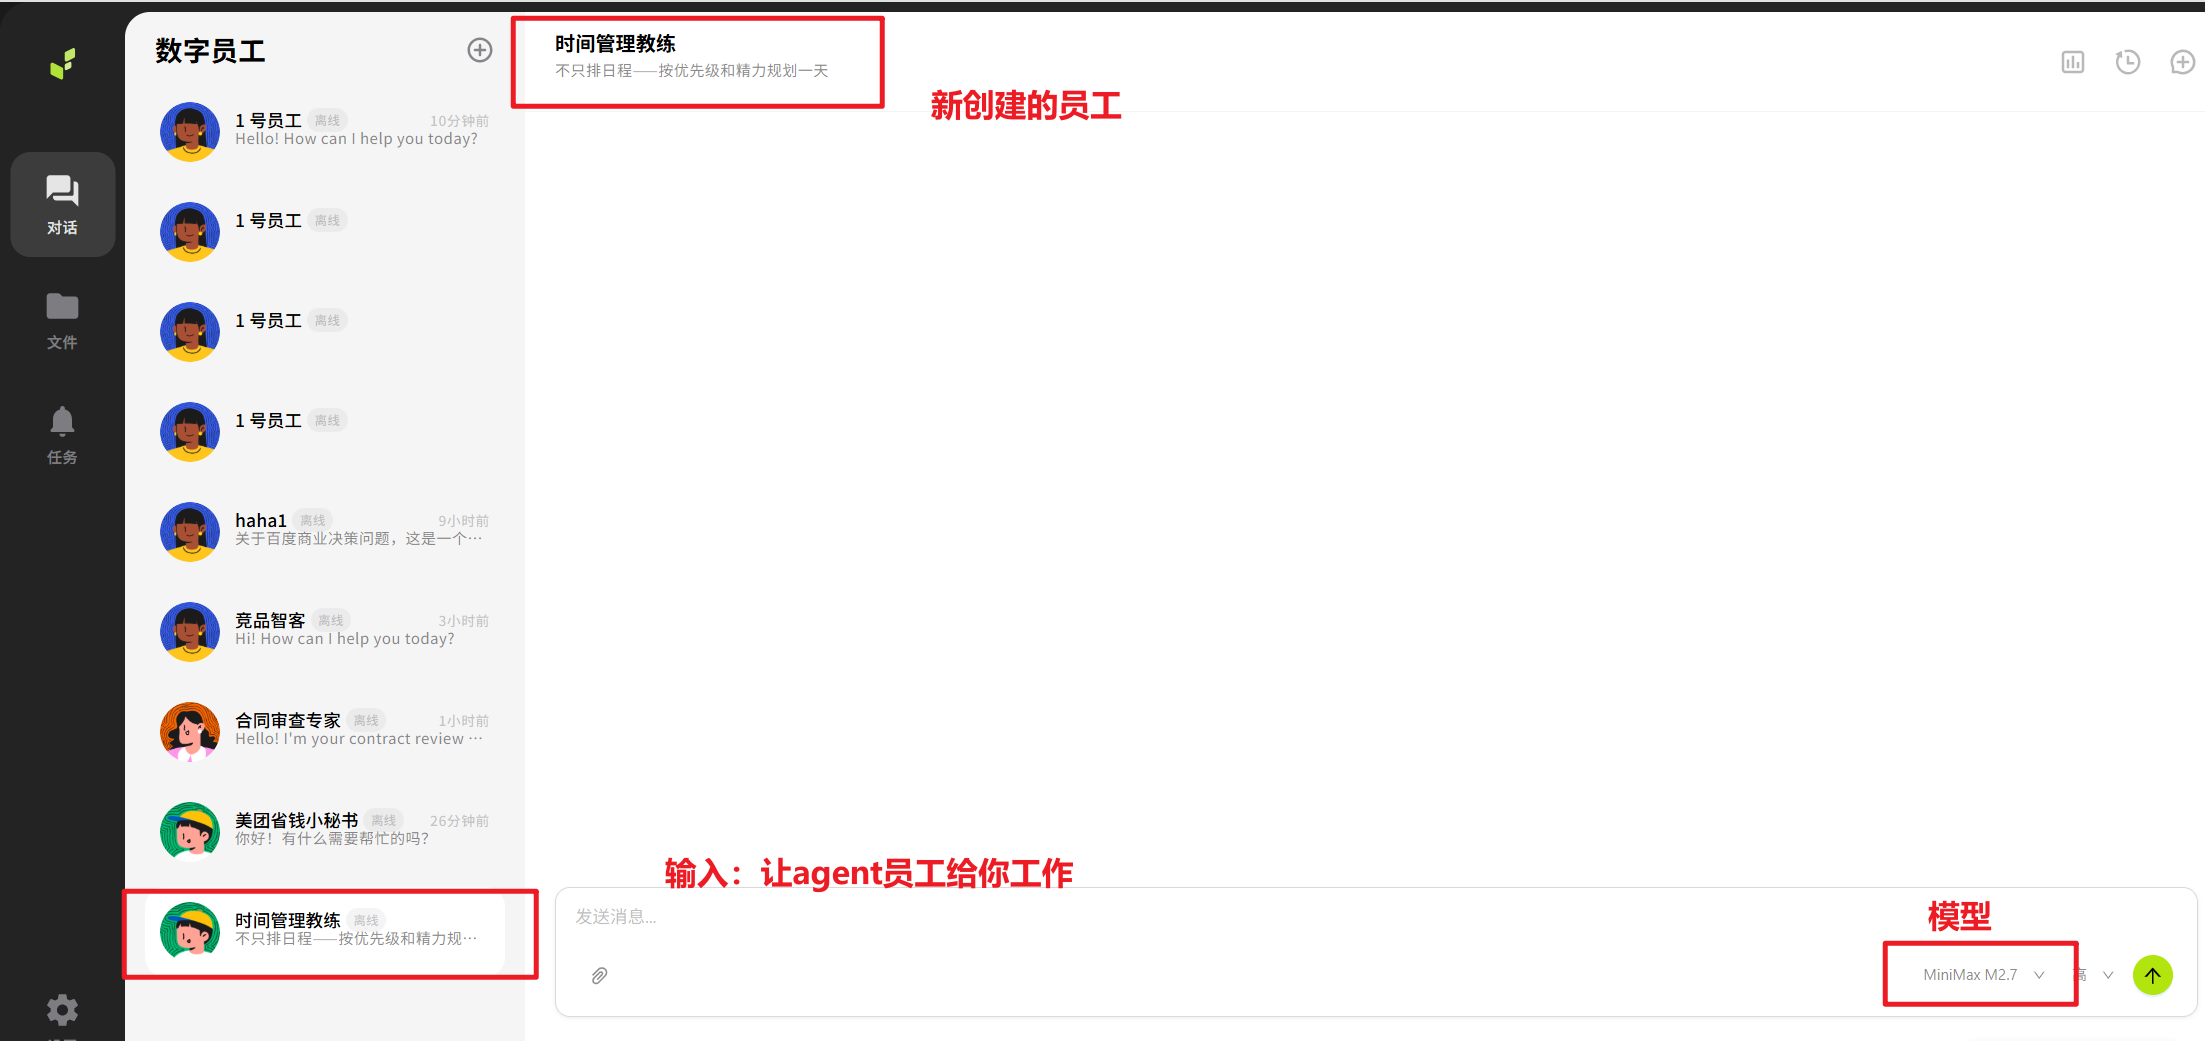
- Employee Panel: Lists all digital employees and supports adding, editing, and deletion
- Chat Interface: Provides real-time streaming conversations with the selected employee, with tool execution progress shown inline
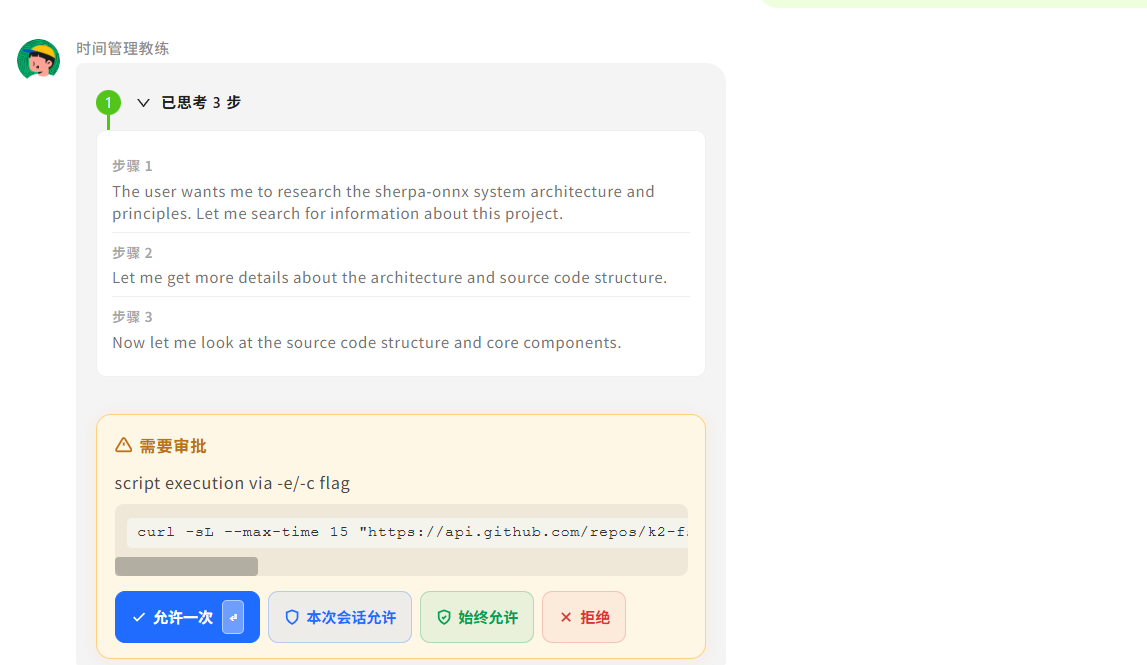
- Approval Workflow: Displays confirmation prompts for sensitive operations such as terminal commands and file writes
- Session Management: Supports browsing conversation history, search, archiving, and export
- File Browser: Provides workspace file management with preview and editing support
- Skills & Memory: Displays and manages the skills and long-term memory accumulated by each employee
- Scheduled Tasks: Supports creation and monitoring of background cron jobs
Tutorial: K3 pico-ITX Bianbu OS LXQT
This tutorial describes the complete installation and usage flow on a K3 pico-ITX board running Bianbu OS LXQT.
Step 1: Install AgentForce
Note: Installation currently uses the company's internal package repository. Ensure that
https://archive.bianbu.xyz/bianbu4is configured in advance.
Open a terminal and run:
sudo apt update
sudo apt install bianbu-agentforce
Wait for the installation to complete. Compared with manually setting up a native agent, the apt method is fully automated and significantly easier to start with.
Step 2: Open AgentForce
Once installation is complete, open a browser and navigate to:
http://127.0.0.1:8881/#/onboardingThe guided installation wizard launches automatically.
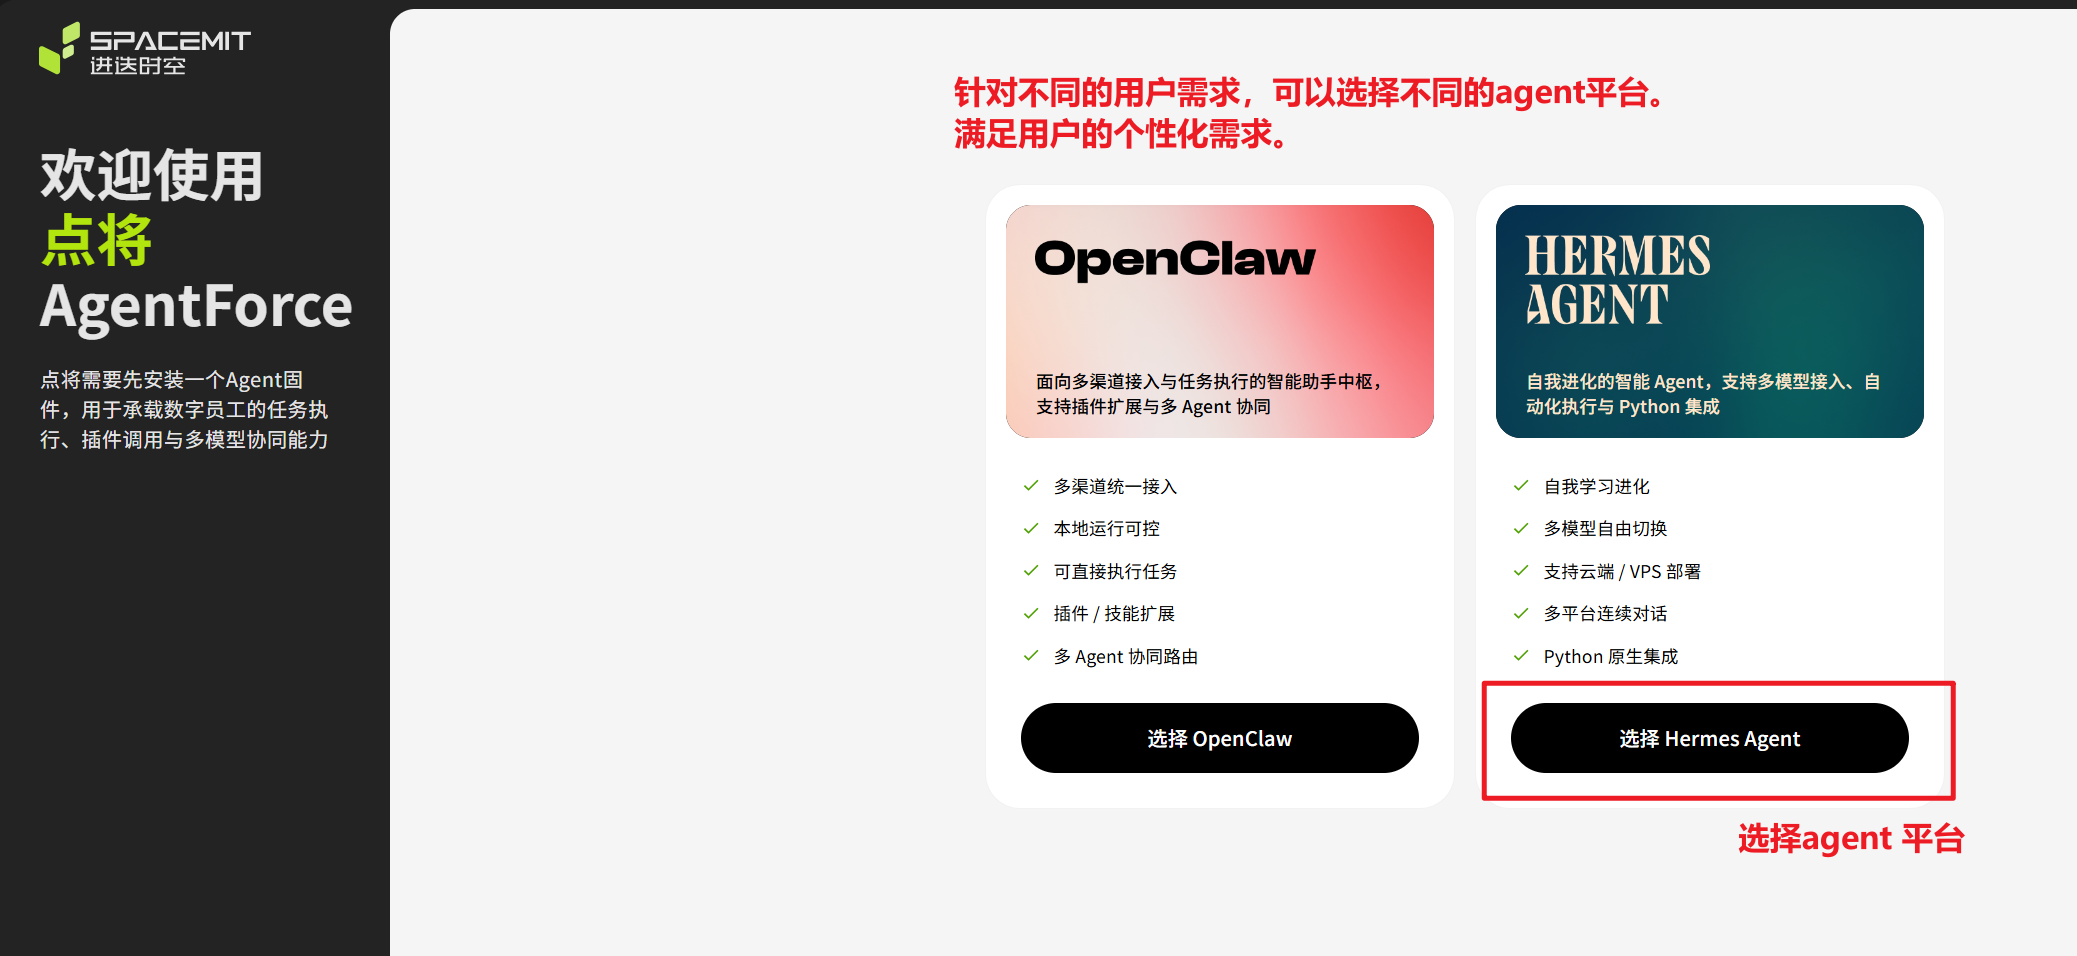
Step 3: Install the Agent Package
The wizard automatically detects the agent runtime environment. If it is not yet installed, click Install and enter the sudo password to authorize installation of the hermes-agent package.
Wait for the installation to finish. This usually takes approximately 1–3 minutes, and real-time logs are displayed on the page.
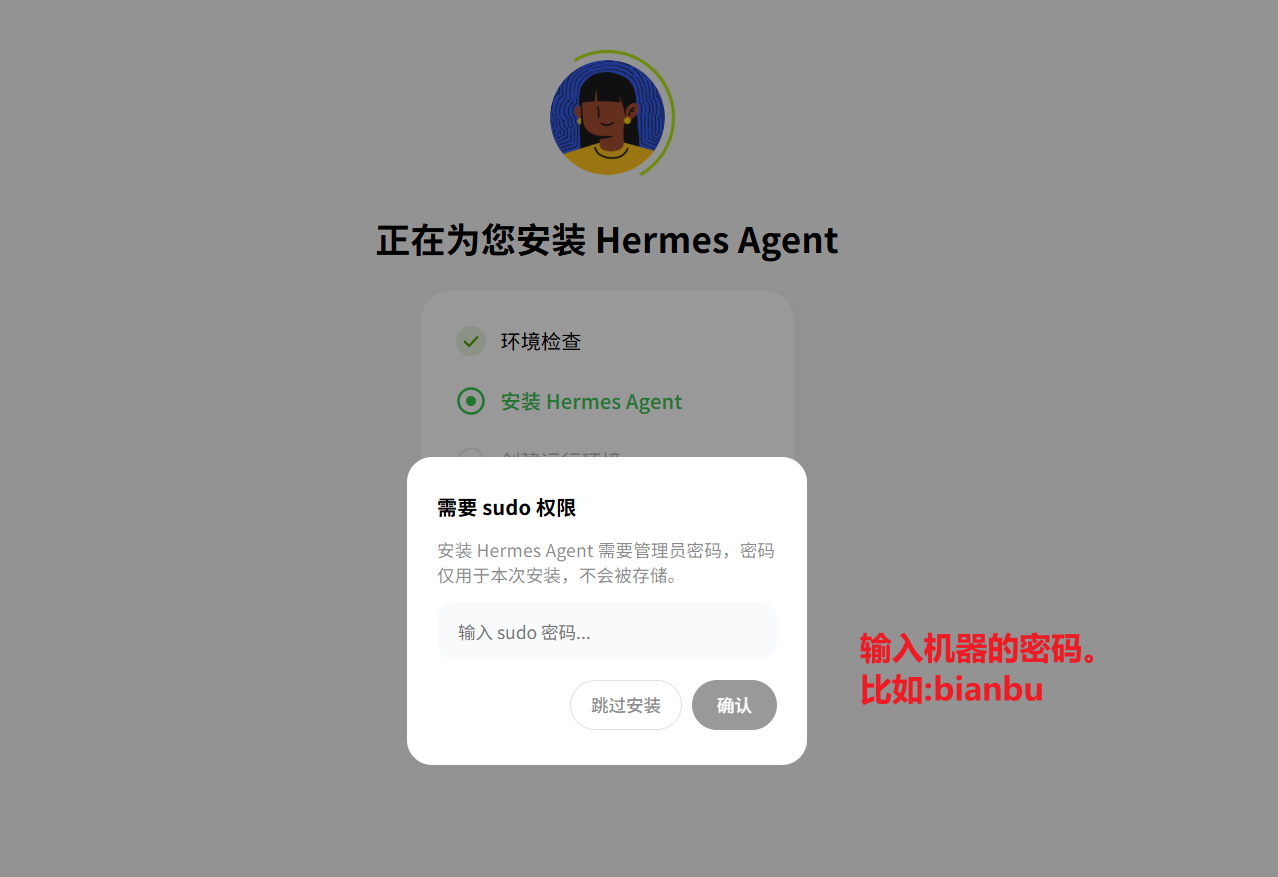
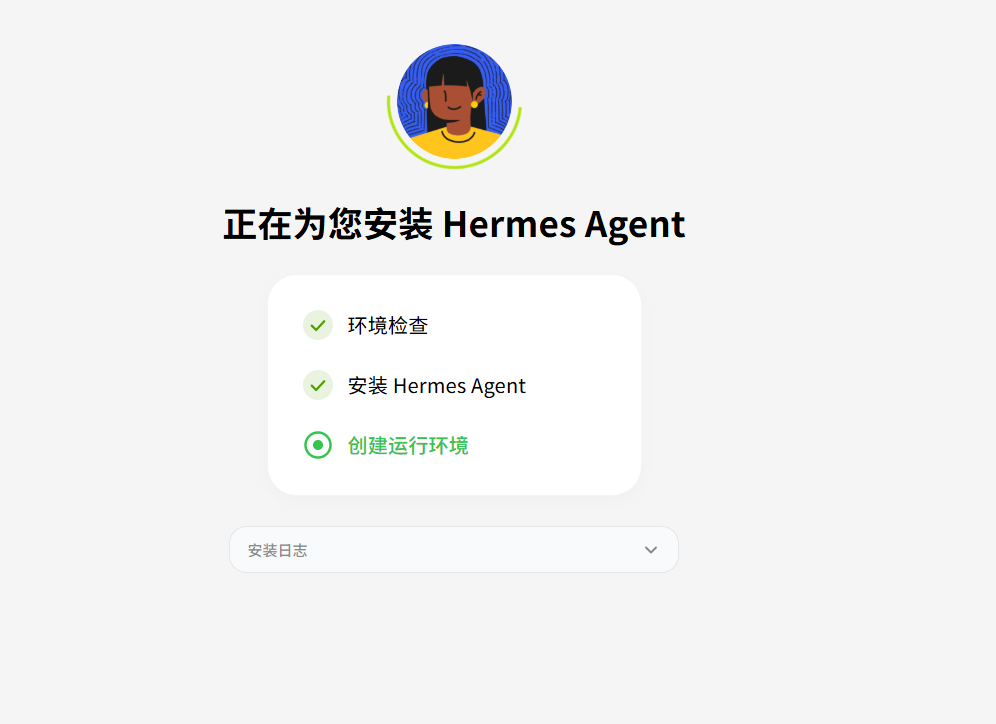
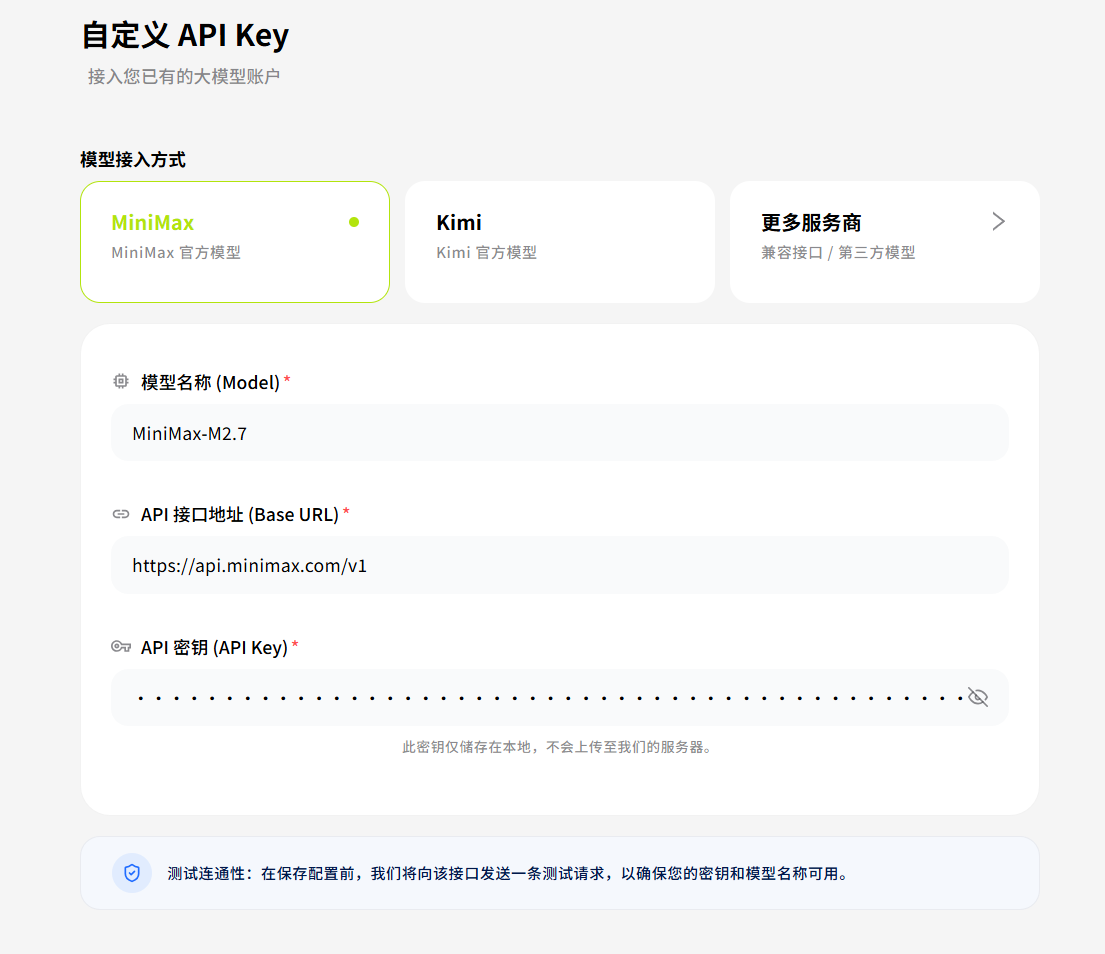
Step 4: Configure the Model
Enter the LLM API credentials. The following demo API key can be used for a quick start:
| Field | Value |
|---|---|
| API Key | sk-cp-vkEj751v_1aM*********************************** |
| Base URL | https://api.minimax.com/v1 |
| Model Name | MiniMax-M2.7 |
Enter a valid API key, or leave the field empty and click Next. The system automatically assigns a default API key for demonstration purposes.
Step 5: Select and Customize a Digital Employee
Select one of the seven preset templates, or customize the name, description, and avatar to create a custom digital employee.
Step 6: Start Chatting
Once the chat page is opened, tasks can be assigned to the digital employee. The agent continues exploring solutions until the task is completed or human approval is required.
Approval Workflow: When the agent needs to run a terminal command or perform another sensitive operation, an approval dialog appears. The operation can be allowed once, allowed for the session, or denied.
If streaming output fails, the cause may be a frontend issue. Report it through the issue tracker.
Example Use Cases
Product Manager
Q: Research a competitor product and produce an analysis report
QA Engineer
Q: Analyze the edge cases in this code and generate test cases
Technical Writer
Q: Generate API reference documentation from the following code
Developer — Scenario 1: Research an open-source project
Q: Research the system architecture and principles of sherpa-onnx
Developer — Scenario 2: Research a hardware platform
Q: Research the AI instructions, programming examples, system architecture, principles, and hardware structure of the Spacemit K3 A100
FAQ
Context limit warning
After an extended conversation, the page may display "⚠ Context approaching limit, consolidating memory." Wait 1–3 minutes for the agent to automatically compress the context, and then continue the conversation without restarting the session.
Reporting issues
If any issues are encountered, file a report in the project's issue tracker for follow-up.