



Hardware Function Usage
Login
There are two ways to login to AIBOX PRO, one is via Console (Debug serial), the other is via HDMI.
Console Login
Type-C Connects to the Console port. The login account is root. By default, the root password is not set.
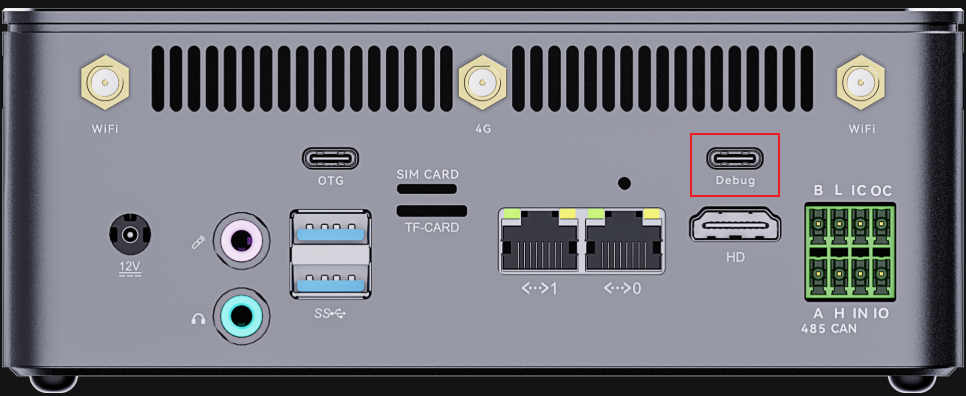
Use the following serial port parameters:
- Baud rate: 115200
- Data bit: 8
- Stop bit: 1
- Parity check: None
- Flow control: None
HDMI Login
When logging in via the HDMI, it automatically logs in as the user firefly, with the password also being firefly.
Watchdog
Main Module
The device names for the external watchdogs is /dev/wdt_core. For example, using /dev/wdt_core, the procedure is as follows:
# Write to different fields to enable the watchdog and set the time.
# The numbers 0, 1, 2, and 3 represent 0.64s, 2.56s, 10.24s, and 40.96s, respectively.
# The letter 'e' indicates enabling the watchdog, while the letter 'd' indicates disabling it.

# Enable and set the timer for 10.24 seconds. You need to write to it once every 10.24 seconds. You can also write different numbers at any time to change the timing.
echo e >/dev/wdt_core //Enable
echo 2 >/dev/wdt_core //Set the timeout to 10.24 seconds.
Main Board
The device names for the external watchdogs is /dev/wdt_base. For example, using /dev/wdt_base, the procedure is as follows:
# Write to different fields to enable the watchdog and set the time.
# The numbers 0, 1, 2, and 3 represent 0.64s, 2.56s, 10.24s, and 40.96s, respectively.
# The letter 'e' indicates enabling the watchdog, while the letter 'd' indicates disabling it.

# Enable and set the timer for 10.24 seconds. You need to write to it once every 10.24 seconds. You can also write different numbers at any time to change the timing.
echo e >/dev/wdt_base //Enable
echo 2 >/dev/wdt_base //Set the timeout to 10.24 seconds.
RTC
Introduction
AIBOX PRO has an external RTC powered by a capacitor on the external motherboard, which ensures the RTC continues to run for a short period after power loss. In the kernel, it is represented as rtc0.
Interface Usage
Linux provides three user-space interfaces for interacting with the RTC. The paths are:
- SYSFS interface: /sys/class/rtc/rtc0/
- PROCFS interface: /proc/driver/rtc
- IOCTL interface: /dev/rtc0
Synchronize the current system time to the RTC.
hwclock -wSYSFS interface
You can directly use cat and echo to operate the interfaces under /sys/class/rtc/rtc0/.
For example, to view the current RTC date and time:
# cat /sys/class/rtc/rtc0/date
2024-07-10
# cat /sys/class/rtc/rtc0/time
02:36:30
PROCFS interface
To print RTC-related information:
# cat /proc/driver/rtc
rtc_time        : 02:37:00
rtc_date        : 2024-07-10
alrm_time       : 00:00:00
alrm_date       : 1970-01-01
alarm_IRQ       : no
alrm_pending    : no
update IRQ enabled      : no
periodic IRQ enabled    : no
periodic IRQ frequency  : 1
max user IRQ frequency  : 64
24hr            : yes
IOCTL interface
You can use ioctl to control /dev/rtc0。
For detailed usage instructions, please refer to document kernel-jammy-src/Documentation/admin-guide/rtc.rst 。
Bluetooth
AIBOX PRO supports wireless bluetooth, you can display the bluetooth device information through hciconfig -a command:
linaro@bm1684:~$ hciconfig -a
hci0:	Type: Primary  Bus: USB
	BD Address: 20:57:9E:BA:7C:EC  ACL MTU: 1021:8  SCO MTU: 255:16
	UP RUNNING
	RX bytes:650 acl:0 sco:0 events:41 errors:0
	TX bytes:2170 acl:0 sco:0 commands:41 errors:0
	Features: 0xff 0xff 0xff 0xfa 0xdb 0xbd 0x7b 0x87
	Packet type: DM1 DM3 DM5 DH1 DH3 DH5 HV1 HV2 HV3
	Link policy: RSWITCH HOLD SNIFF PARK
	Link mode: SLAVE ACCEPT
	Name: 'bm1684'
	Class: 0x000000
	Service Classes: Unspecified
	Device Class: Miscellaneous,
	HCI Version: 4.2 (0x8)  Revision: 0xaba8
	LMP Version: 4.2 (0x8)  Subversion: 0xa0cd
	Manufacturer: Realtek Semiconductor Corporation (93)
Note that if the following error message is printed:
Can't open HCI socket.: Address family not supported by protocolThen there may be a problem with the dependencies of the loadable modules. At this time, reload the dependencies and soft restart:
sudo -i
depmod -a
reboot
Check whether it is currently the master device or the slave device:
linaro@bm1684:~$ hciconfig hci0 lm
hci0:	Type: Primary  Bus: USB
	BD Address: 20:57:9E:BA:7C:EC  ACL MTU: 1021:8  SCO MTU: 255:16
	Link mode: SLAVE ACCEPT # slave device
Start the PulseAudio service as a media device:
linaro@bm1684:~$ pulseaudio --start --log-target=syslogThe steps to connect a Bluetooth device are as follows:
(1) Start the Bluetooth controller tool:
linaro@bm1684:~$ bluetoothctl
[NEW] Controller 20:57:9E:BA:7C:EC bm1684 [default]
(2) Power on the Bluetooth controller:
[bluetooth]# power on
Changing power on succeeded
(3) Set the bluetooth agent as default:
[bluetooth]# agent on
Agent registered
[bluetooth]# default-agent
Default agent request successful
(4) Open to be discovered by other Bluetooth devices:
[bluetooth]# discoverable on
Changing discoverable on succeeded
[CHG] Controller 20:57:9E:BA:7C:EC Discoverable: yes
(5) At this point, the AIBOX PRO Bluetooth device can be found on the smartphone, and the phone can be paired after clicking:
[NEW] Device A4:90:CE:DF:64:4F iQOO Neo6 SE
[CHG] Device A4:90:CE:DF:64:4F Modalias: bluetooth:v001Dp1200d1436
[CHG] Device A4:90:CE:DF:64:4F UUIDs: 00001105-0000-1000-8000-00805f9b34fb
[CHG] Device A4:90:CE:DF:64:4F UUIDs: 0000110a-0000-1000-8000-00805f9b34fb
[CHG] Device A4:90:CE:DF:64:4F UUIDs: 0000110c-0000-1000-8000-00805f9b34fb
[CHG] Device A4:90:CE:DF:64:4F UUIDs: 0000110e-0000-1000-8000-00805f9b34fb
[CHG] Device A4:90:CE:DF:64:4F UUIDs: 00001112-0000-1000-8000-00805f9b34fb
[CHG] Device A4:90:CE:DF:64:4F UUIDs: 00001115-0000-1000-8000-00805f9b34fb
[CHG] Device A4:90:CE:DF:64:4F UUIDs: 00001116-0000-1000-8000-00805f9b34fb
[CHG] Device A4:90:CE:DF:64:4F UUIDs: 0000111f-0000-1000-8000-00805f9b34fb
[CHG] Device A4:90:CE:DF:64:4F UUIDs: 0000112d-0000-1000-8000-00805f9b34fb
[CHG] Device A4:90:CE:DF:64:4F UUIDs: 0000112f-0000-1000-8000-00805f9b34fb
[CHG] Device A4:90:CE:DF:64:4F UUIDs: 00001132-0000-1000-8000-00805f9b34fb
[CHG] Device A4:90:CE:DF:64:4F UUIDs: 00001200-0000-1000-8000-00805f9b34fb
[CHG] Device A4:90:CE:DF:64:4F UUIDs: 00001800-0000-1000-8000-00805f9b34fb
[CHG] Device A4:90:CE:DF:64:4F UUIDs: 00001801-0000-1000-8000-00805f9b34fb
[CHG] Device A4:90:CE:DF:64:4F UUIDs: 2c042b0a-7f57-4c0a-afcf-1762af70257c
[CHG] Device A4:90:CE:DF:64:4F UUIDs: 8fa9c715-bd1f-596c-a1b0-13162b15c892
[CHG] Device A4:90:CE:DF:64:4F ServicesResolved: yes
[CHG] Device A4:90:CE:DF:64:4F Paired: yes
[CHG] Device A4:90:CE:DF:64:4F ServicesResolved: no
[CHG] Device A4:90:CE:DF:64:4F Connected: no
[CHG] Controller 20:57:9E:BA:7C:EC Discoverable: no
(6) Connect mobile device:
[bluetooth]# connect A4:90:CE:DF:64:4F
Attempting to connect to A4:90:CE:DF:64:4F
[CHG] Device A4:90:CE:DF:64:4F Connected: yes
Connection successful
[CHG] Device A4:90:CE:DF:64:4F ServicesResolved: yes
[iQOO Neo6 SE]#
(7) Set the mobile device to trust:
[iQOO Neo6 SE]# trust A4:90:CE:DF:64:4F
[CHG] Device A4:90:CE:DF:64:4F Trusted: yes
Changing A4:90:CE:DF:64:4F trust succeeded
Bluetooth Audio
Bluetooth audio is available using the bluez-alsa tool, a Bluetooth audio ALSA backend utility.
Install the bluez-alsa tool
AIBOX PRO does not have this tool installed by default, and users need to compile and install it by themselves. Here are the steps for version 1.3.0, as follows:
(1) Download the source package: https://github.com/Arkq/bluez-alsa/releases/tag/v1.3.0
(2) Installation dependencies:
sudo apt install -y libasound2-dev libbluetooth-dev libglib2.0-dev libsbc-dev libfdk-aac-dev pkgconf(3) Extract:
tar xzvf bluez-alsa-1.3.0.tar.gz
cd bluez-alsa-1.3.0
(4) Compile and install:
autoreconf --install
mkdir build && cd build
../configure --enable-aac --enable-debug
make && make install
Audio Test
After the installation is complete, you can connect a Bluetooth headset or speaker to play music. First, configure Bluetooth as the master device mode:
sudo hciconfig hci0 lm masterEnable the bluez-alsa service, note that the PulseAudio service and bluez-alsa are mutually exclusive:
# Remove the PulseAudio process
killall pulseaudio
# Open the bluez-alsa service for connecting to bluetooth
bluealsa -p a2dp-source -p hsp-ag &
To connect a Bluetooth headset:
[bluetooth]# connect 0C:AE:BD:9B:BB:5C
Attempting to connect to 0C:AE:BD:9B:BB:5C
[CHG] Device 0C:AE:BD:9B:BB:5C Connected: yes
Connection successful
[CHG] Device 0C:AE:BD:9B:BB:5C ServicesResolved: yes
[EDIFIER LolliPods 2022版]#
In addition, open a login and execute the following command to play the audio:
aplay -D bluealsa:HCI=hci0,DEV=0C:AE:BD:9B:BB:5C,PROFILE=a2dp example.wavFor more information about bluez-alsa, please refer to the source code repository: https://github.com/Arkq/bluez-alsa/tree/v1.3.0。
Send and receive files
Bluetooth file sending and receiving can use the OBEX protocol, which encapsulates information data with an object model and transmits applications with a session protocol specification.
The Obex service is needed in Linux. Firstly, connect the AIBOX PRO to the Bluetooth device according to the previous steps, then start the Obex daemon, and set the receiving directory to /home/linaro/:
/usr/lib/bluetooth/obexd -r /home/linaro -a -d &Use obex push service
First configure Bluetooth as master device mode:
sudo hciconfig hci0 lm masterFind the channel for the Obex Push service on your mobile phone:
linaro@bm1684:~$ sdptool search --bdaddr A4:90:CE:DF:64:4F OPUSH
Searching for OPUSH on A4:90:CE:DF:64:4F ...
Service Name: OBEX Object Push
Service RecHandle: 0x1000d
Service Class ID List:
  "OBEX Object Push" (0x1105)
Protocol Descriptor List:
  "L2CAP" (0x0100)
  "RFCOMM" (0x0003)
    Channel: 12
  "OBEX" (0x0008)
Profile Descriptor List:
  "OBEX Object Push" (0x1105)
    Version: 0x0102

Searching for OPUSH on A4:90:CE:DF:64:4F ...
Service Search failed: Invalid argument
You can see that the channel is 12, and then you can push the file to the phone:
linaro@bm1684:~$ obexftp --nopath --noconn --uuid none --bluetooth A4:90:CE:DF:64:4F --channel 12 --put sn.txt
Suppressing FBS.
Connecting..\done
Sending "sn.txt".../done
Disconnecting..-done
At this time, you can see the pop-up window whether to receive the file on the mobile phone.
Use obexctl interactive command line
The following demonstrates the steps for AIBOX PRO to receive files:
(1) Start the obex service on the device side (slave device):
root@firefly:~# systemctl --user start obex(2) Enter the interactive command line:
root@firefly:~# obexctl
[NEW] Client /org/bluez/obex
(3) Connect AIBOX PRO (master device):
[obex]# connect 20:57:9E:BA:7C:EC
Attempting to connect to 20:57:9E:BA:7C:EC
...
[NEW] Session /org/bluez/obex/client/session2 [default]
[NEW] ObjectPush /org/bluez/obex/client/session2
(4) Send files:
[20:57:9E:BA:7C:EC]# send /root/test.txt
Attempting to send /root/test.txt to /org/bluez/obex/client/session1
[NEW] Transfer /org/bluez/obex/client/session1/transfer1
Transfer /org/bluez/obex/client/session1/transfer1
        Status: queued
        Name: test.txt
        Size: 0
        Filename: /root/test.txt
        Session: /org/bluez/obex/client/session1
[CHG] Transfer /org/bluez/obex/client/session1/transfer1 Status: complete
(5) Check the test.txt file in the /home/linaro/ directory of AIBOX PRO:
linaro@bm1684:~$ ls -l test.txt
-rw------- 1 linaro linaro 0 Nov 25 15:49 test.txt
WIFI
AIBOX PRO supports wireless WIFI, and the network card name in the system defaults to wlan0:
root@bm1684:~# ifconfig wlan0
wlan0: flags=4099<UP,BROADCAST,MULTICAST> mtu 1500
         ether 20:57:9e:ba:02:fc txqueuelen 1000 (Ethernet)
         RX packets 0 bytes 0 (0.0 B)
         RX errors 0 dropped 0 overruns 0 frame 0
         TX packets 0 bytes 0 (0.0 B)
         TX errors 0 dropped 0 overruns 0 carrier 0 collisions 0
WIFI connection
(1) Enable WIFI:
nmcli radio wifi on(2) Check whether WIFI is enabled successfully:
# Print out enabled to indicate success
nmcli radio wifi
(3) View WIFI access point:
nmcli dev wifi list(4) Connect to WIFI access point:
sudo nmcli device wifi connect zouxftest1 password 12345678 name testWhere zouxftest1 is the name of the WIFI access point, and 12345678 is the password.
The connection success log is as follows:
Device 'wlan0' successfully activated with 'fd6c634b-f517-4ae9-a8e9-292a9c19d25c'.Note that if you want to disable WIFI status:
nmcli radio wifi offWIFI hotspot
Use the nmcli command to create a wireless AP hotspot:
sudo nmcli device wifi hotspot ifname wlan0 con-name my-hostapt ssid zouxftest7 band bg password 12345678 channel 5described as follows:
con-name: The name of the connection, defined here asmy-hostaptssid: the name of the created AP hotspot, defined here aszouxftest7band: WIFI protocol standard, choosebgherepassword: the password of the created AP hotspot, defined here as12345678channel: the pass through of the created AP hotspot, defined as5here
After creating a wireless AP hotspot, if you want to turn on/off the WIFI hotspot:
sudo nmcli connection up [down] my-hostaptRS485
AIBOX PRO has one RS485 interface. If the CPU is RK3588, the device name is /dev/ttyS6; if the CPU is RK3576, the device name is /dev/ttyS3. It supports half-duplex communication, and the default baud rate is 9600. This interface uses a Phoenix terminal block, so a compatible terminal connector is required. Once connected, it can be debugged using standard serial port methods.
Cellular Network
AIBOX PRO supports 4G LTE. In system settings, there are multiple network options. You can enable mobile data here:
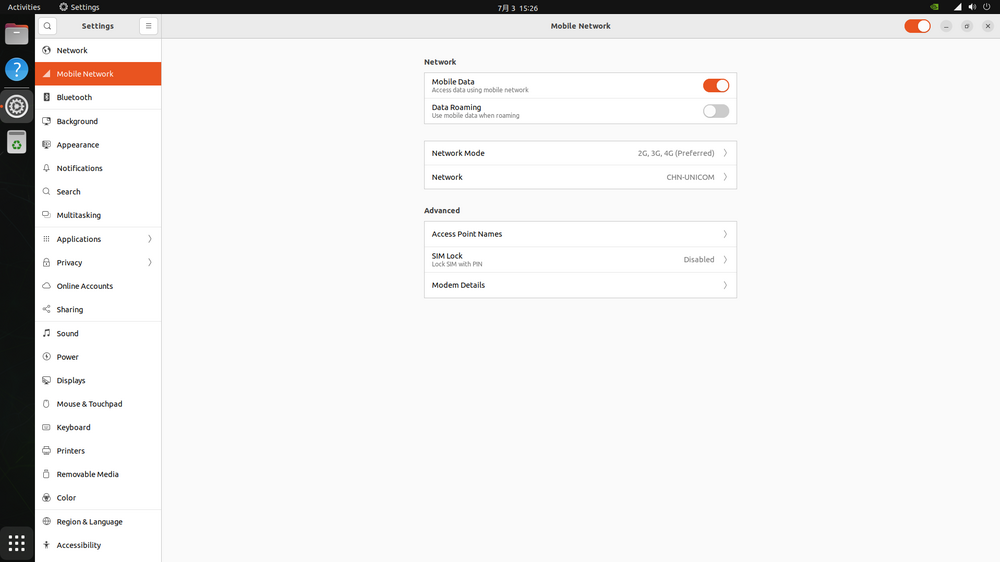
Check the network interface via command line:
$ ifconfig wwan0
wwan0: flags=4305<UP,POINTOPOINT,RUNNING,NOARP,MULTICAST>  mtu 1500
        inet 10.176.252.100  netmask 255.255.255.248  destination 10.176.252.100
        unspec 00-00-00-00-00-00-00-00-00-00-00-00-00-00-00-00  txqueuelen 1000  (UNSPEC)
        RX packets 4  bytes 405 (405.0 B)
        RX errors 0  dropped 0  overruns 0  frame 0
        TX packets 8  bytes 439 (439.0 B)
        TX errors 0  dropped 0 overruns 0  carrier 0  collisions 0
CAN Usage
CAN Introduction
CAN (Controller Area Network) is a serial communication network that supports distributed and real-time control. For more information, refer to the CAN Application Report.
Hardware Connection
The CAN interface location of the AIBOX PRO development board is shown here.
Since there is only one CAN interface, the first device created in the kernel is can0 by default.
CAN Communication Test
Use candump and cansend to send and receive messages. These tools are included in the SDK and can also be downloaded from GitHub.
# Bring down can0 on both ends
ip link set can0 down
# Set the bitrate to 250Kbps on both ends
ip link set can0 type can bitrate 250000
# Bring up can0 on both ends
ip link set can0 up
# Run candump on the receiving end
candump can0
# Run cansend on the sending end
cansend can0 123#1122334455667788
FAQS
Messages are delayed or not received
Check whether the CAN_H and CAN_L bus wires are loose or connected in reverse.