



USB-TO-TTL-Serial
Product Introduction
Overview
This USB-to-ttl-serial module is based on CP2104, powered via MicroUSB, features a 3-pin header output, onboard three LEDs for status indication, and measures just 25×15.5mm.
Shipping List
Specifications
| Parameter | |
|---|---|
| Size | 25x15.5mm |
| Chip | CP2104 |
| LED | Power LED, TX LED, RX LED |
| USB Type | MicroUSB |
| Pin Header | 2.54mm 3PIN |
Usage
Hardware Connection
| CPU | Board |
|---|---|
| PX30 | AIO-PX30-JD4 |
| RK3128 | Firefly-RK3128, AIO-3128C |
| RK3288 | Firefly-RK3288, AIO-3288C, AIO-3288J |
| RK3308 | ROC-RK3308-CC, ROC-RK3308B-CC V0.1, ROC-RK3308B-CC V1.0 ROC-RK3308B-CC-PLUS |
| RK3328 | ROC-RK3328-CC, ROC-RK3328-PC, AIO-RK3328-JD4 |
| RK3399 | AIO-3399C, AIO-3399J, AIO-3399JD4 ROC-RK3399-PC-PLUS, ROC-RK3399-PC, ROC-RK3399-PC-Pro Firefly-RK3399, Face-RK3399 V1, Face-RK3399 V2 |
| RK3399Pro | AIO-3399ProC, AIO-3399Pro-JD4 |
| RK3566 | AIO-3566JD4, ROC-RK3566-PC |
| RK3568 | AIO-3568J, ROC-RK3568-PC, ROC-RK3568-PC SE |
| RV1106 | CT36L |
| RV1126_RV1109 | AIO-1126B-JD4,AIO-1126-JD4, AIO-1109-JD4, [CAM-C1126S2U](../../AI Camera/CAM-C1126S2U/quick_usage.md#serial-port-debugging), [CAM-C1109S2U](../../AI Camera/CAM-C1109S2U/quick_usage.md#serial-port-debugging) |
| RK3588 | AIO-3588SJD4 AI,AIO-3588JD4,ITX-3588J,ROC-RK3588S-PC,AIO-3588SJD4,ROC-RK3588-PC,AIO-3588Q,AIO-3588SG,AIO-3588L,ROC-RK3588-RT |
| RK3576 | ROC-3576-PC, CAM-3576Q38, AIO-3576Q, AIO-3576JD4,AIO-3576C |
| RK3506 | ROC-RK3506B-CC,ROC-RK3506J-CC |
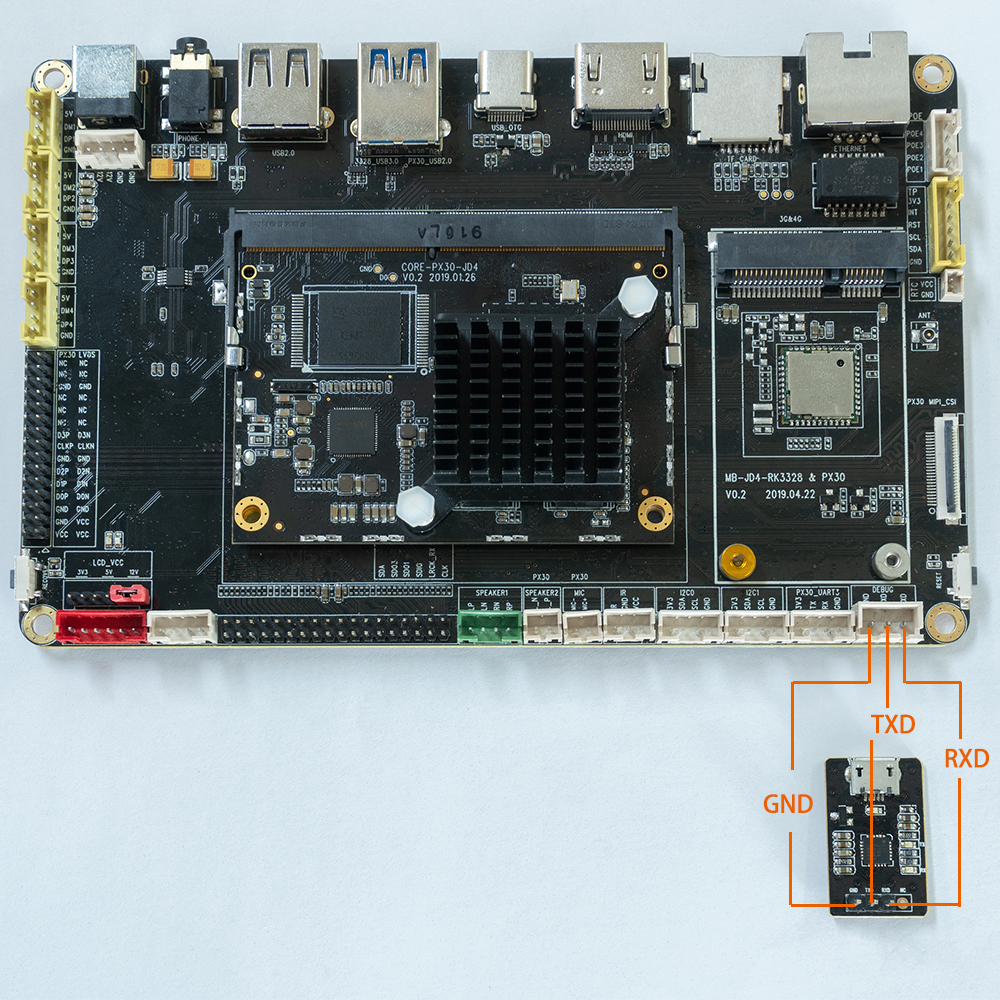
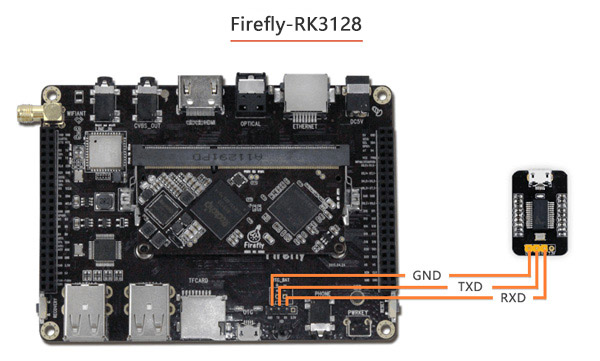
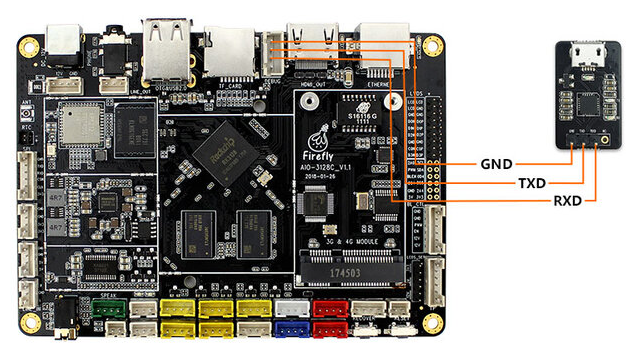
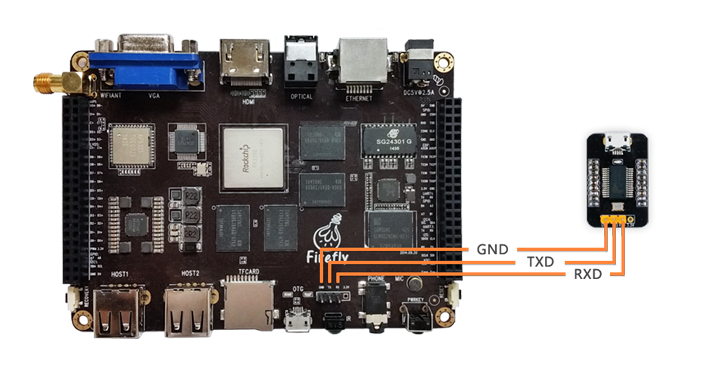
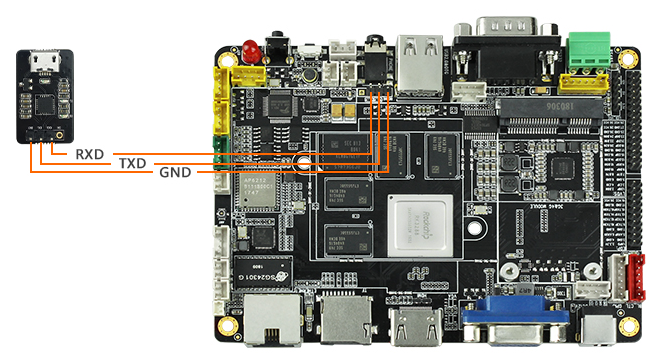
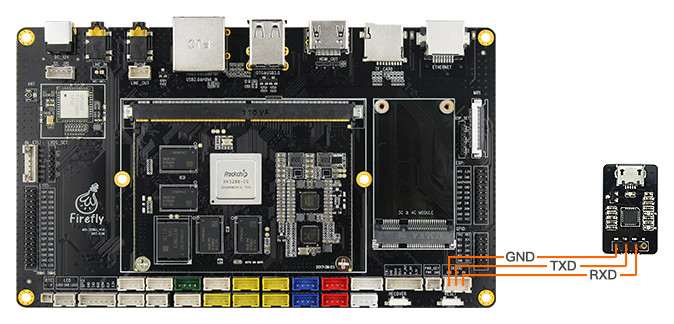
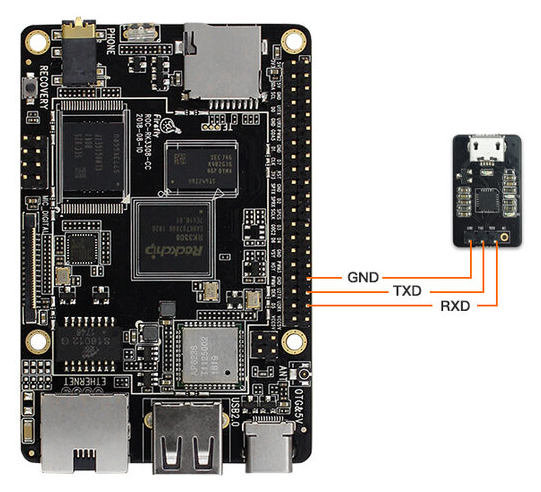
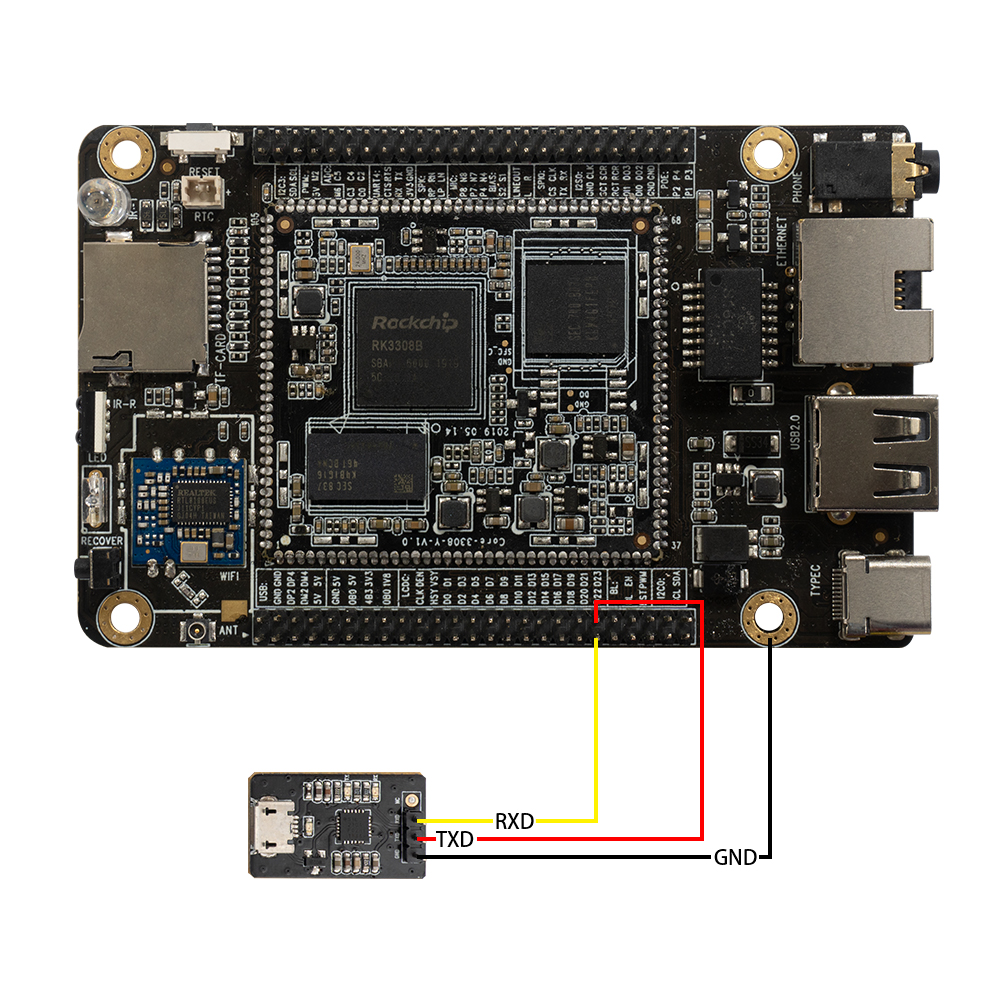
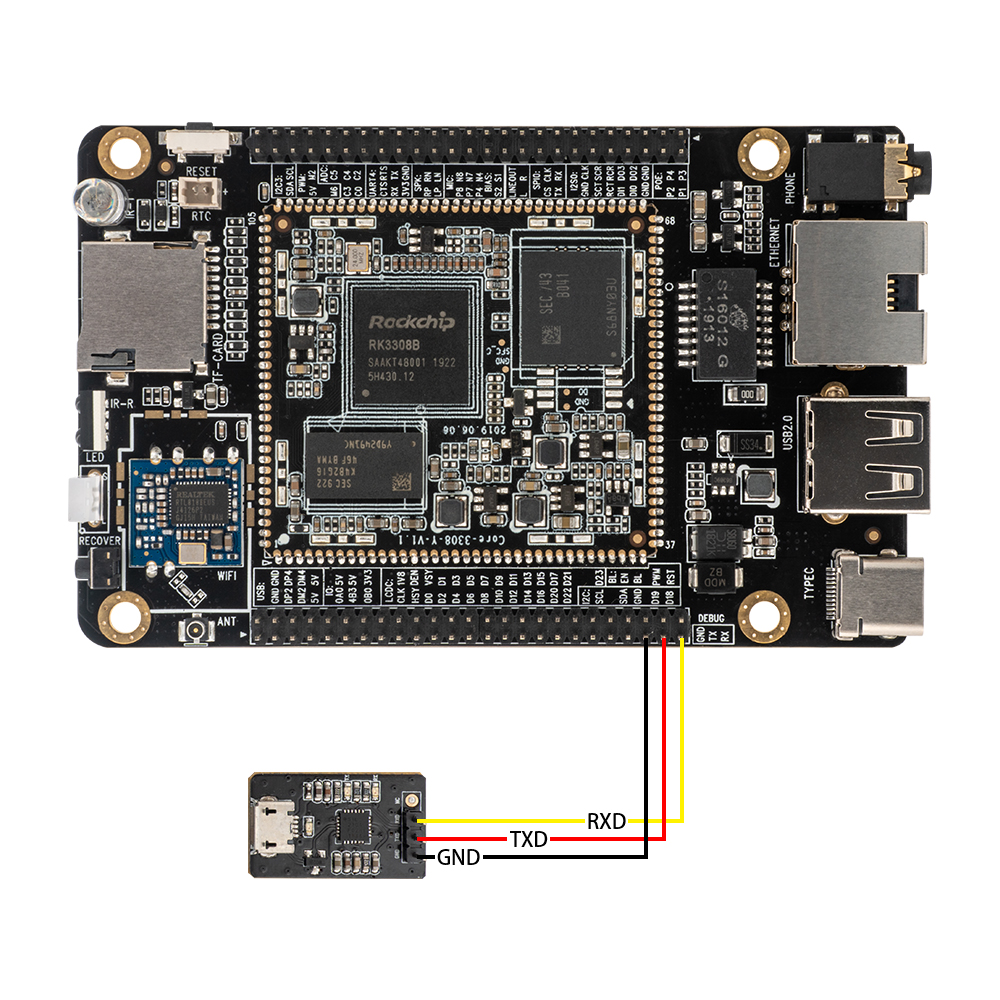
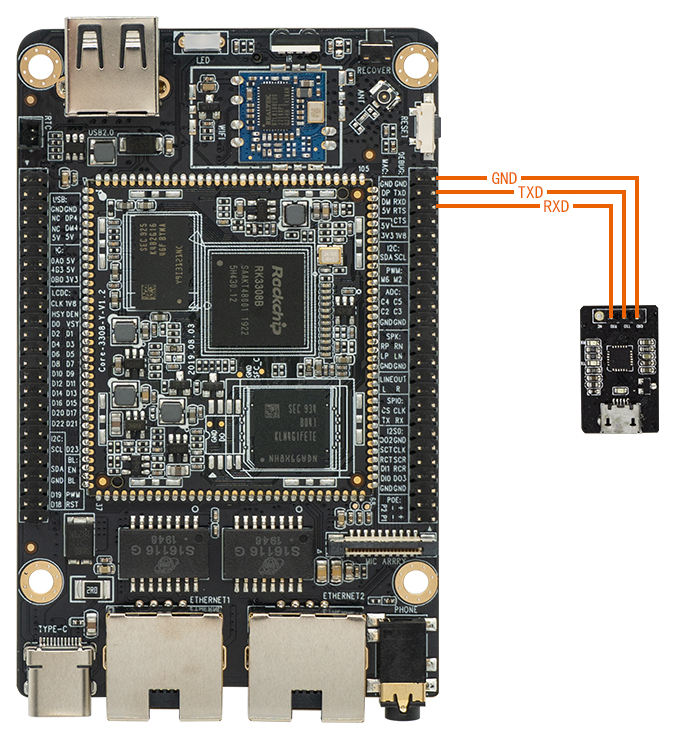
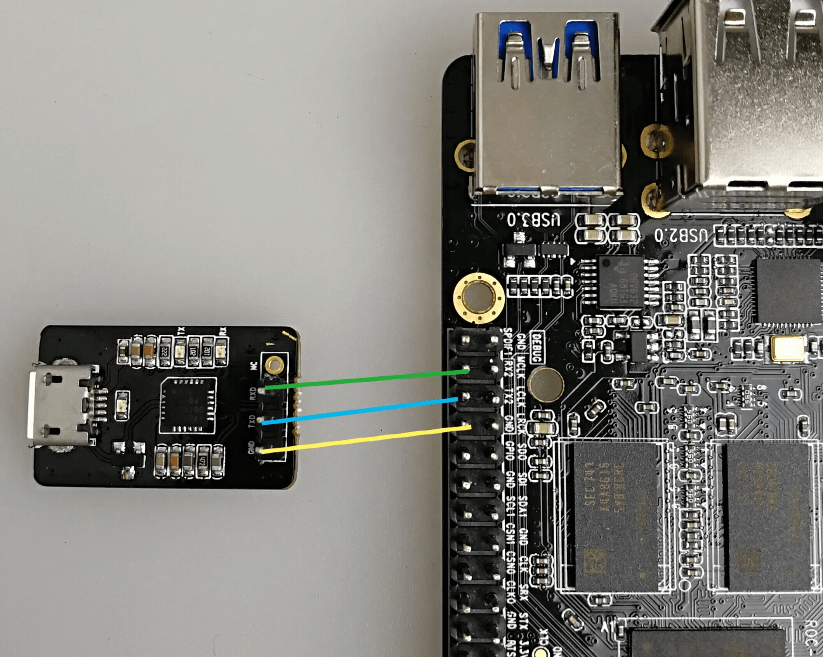
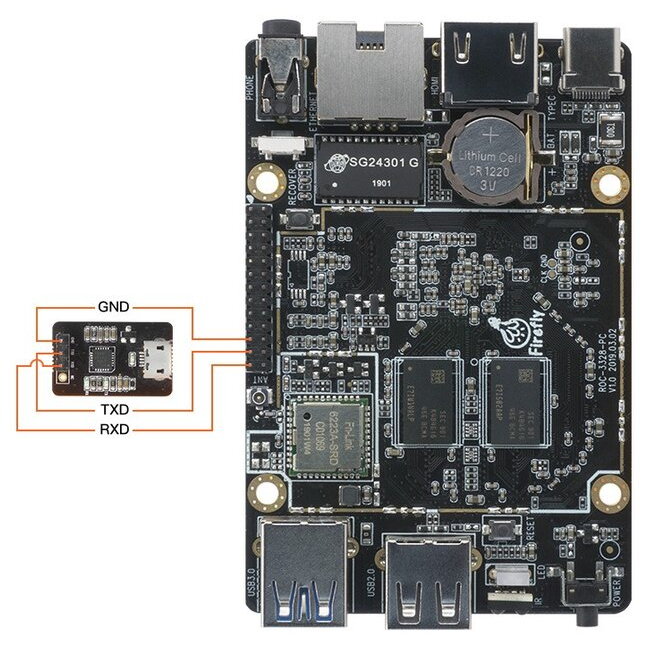
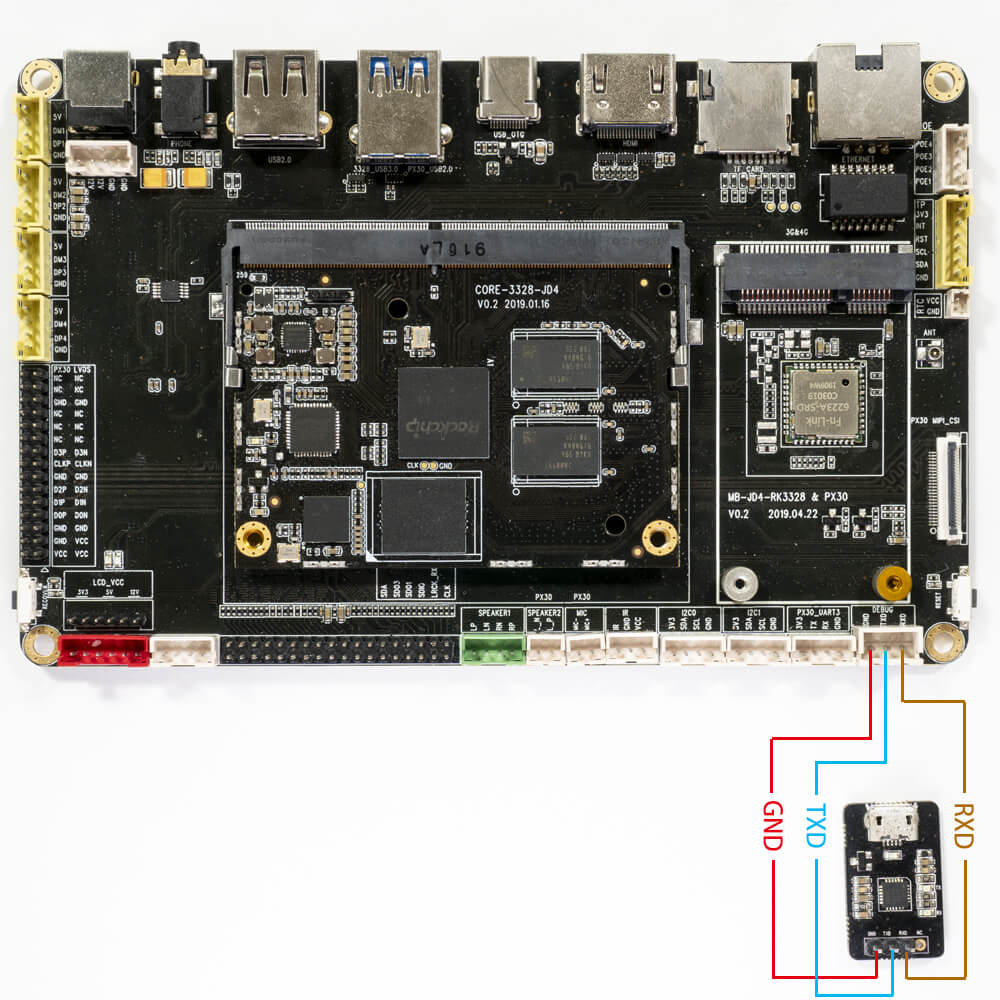
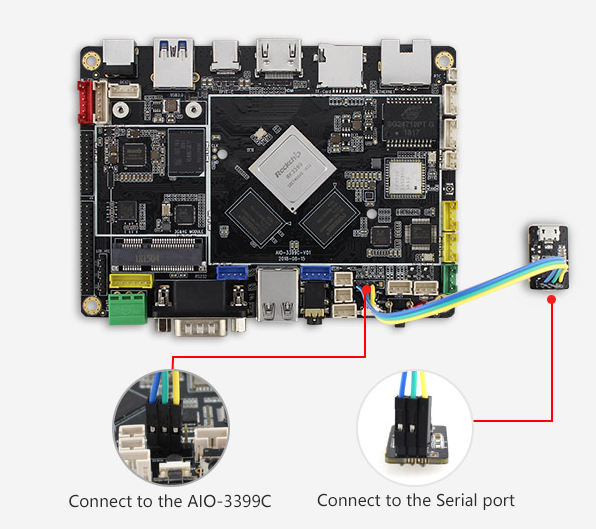
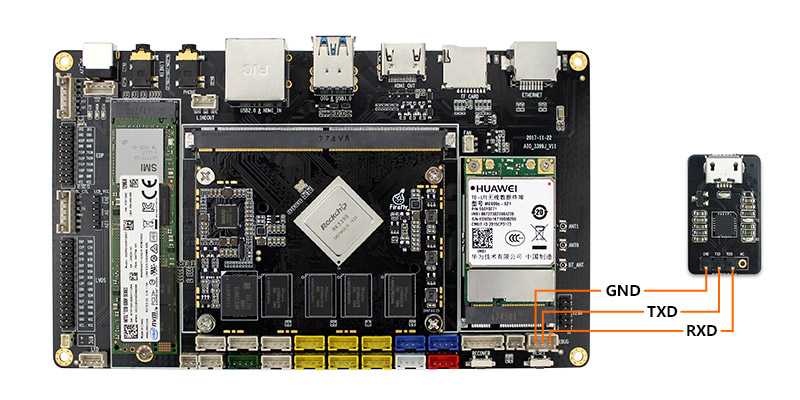
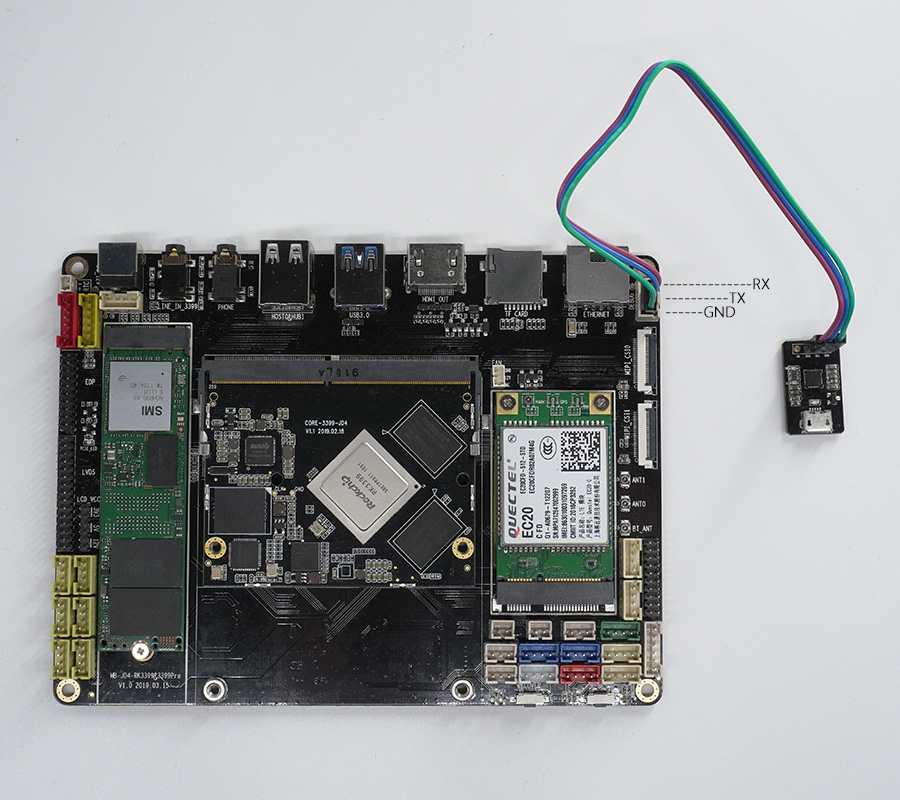
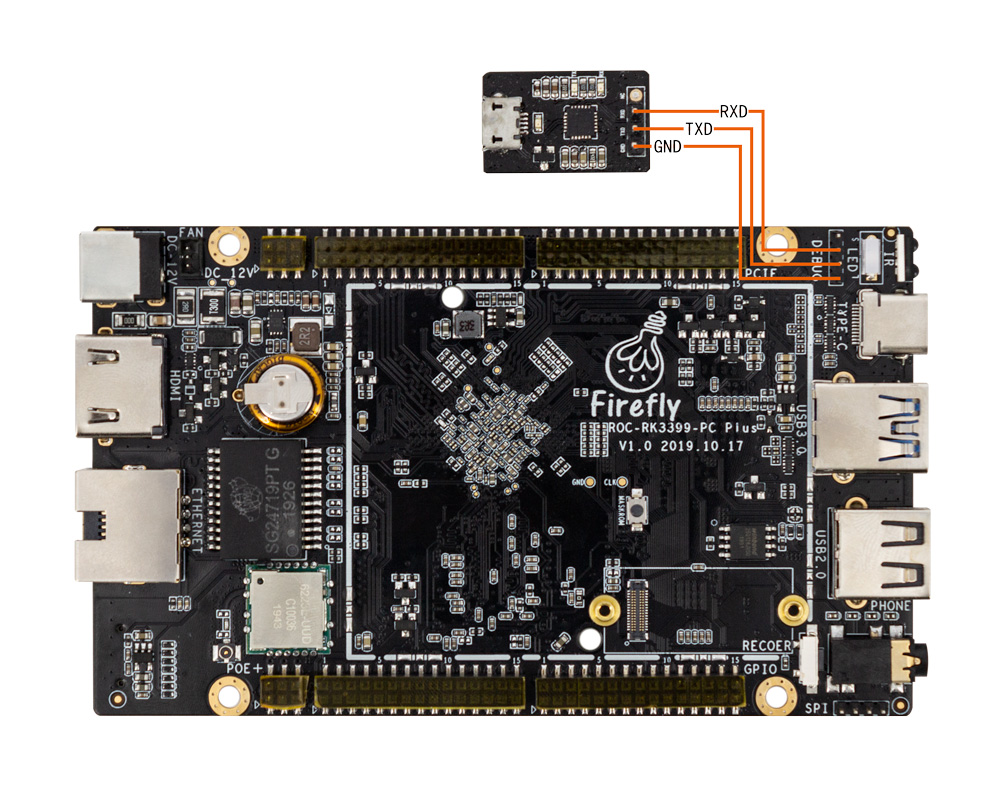
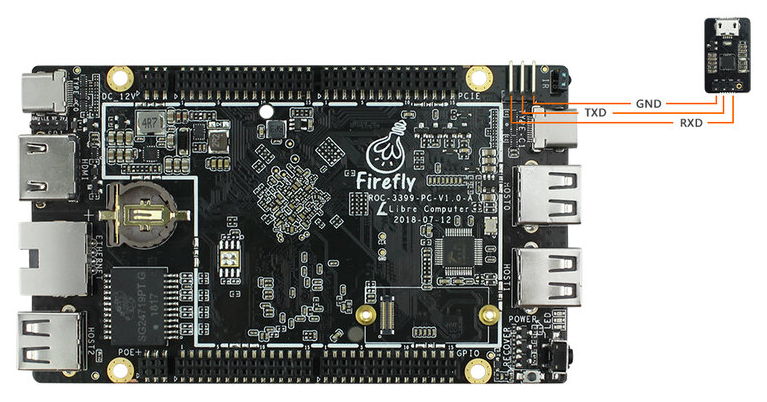
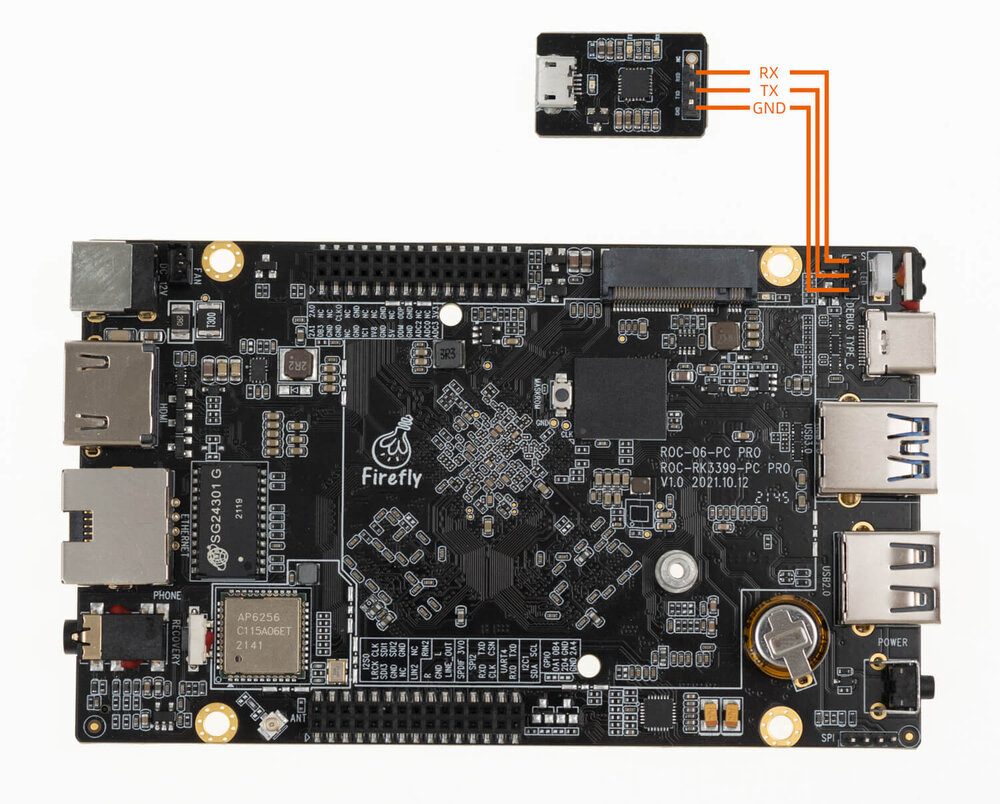
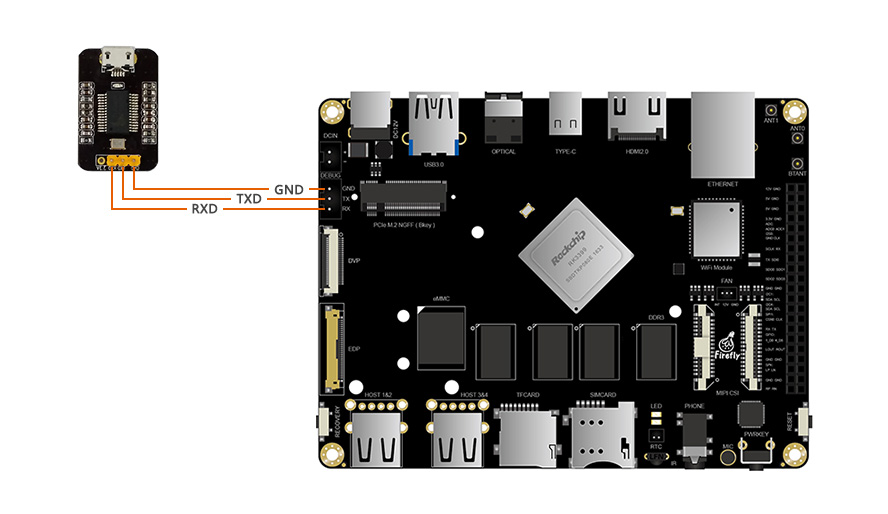
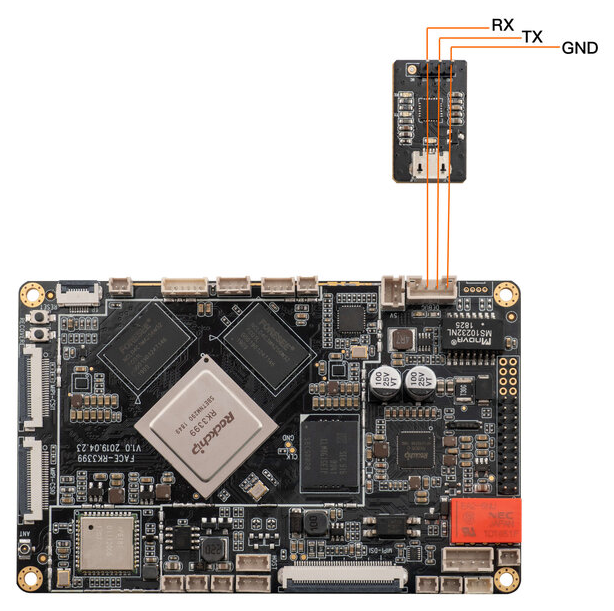
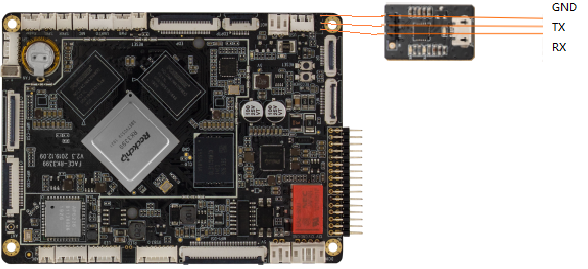
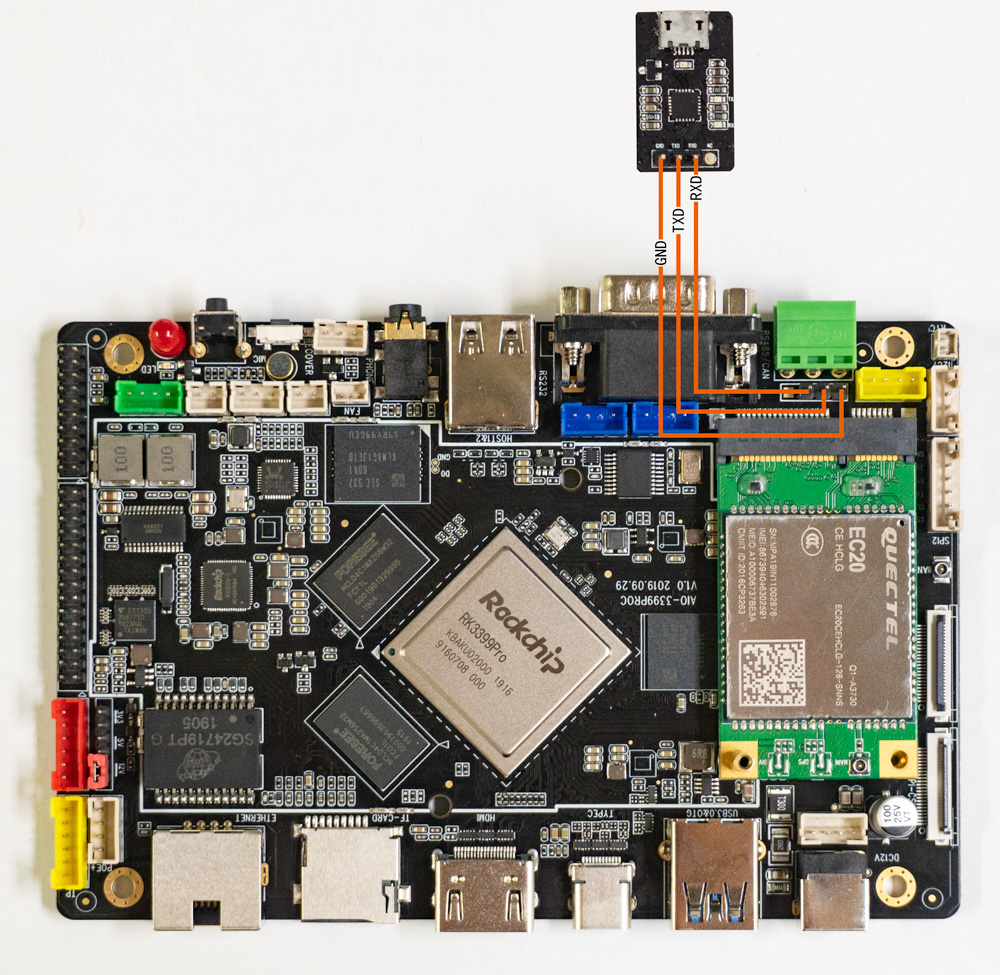
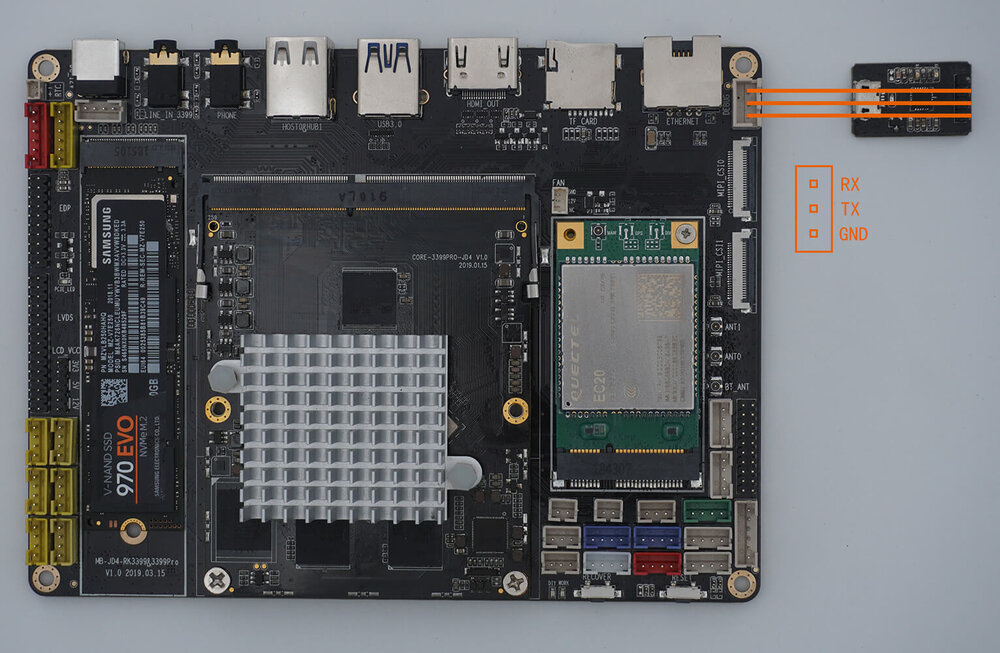
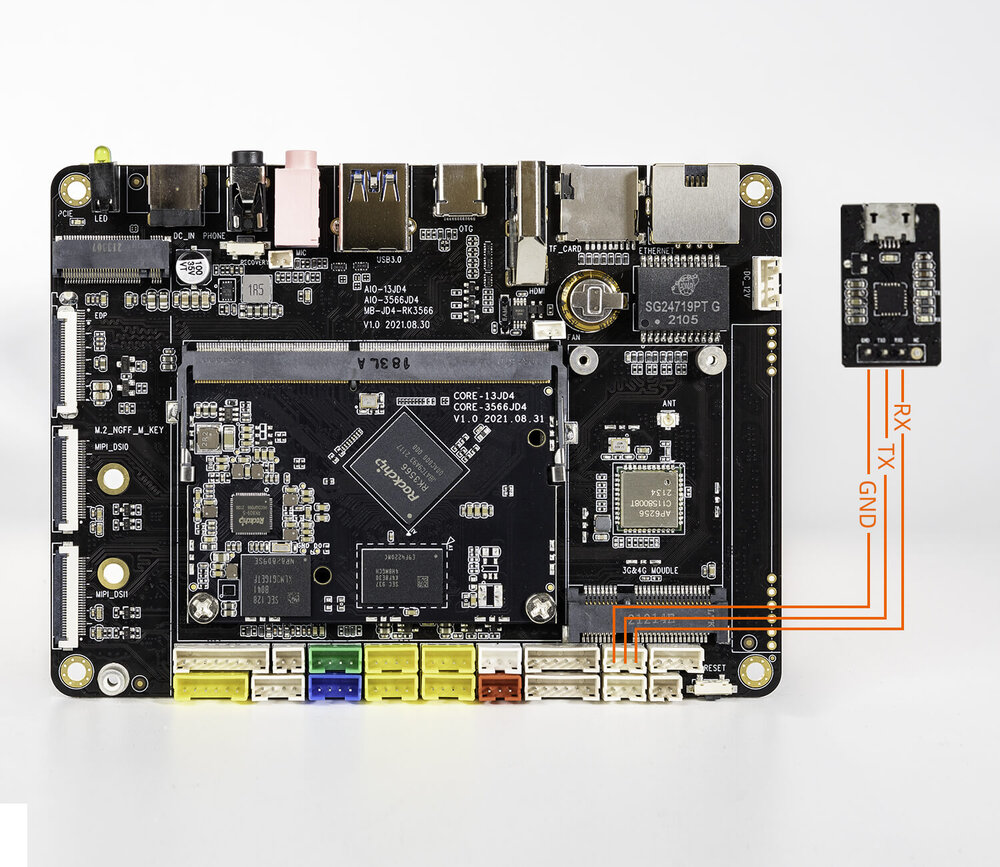
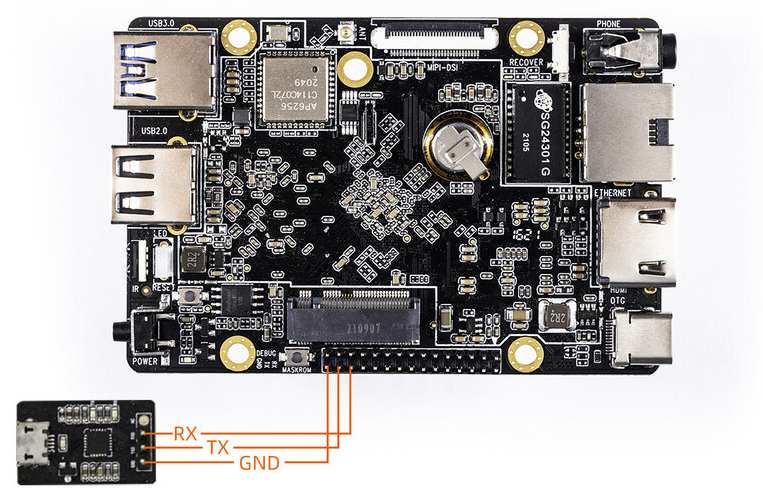
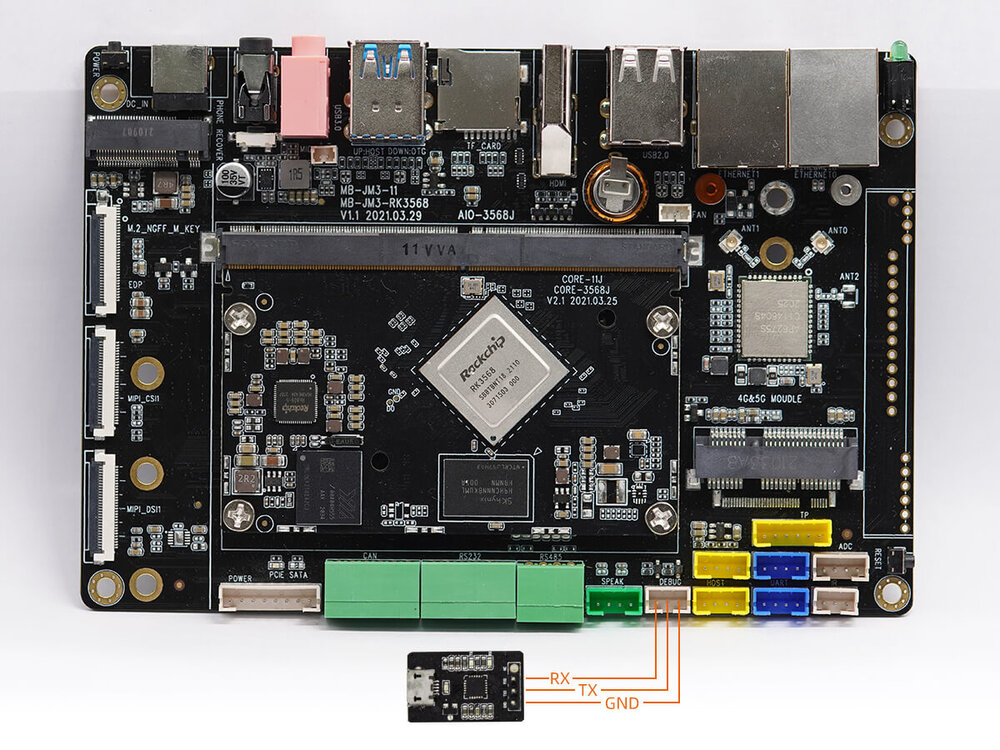
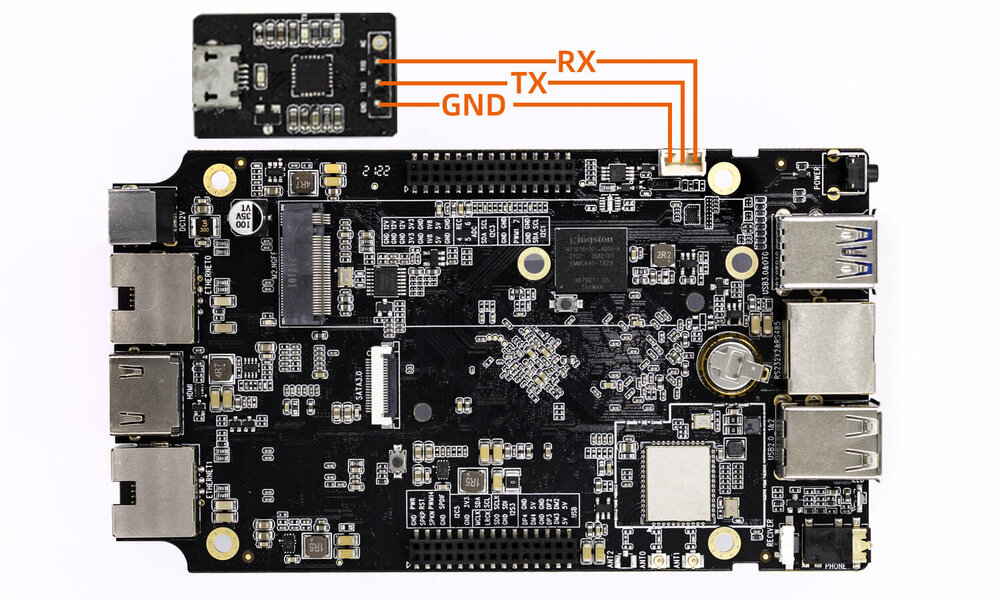
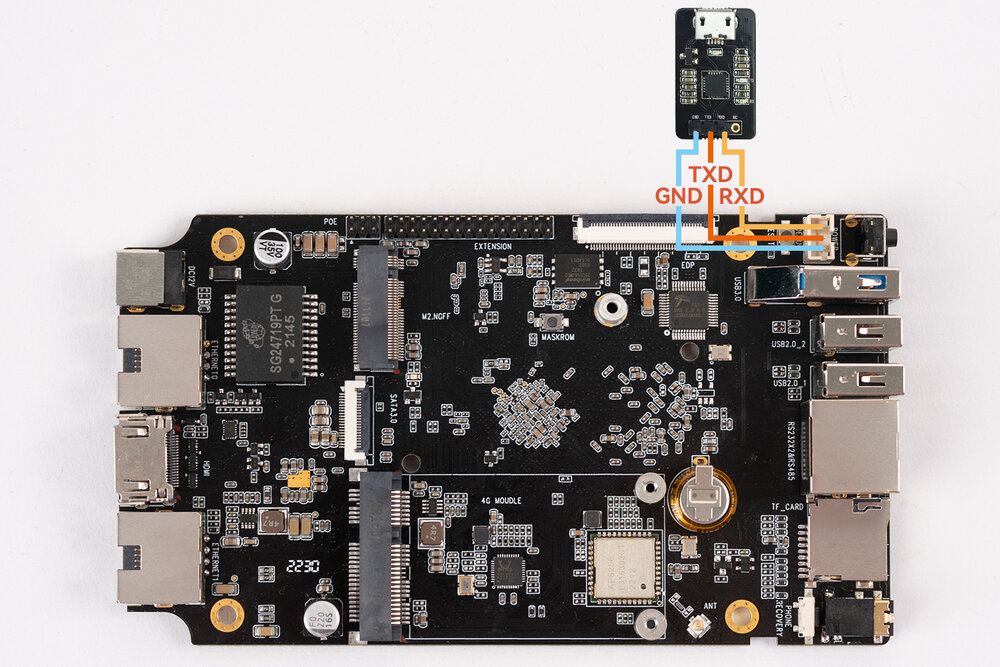
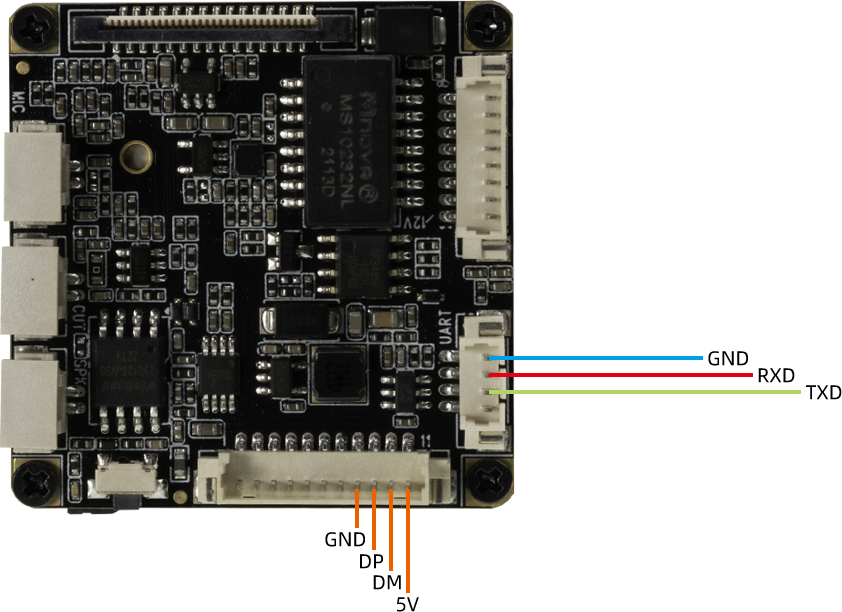
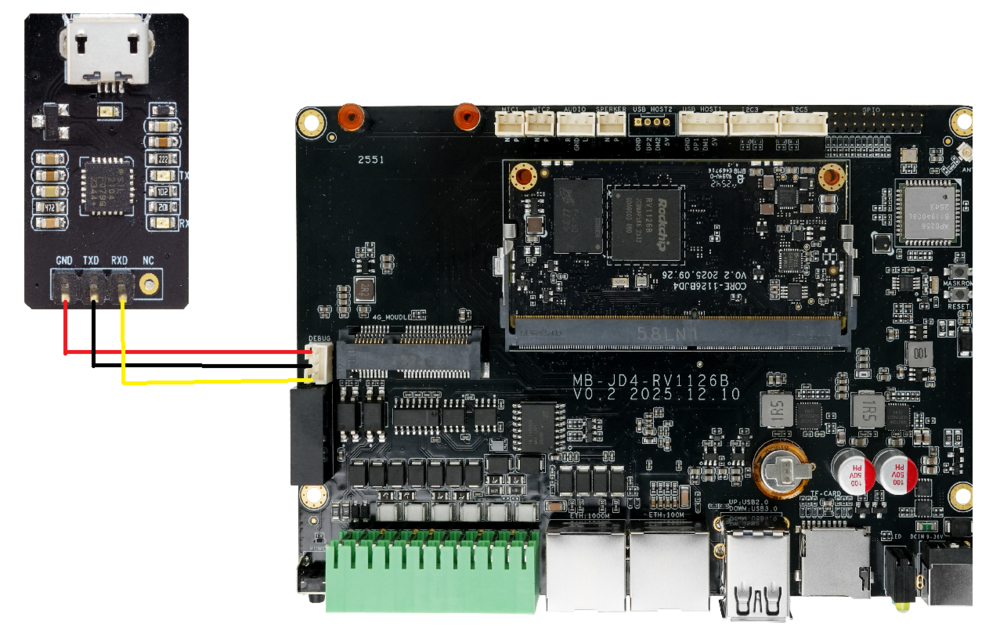
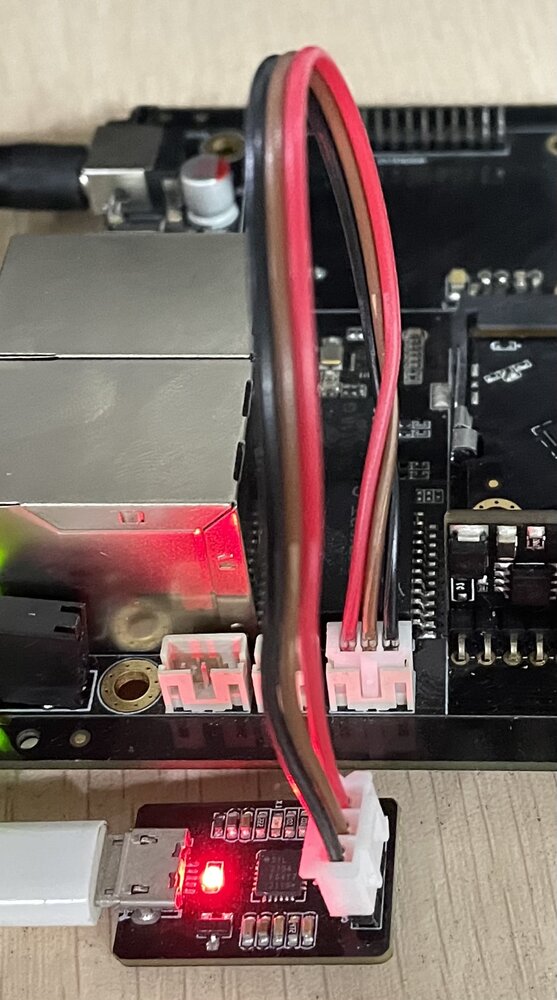
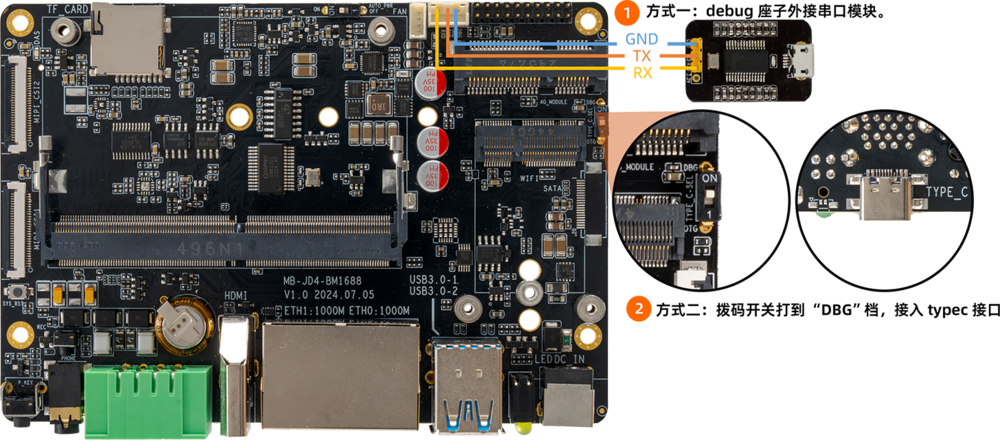
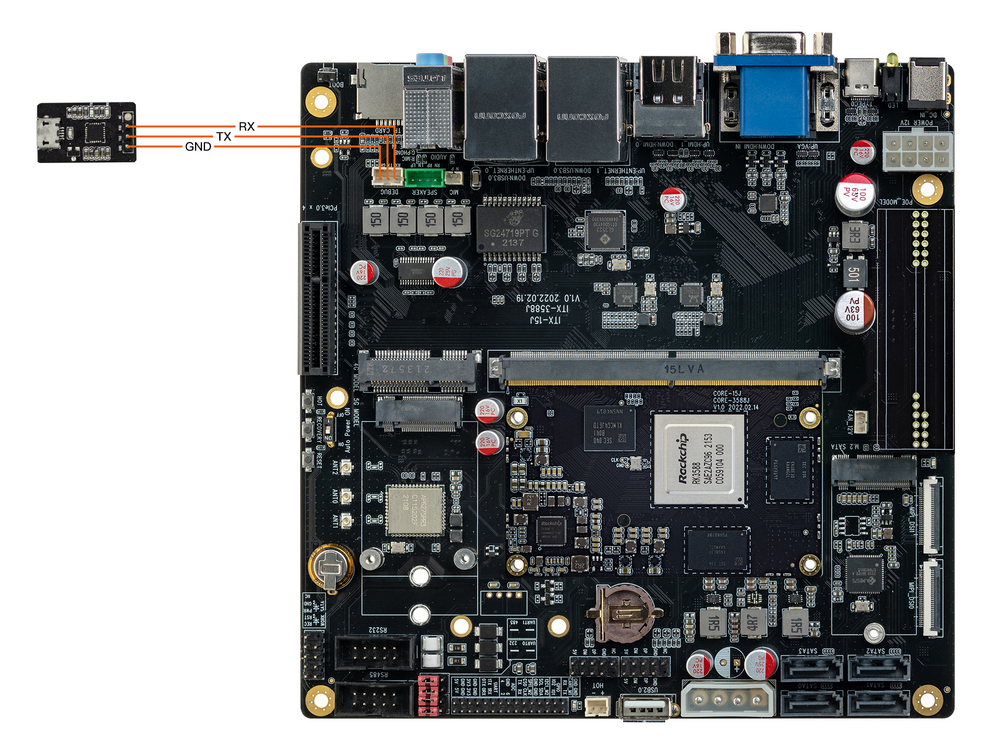
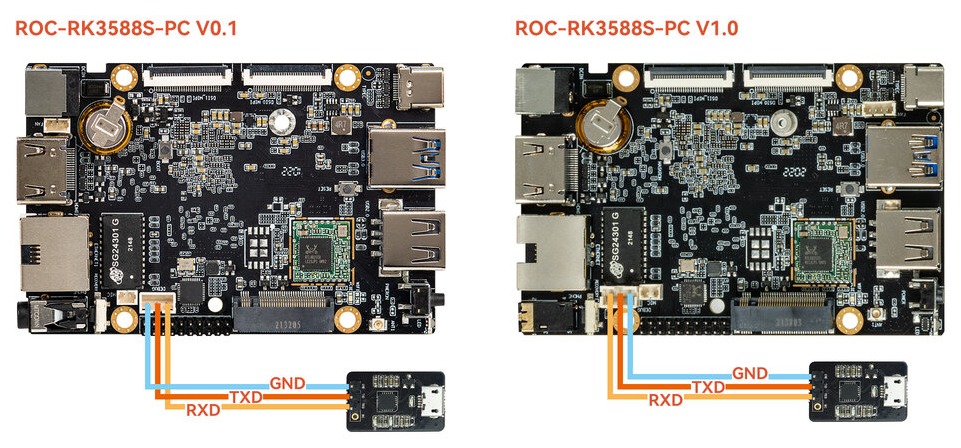
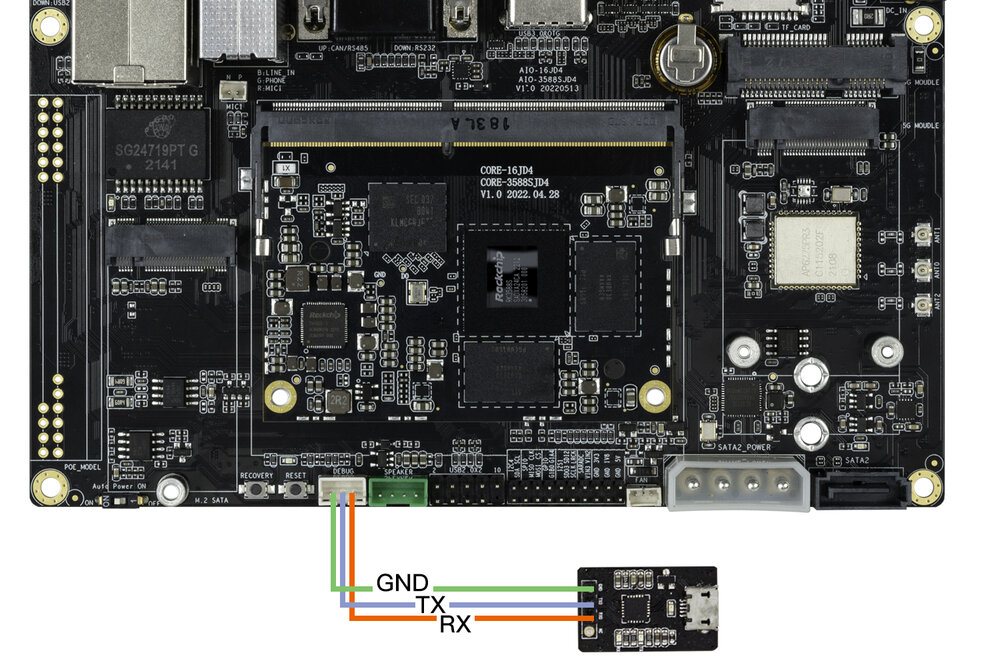
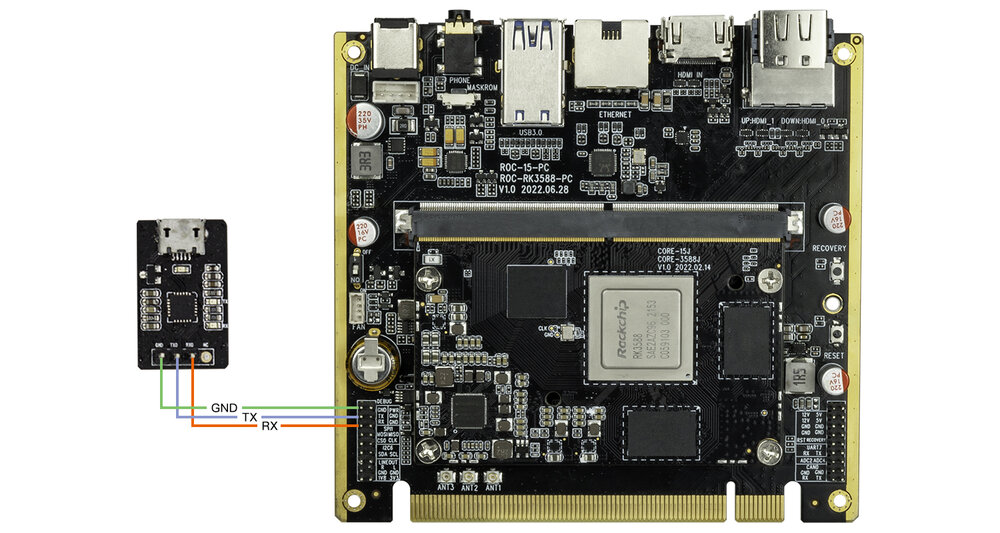
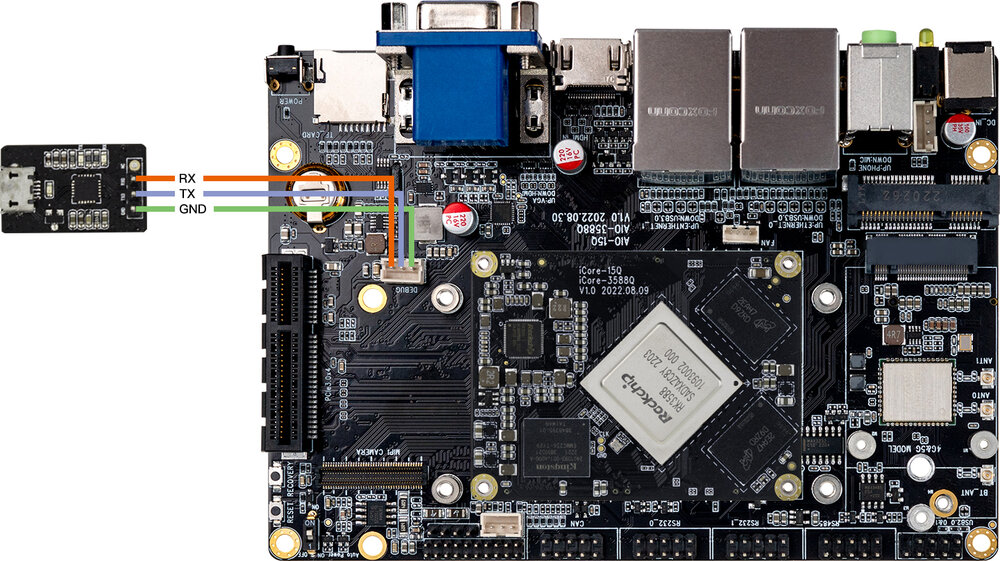
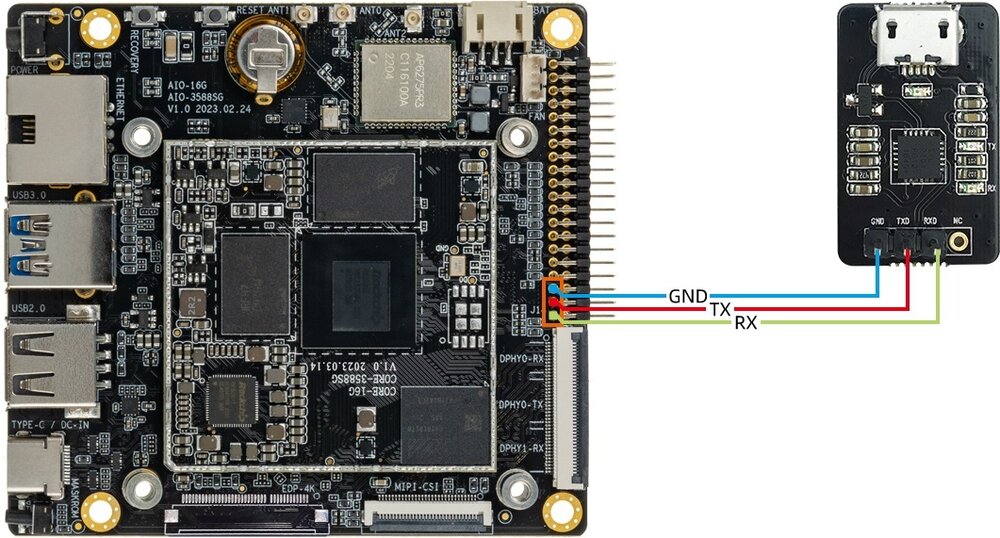
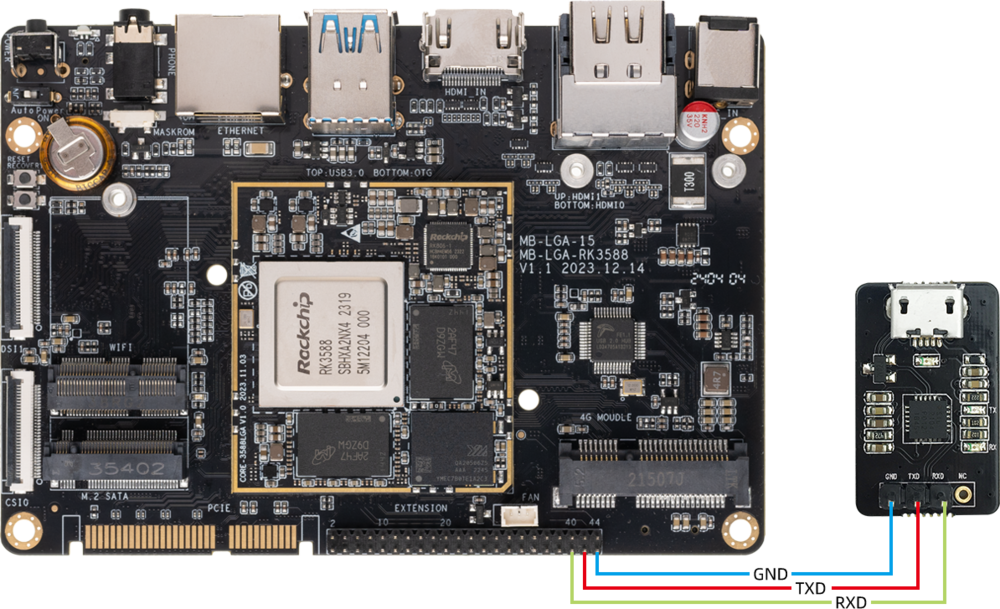
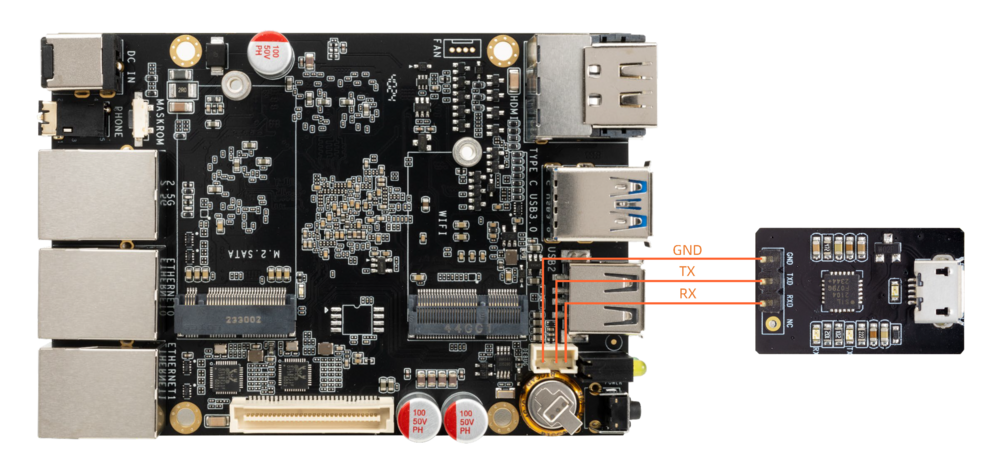
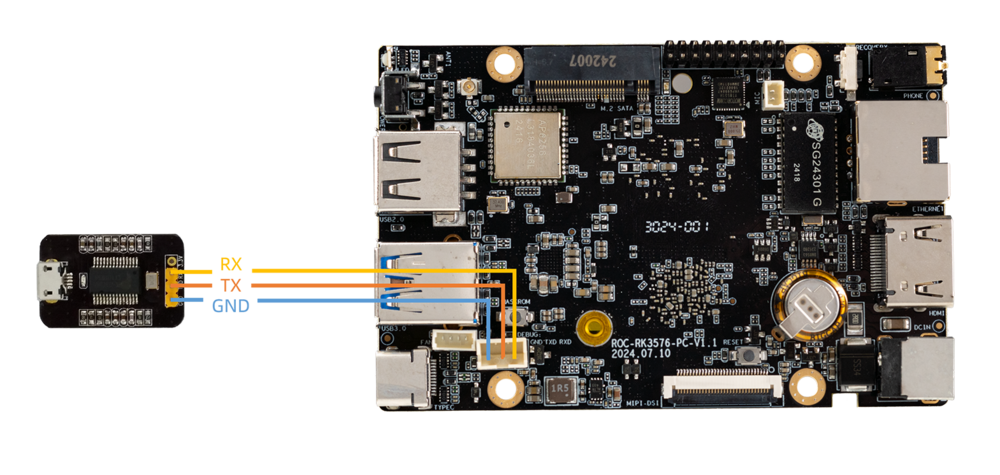
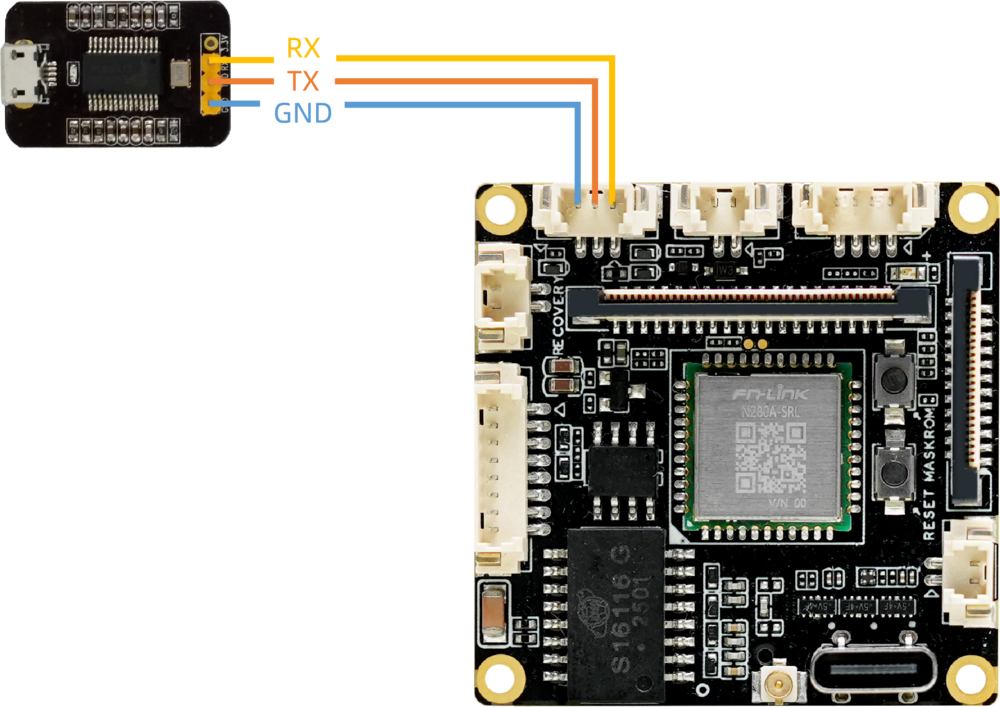
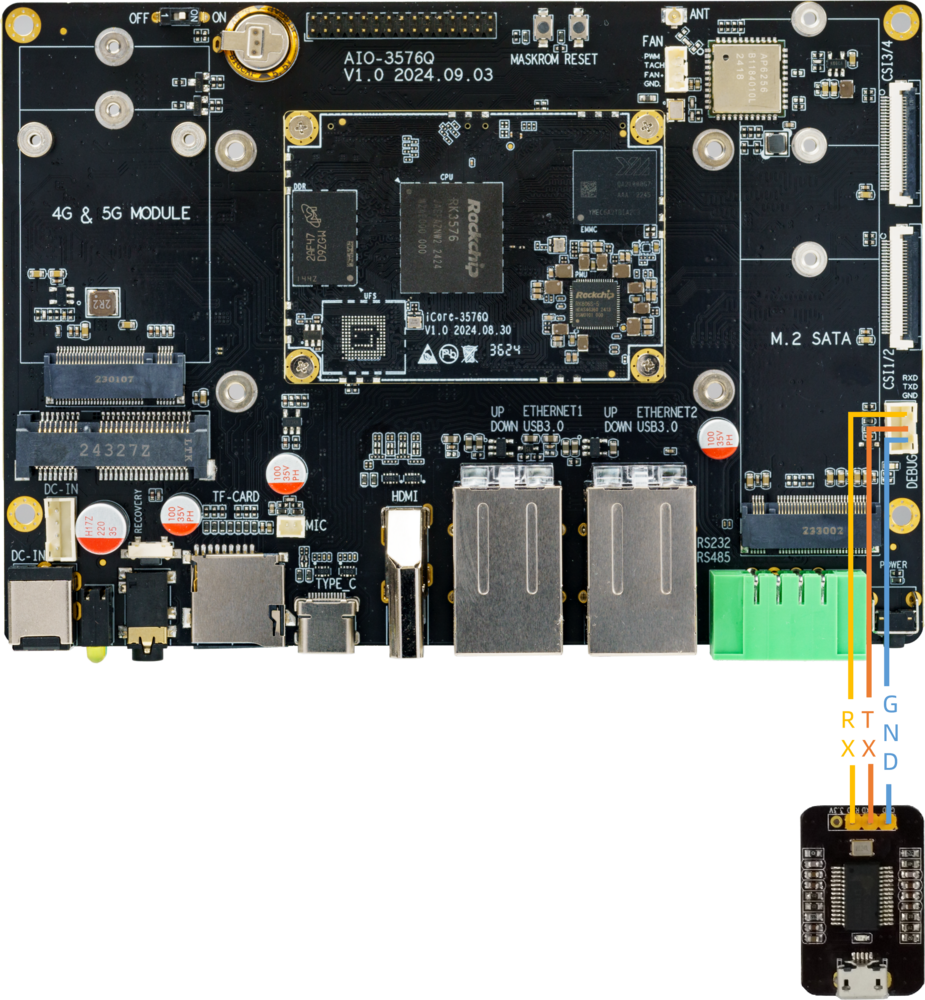
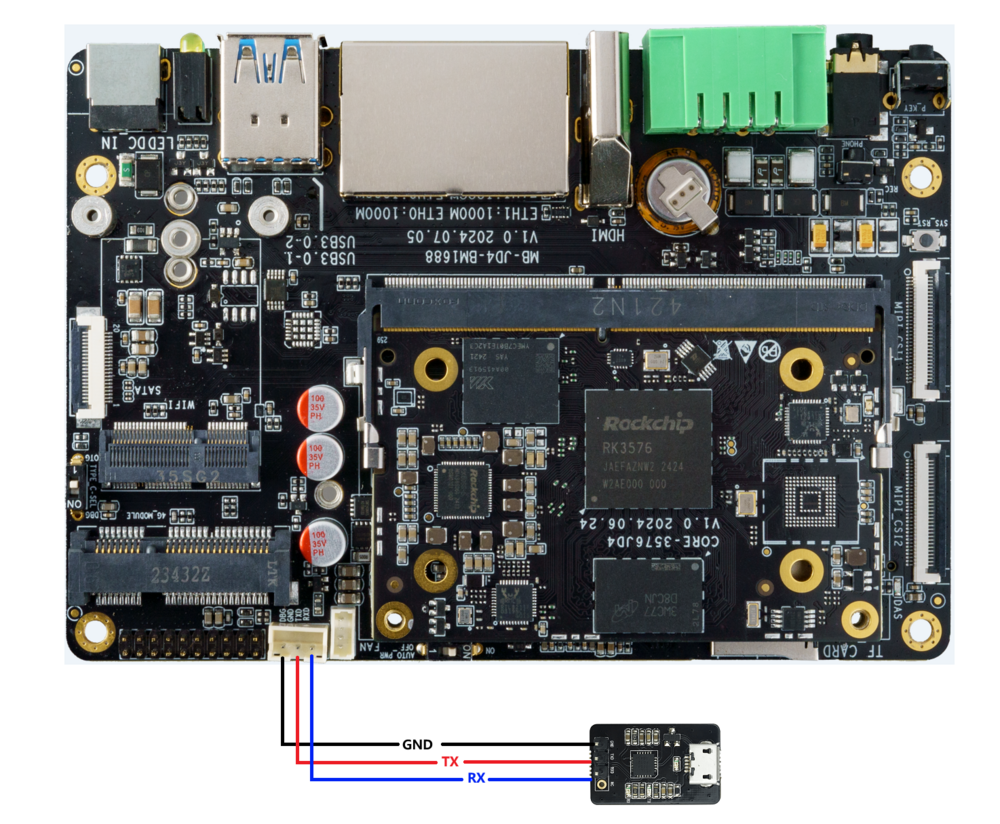
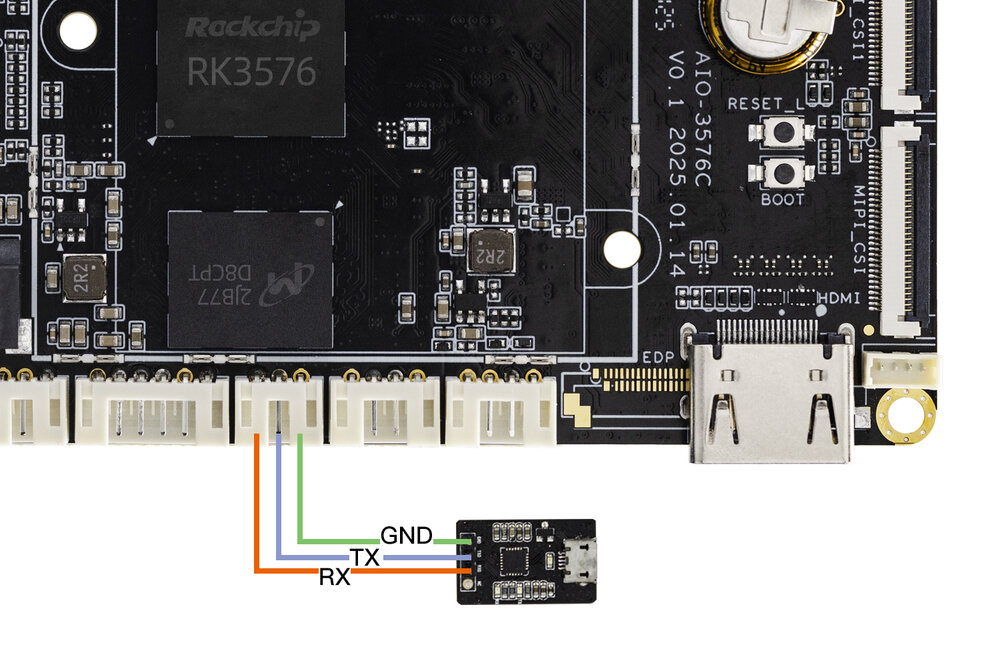
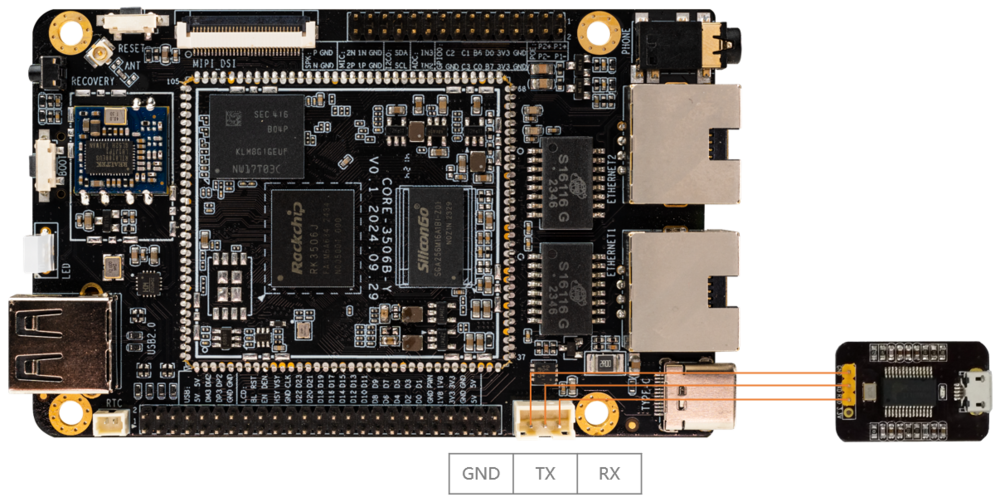
Note: If you encounter the problem that TX and RX cannot input and output when using other serial adapters, you can try to exchange TX and RX connections.
Serial Parameters
- Baud rate: 1500000
- Data bit: 8
- Stop bit: 1
- Parity check: none
- Flow control: none
Note: Boards in the following chart use the different debug baudrate, which is 115200
| Model |
|---|
| RK3128 Series, RK3288 Series, AIO-3576JD4 |
Use Serial on Windows
Install Driver
Our usb-to-ttl module is using CP2104, so download driver here:
If you bought the module using the CH340 or PL2303 from elsewhere, you can download drivers here:
After the adapter is inserted, the system will prompt for the discovery of new hardware and initialization, and then the corresponding COM port can be found in the device manager:
Install Software
Putty or SecureCRT is generally used on Windows. Among them, we recommend using the free version of MobaXterm. This is a powerful terminal software. Here we will introduce how to use MobaXterm.
- Select
sessiontoSerial. - Modify
Serial portto the COM port found in the device manager. - Set
Speed (bsp)to 1500000. - Click
OKbutton.
Use Serial Debug on Ubuntu
There are many options available on Ubuntu:
- minicom
- picocom
- kermit
The following shows how to use minicom.
Install minicom
sudo apt-get install minicomTo connect the serial port line, see what the serial port device file is. The following example is /dev/ttyusb0:
$ ls /dev/ttyUSB*
/dev/ttyUSB0
Run:
$ sudo minicom
Welcome to minicom 2.7
OPTIONS: I18n
Compiled on Jan  1 2014, 17:13:19.
Port /dev/ttyUSB0, 15:57:00
Press CTRL-A Z for help on special keys
Based on the above tips: Press Ctrl-a and then press Z again to bring up the help menu.
+--------------------------------------------------------------------+
                        Minicom Command Summary                      |
|                                                                    |
|              Commands can be called by CTRL-A <key>                |
|                                                                    |
|               Main Functions                  Other Functions      |
|                                                                    |
| Dialing directory..D  run script (Go)....G | Clear Screen.......C  |
| Send files.........S  Receive files......R | cOnfigure Minicom..O  |
| comm Parameters....P  Add linefeed.......A | Suspend minicom....J  |
| Capture on/off.....L  Hangup.............H | eXit and reset.....X  |
| send break.........F  initialize Modem...M | Quit with no reset.Q  |
| Terminal settings..T  run Kermit.........K | Cursor key mode....I  |
| lineWrap on/off....W  local Echo on/off..E | Help screen........Z  |
| Paste file.........Y  Timestamp toggle...N | scroll Back........B  |
| Add Carriage Ret...U                                               |
|                                                                    |
|             Select function or press Enter for none.               |
+--------------------------------------------------------------------+
Press O to enter the setting interface, as follows:
+-----[configuration]------+
| Filenames and paths      |
| File transfer protocols  |
| Serial port setup        |
| Modem and dialing        |
| Screen and keyboard      |
| Save setup as dfl        |
| Save setup as..          |
| Exit                     |
+--------------------------+
Move the cursor to Serial port setup, press enter to enter the Serial port setup interface, then enter the letter prompted earlier, select the corresponding option, and set it as follows:
+-----------------------------------------------------------------------+
| A -    Serial Device      : /dev/ttyUSB0                              |
| B - Lockfile Location     : /var/lock                                 |
| C -   Callin Program      :                                           |
| D -  Callout Program      :                                           |
| E -    Bps/Par/Bits       : 1500000 8N1                               |
| F - Hardware Flow Control : No                                        |
| G - Software Flow Control : No                                        |
|                                                                       |
|    Change which setting?                                              |
+-----------------------------------------------------------------------+Hardware Flow Control and Software Flow Control should be set to No, otherwise it may not be impossible to input.After finishing the setting, go back to the previous menu and select Save setup as dfl to save as the default configuration, which will be used by default later.