



RKNN2
AI Algorithm Deployment
Rockchip NPU platforms support the deployment of a range of mainstream artificial intelligence algorithms, including but not limited to the following categories of algorithms:
| sample | category |
|---|---|
| LPRNet | License Plate Recognition |
| PPOCR | OCR |
| RetinaFace | Face detection |
| clip | MultiModal Object Detection |
| deeplabv3 | Semantic segmentation |
| lite_transformer | Lite NLP |
| mobilenet | Image classification |
| ppseg | Instance segmentation |
| ppyoloe | Object Detection |
| resnet | Image classification |
| whisper | Speech Recognition |
| YAMNet | Audio classification |
| yolo_world | Object Detection |
| yolov10 | Object Detection |
| yolov5 | Object Detection |
| yolov5_seg | Instance segmentation |
| yolov6 | Object Detection |
| yolov7 | Object Detection |
| yolov8 | Object Detection |
| yolov8_obb | Rotating Frame Object Detection |
| yolov8_pose | Keypoint detection |
| yolov8_seg | Instance segmentation |
| yolox | Object Detection |
In addition to the above artificial intelligence algorithms,see rknn_model_zoo for more examples.Rockchip NPU platforms also support large language models. For information on deploying large language models, please refer to the Large Language Model section.
1.1 NPU Usage
Platforms such as RK3588 come with a built-in NPU module; the RK3588 NPU offers processing performance of up to 6 TOPS.To use this NPU,you need to download the RKNN SDK.The RKNN SDK provides C++/Python programming interfaces, which help users deploy RKNN models exported by RKNN-Toolkit2,accelerating the deployment of AI applications. The overall development steps for RKNN are divided into three main parts: model conversion, model evaluation, board-side deployment and execution.
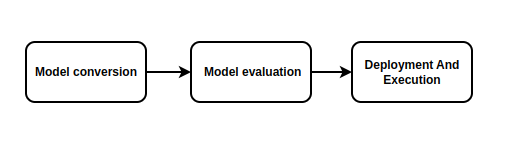
- Model Conversion converting models from
Caffe、TensorFlow、TensorFlow Lite、ONNX、DarkNet、PyTorchetc.,to RKNN models.It also supports importing and exporting RKNN models, which can be used on the Rockchip NPU platform. - Model Evaluation model evaluation phase helps users quantify and analyze model performance, including key metrics such as accuracy, on-board inference performance, and memory usage.
- Board-Side Deployment and Execution loading the RKNN model onto the RKNPU platform, and performing model preprocessing, inference, post-processing, and release.
1.2 RKNN-Toolkit2
RKNN-Toolkit2 RKNN-Toolkit2 is a development suite provided for model conversion, inference, and performance evaluation on PC and Rockchip NPU platforms. Users can conveniently perform various operations using the Python interface provided by this tool.Note
PC x86_64 platform and should not be installed on the target device.
1.2.1 RKNN-Toolkit2 Installation
The RKNN SDK offers two installation methods for RKNN-Toolkit2: via Docker and via pip. Users can choose either method for installation. Here is an example using pip on PC Ubuntu20.04(x64).Since there may be multiple versions of Python environments on the system, it is recommended to use miniforge3 to manage the Python environment.
# Check if miniforge3 and conda are installed. If already installed, this step can be skipped.
conda -V
# Download the miniforge3 installation package
wget -c https://mirrors.bfsu.edu.cn/github-release/conda-forge/miniforge/LatestRelease/Miniforge3-Linux-x86_64.sh
# Install miniforge3
chmod 777 Miniforge3-Linux-x86_64.sh
bash Miniforge3-Linux-x86_64.sh
# Enter the Conda base environment; miniforge3 is the installation directory
source ~/miniforge3/bin/activate
# Create a Conda environment named RKNN-Toolkit2 with Python 3.8 (recommended version)
conda create -n RKNN-Toolkit2 python=3.8
# Enter the RKNN-Toolkit2 Conda environment
conda activate RKNN-Toolkit2
# Install dependency libraries
pip3 install -r rknn-toolkit2/packages/requirements_cp38-2.0.0b0.txt
# Install RKNN-Toolkit2, for example:
pip3 install rknn-toolkit2/packages/rknn_toolkit2-2.0.0b0+9bab5682-cp38-cp38-linux_x86_64.whl
If no errors are reported when executing the following command, the installation is successful.
python
from rknn.api import RKNN
If installation fails or if other installation methods are needed, please refer to the RKNN SDK documentation.
1.2.2 Model Conversion Demo
In the rknn-toolkit2/examples directory, there are various function demos. Here, we will run a model conversion demo as an example. This demo shows the process of converting a yolov5 onnx model to an RKNN model on a PC, then exporting and inferring on a simulator. For the specific implementation of model conversion, refer to the demo's source code and the RKNN SDK documentation.
root@9893c1c48f42:/rknn-toolkit2/examples/onnx/yolov5# python3 test.py
I rknn-toolkit2 version: 2.0.0b0+9bab5682
--> Config model
done
--> Loading model
I It is recommended onnx opset 19, but your onnx model opset is 12!
I Model converted from pytorch, 'opset_version' should be set 19 in torch.onnx.export for successful convert!
I Loading : 100%|██████████████████████████████████████████████| 125/125 [00:00<00:00, 22152.70it/s]
done
--> Building model
I GraphPreparing : 100%|███████████████████████████████████████| 149/149 [00:00<00:00, 10094.68it/s]
I Quantizating : 100%|███████████████████████████████████████████| 149/149 [00:00<00:00, 428.06it/s]
W build: The default input dtype of 'images' is changed from 'float32' to 'int8' in rknn model for performance!
                       Please take care of this change when deploy rknn model with Runtime API!
W build: The default output dtype of 'output' is changed from 'float32' to 'int8' in rknn model for performance!
                      Please take care of this change when deploy rknn model with Runtime API!
W build: The default output dtype of '283' is changed from 'float32' to 'int8' in rknn model for performance!
                      Please take care of this change when deploy rknn model with Runtime API!
W build: The default output dtype of '285' is changed from 'float32' to 'int8' in rknn model for performance!
                      Please take care of this change when deploy rknn model with Runtime API!
I rknn building ...
I rknn buiding done.
done
--> Export rknn model
done
--> Init runtime environment
I Target is None, use simulator!
done
--> Running model
I GraphPreparing : 100%|███████████████████████████████████████| 153/153 [00:00<00:00, 10289.55it/s]
I SessionPreparing : 100%|██████████████████████████████████████| 153/153 [00:00<00:00, 1926.55it/s]
done
   class        score      xmin, ymin, xmax, ymax
--------------------------------------------------
   person       0.884     [ 208,  244,  286,  506]
   person       0.868     [ 478,  236,  559,  528]
   person       0.825     [ 110,  238,  230,  533]
   person       0.334     [  79,  353,  122,  517]
    bus         0.705     [  92,  128,  554,  467]
Save results to result.jpg!
If the rknn-toolkit2 is missing a model demo you need, you can refer to the rknn_model_zoo repository for Python examples.
1.3 RKNPU2 Usage
RKNPU2 provides C/C++ programming interfaces for model inference on the board-side Rockchip NPU platform.
1.3.1 Environment Installation
If the RKNPU2 Runtime library file librknnrt.so is missing or needs updating on the board, for Linux systems, you can push rknpu2/runtime/Linux/librknn_api/aarch64/librknnrt.so to the /usr/lib directory using scp.
1.3.2 Board-Side Inference
The RKNN SDK directory rknpu2/examples provides many model inference demos. Users can refer to these examples to develop and deploy their own AI applications.The rknn_model_zoo repository also provides C/C++ examples.
1.4 RKNN-Toolkit Lite2 Introduction
RKNN-Toolkit Lite2 provides a Python interface for board-side model inference, making it convenient for users to develop AI applications using Python. Note: RKNN-Toolkit Lite2 is installed and run on the board-side, and it is used only for inference; it does not support model conversion.
1.4.1 RKNN-Toolkit Lite2 Installation
# Install python3/pip3
sudo apt-get update
sudo apt-get install -y python3 python3-dev python3-pip gcc python3-opencv python3-numpy
# Install RKNN-Toolkit Lite2; find the installation package in rknn-toolkit-lite2/packages and install the corresponding version according to the system python version
pip3 install rknn_toolkit_lite2-2.0.0b0-cp310-cp310-linux_aarch64.whl
1.4.2 RKNN-Toolkit Lite2 Usage
In the RKNN SDK/rknn-toolkit-lite2/examples directory, there are applications developed based on RKNN-Toolkit Lite2. Although the number of provided examples is limited, in practice, the interfaces of RKNN-Toolkit Lite2 and RKNN-Toolkit2 are quite similar. Users can refer to the RKNN-Toolkit2 examples for porting to RKNN-Toolkit Lite2.
1.5 Detailed Development Documentation
For detailed usage of NPU and Toolkit, please refer to the doc documentation under RKNN SDK.
1.6 FAQs
Q1 is there a decrease in inference accuracy of the rknn model compared to the original model?
A1:Please refer to the accuracy troubleshooting section in the document《Rockchip_RKNPU_User_Guide_RKNN_SDK*》 to step-by-step identify the cause.
Q2 prompts that the 'expand' is not supported
A2:Try to update RKNN-Toolkit2/RKNPU2 to the latest version or modify the model and use ‘Repeat’ instead of ‘Expand’.
For more conversion issues or error causes, please refer to the Trouble Shooting section in the document《Rockchip_RKNPU_User_Guide_RKNN_SDK*》