



Firefly Ubuntu Qt Environment Deployment Guide
Firefly Ubuntu Qt Environment Deployment Guide
English | 简体中文
What is Qt?
Qt is a cross-platform C++ framework for developing graphical user interface (GUI) applications. It can be used to build high-performance desktop, mobile, and web applications, as well as non-GUI programs such as console tools and servers. Qt is an object-oriented framework that uses special code generation extensions and macros, making it easy to extend and allowing for true component programming.

Due to its high modularity, reusability, and ease of getting started, Qt has become a very popular development framework.
Ubuntu 18/20 Deployment
Firefly provides corresponding Qt environment packages for Firefly products running Ubuntu 18/20 systems, allowing for rapid deployment and development. The environment packages for the two systems are not compatible. Please select the corresponding environment package based on the system version running on your Firefly device.
Please click here to download the environment package.
The environment package uses a cross-compilation model, generating executable code for one platform on another. We need to develop and compile on an x86_64 architecture Linux PC and then transfer the compiled executable files to the target Arm64 architecture device to run. Therefore, the environment package needs to be deployed on both the host and the device.
Note: There are slight differences between different versions of the environment package. The following deployment and environment preparation sections only cover one method. Please refer to the documentation included in the environment package for specific usage.
Host Deployment
Regarding host selection: Please use a host with the same system as the target device for development.
For example: If you need to develop a Qt program for a Firefly device running Ubuntu 20, the host should also be a computer running Ubuntu 20.
1. Start Deployment
After extracting the environment package on your computer, cd into the extracted directory and start the deployment. It is mainly divided into 3 steps:
# Copy files to the system /opt/ directory
cp -rfd firefly_qt5.15_arm64_20.04 /opt/

# Also copy sysroot to the /opt/ directory
cp -rfd sysroot /opt/

# Copy environment variable files to /etc/profile.d/
cp host/host_qtEnv.sh /etc/profile.d/
2. Environment Preparation
Install the cross-compiler.
sudo apt update
sudo apt install -y crossbuild-essential-arm64
Then re-login or restart your computer to ensure the previously copied environment variables take effect.
3. Verification
The environment archive also includes an example folder, which contains several simple Qt demos that can be used to verify if the environment has been successfully set up. If everything works correctly, it indicates that the environment deployment was successful.
# For example, use analogclock to verify
cd example/analogclock

# Execute qmake to automatically generate the build system
qmake

# Execute make to start compilation
make
Device Deployment
1. Start Deployment
After extracting the environment package on the device, cd into the extracted directory and start the deployment. It is mainly divided into 2 steps:
# Copy the ext part to the system's /opt/ directory. Note that this also renames ext to firefly_qt5.15
cp -rfd firefly_qt5.15_arm64_20.04/ext /opt/firefly_qt5.15

# Copy environment variable files to /etc/profile.d/
cp target/target_qtEnv.sh /etc/profile.d/
2. Environment Preparation
Some necessary libraries also need to be installed on the device:
apt install -y libmtdev1 libinput10 libxkbcommon0 \
        libdouble-conversion3 libicu66 libharfbuzz0b \
        libwebpdemux2 libwebpmux3
Open /etc/profile.d/target_qtEnv.sh and you will see three sections of commented-out environment variables:
#XCB
#export QT_QPA_PLATFORM=XCB
#export QT_QPA_EGLFS_INTEGRATION=XCB_EGL

#LinuxFB
#export QT_QPA_PLATFORM=LINUXFB
#export QT_QPA_FB_DRM=1

#EGLFS
#export QT_QPA_PLATFORM=EGLFS
#export QT_QPA_EGLFS_INTEGRATION=EGLFS_KMS #in minimal ubuntu, use eglfs_kms.
#export QT_QPA_EGLFS_KMS_ATOMIC=1  #use drm atomic api or legacy api(two different)
#export QT_QPA_EGLFS_HIDECURSOR=1  #hide cursor
Uncomment the corresponding section based on the QPA_PLATFORM you want to use. For example, the Ubuntu environment generally uses XCB. Uncomment this section, then save and exit the editor.
#XCB
export QT_QPA_PLATFORM=XCB
export QT_QPA_EGLFS_INTEGRATION=XCB_EGL
If using XCB, you will also need to install some additional libraries:
apt install -y libxcb-icccm4 libxcb-image0 libxcb-shm0 \
        libxcb-keysyms1 libxcb-render0 libxcb-render-util0 \
        libxcb-shape0 libxcb-sync1 libxcb-xfixes0 \
        libxcb-xinerama0 libxcb-xkb1 libxcb-randr0 \
        libsm6 libice6 libxkbcommon-x11-0
Finally, execute reboot to restart the device.
3. Verification
Transfer the executable file compiled on the host to the device and run it. If it runs correctly, it indicates that the device-side environment setup was successful.
LD_LIBRARY_PATH=/opt/firefly_qt5.15/lib ./analogclockUbuntu 22 Deployment
If the target Firefly device is running Ubuntu 22, cross-compilation development is not required, and installing Qt is much simpler and more convenient.
Firefly has packaged the Qt environment for Ubuntu 22 into a deb package, which can be installed on the target device using apt:
# Install basic environment
apt update
apt install -y qtcreator qtbase5-dev

# Install additional Qt components and development environments as needed, for example
apt install -y libqt5multimedia5 qtmultimedia5-dev libqt5quick5 qtdeclarative5-dev
Qt Creator Configuration
Qt development often uses Qt Creator as the IDE. In the previous sections, we set up the Qt development environment. Next, we will introduce how to ensure Qt Creator uses the environment we built, rather than the environment that comes with the IDE or is located elsewhere.
Ubuntu 18/20
On the host, you can use the following command to quickly install Qt Creator:
sudo apt update
sudo apt install qtcreator
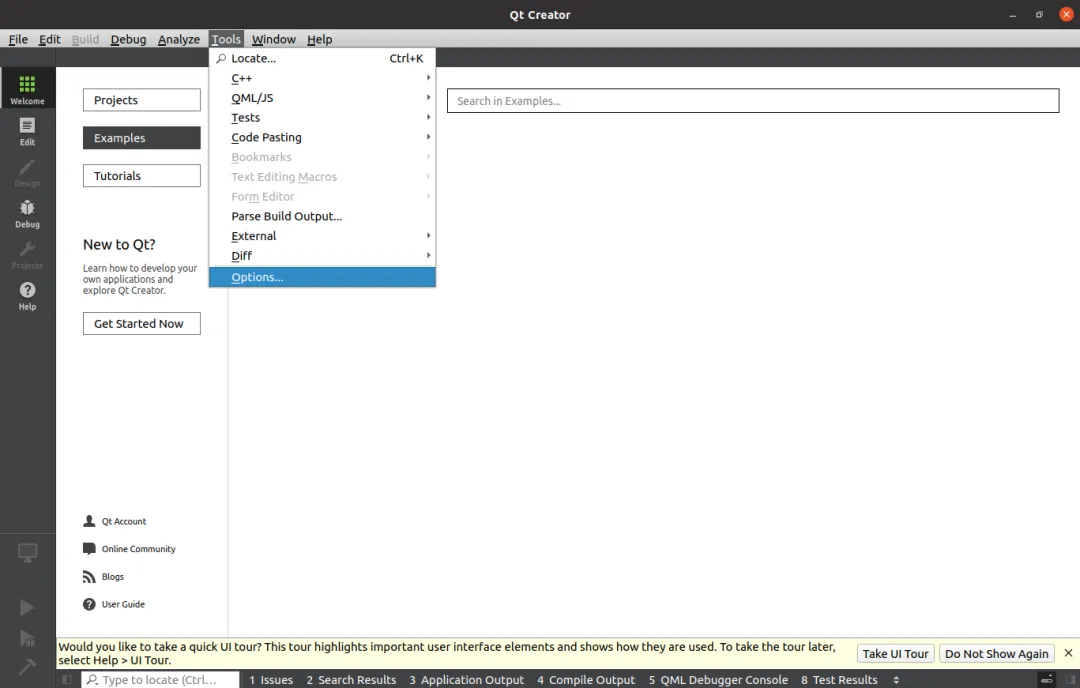
After launching Qt Creator, first click Tools -> Options to open the settings interface:
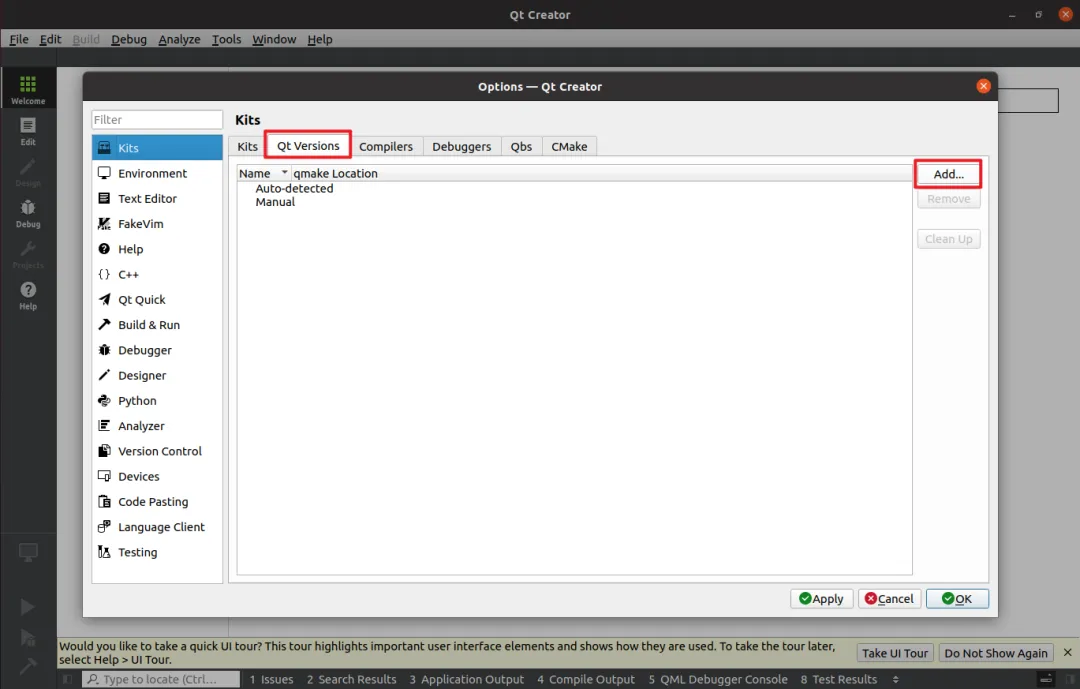
Then select Qt Versions and click Add to add a Qt version:
In the pop-up window, select the Qt environment we previously copied to /opt:
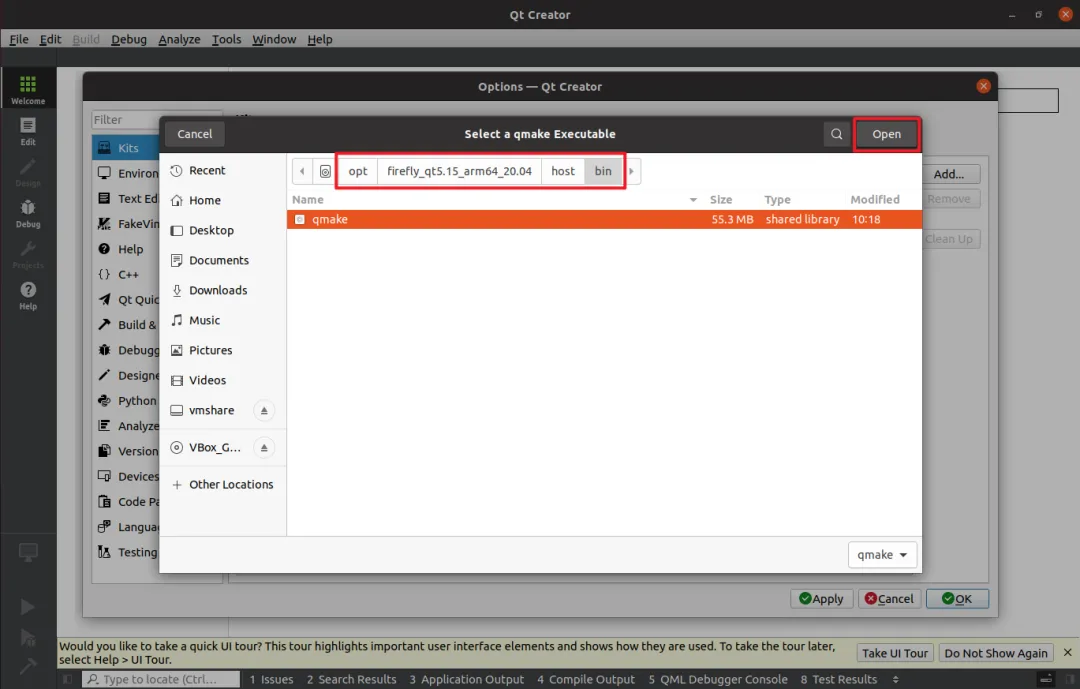
Note: The path here may vary slightly depending on the version of the environment package, but ultimately you need to select the location of qmake under /opt.
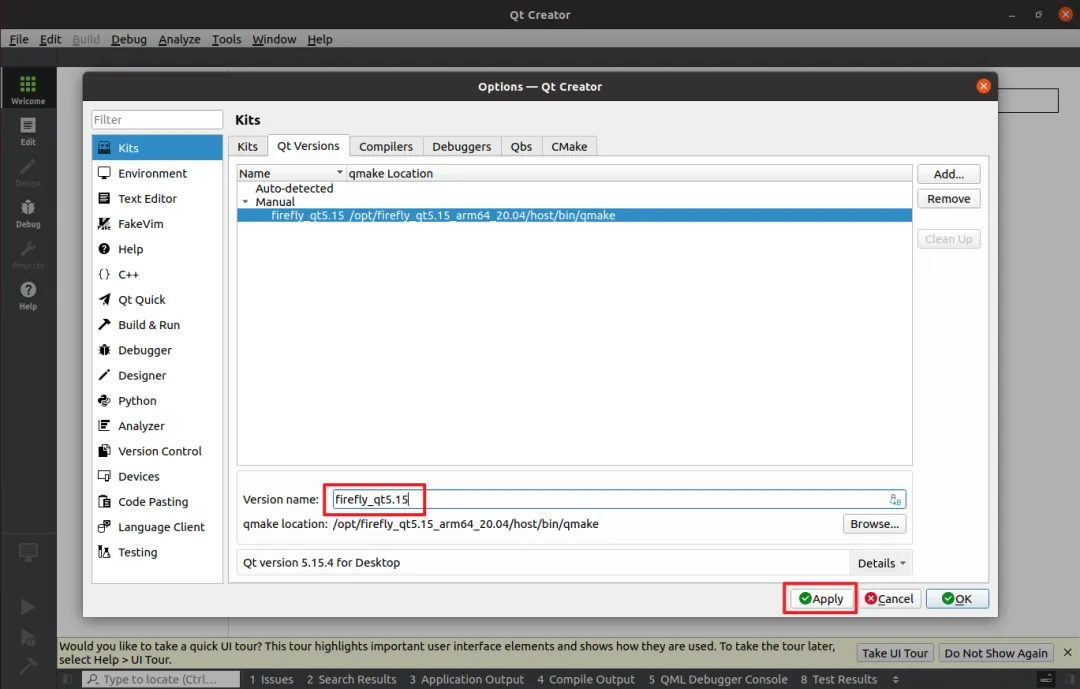
You can give the newly added Qt Version a name, then click Apply to make the addition effective:
Next, go to the Kits page and add a new Kit:
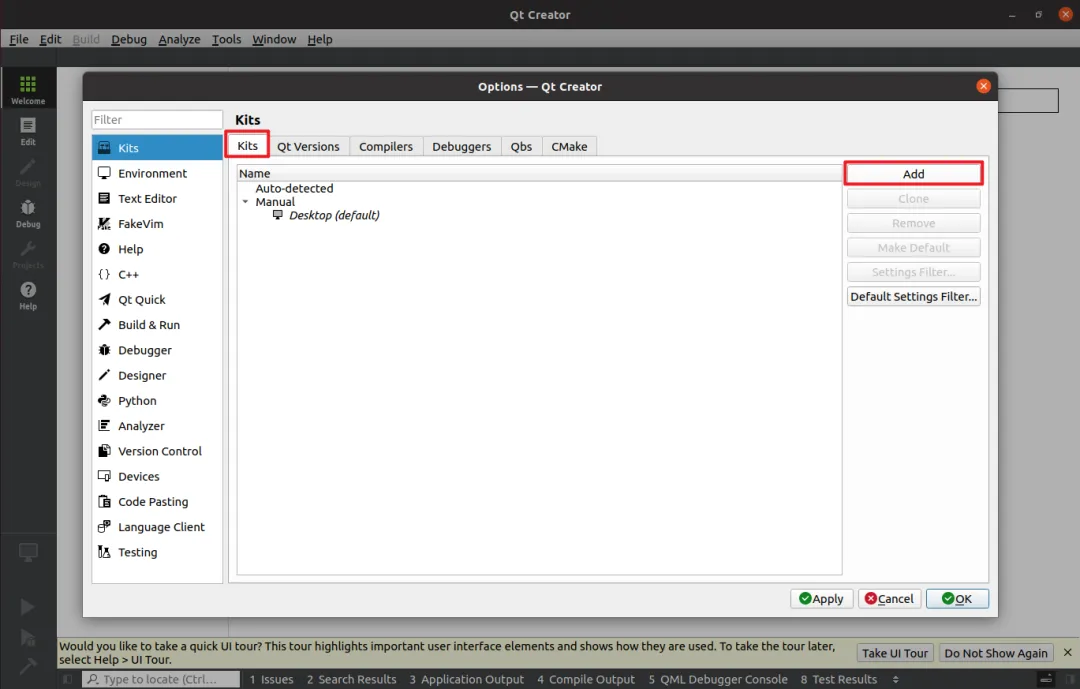
Configure the new Kit as follows:
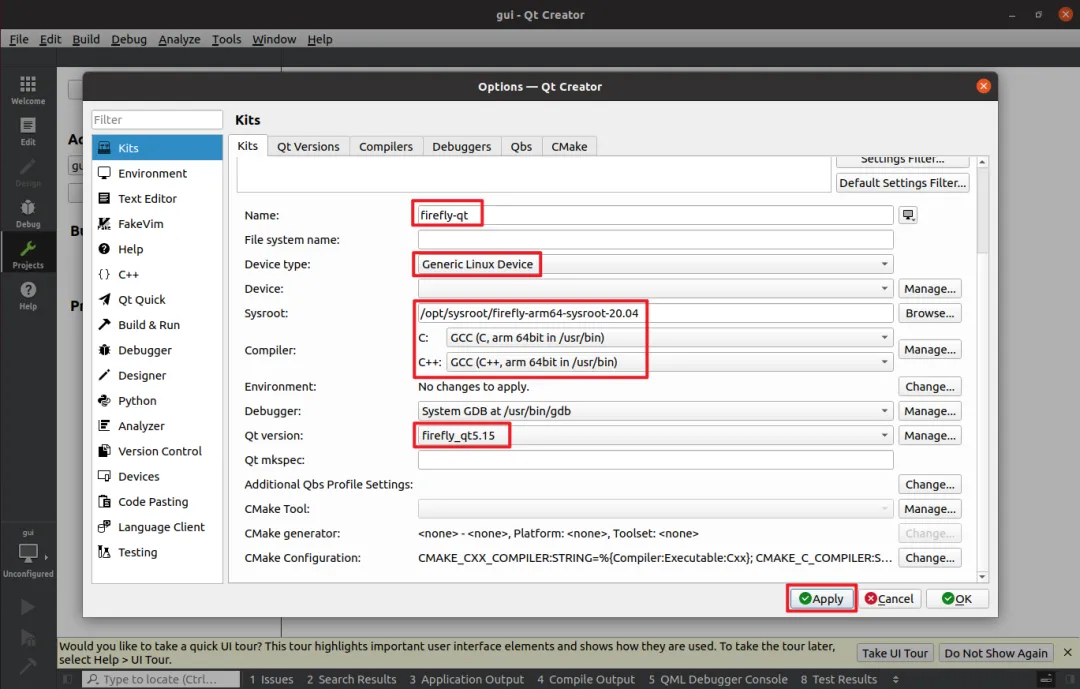
Configuration details: First, give the Kit a name for easy identification. Device Type should be set to Generic Linux Device. The key part is the next three configurations: Sysroot should be set to the sysroot we previously copied to /opt; Compiler should be set to the arm 64bit GCC; Qt version should be set to the Qt Version we added in the previous step. Then click Apply to apply the changes.
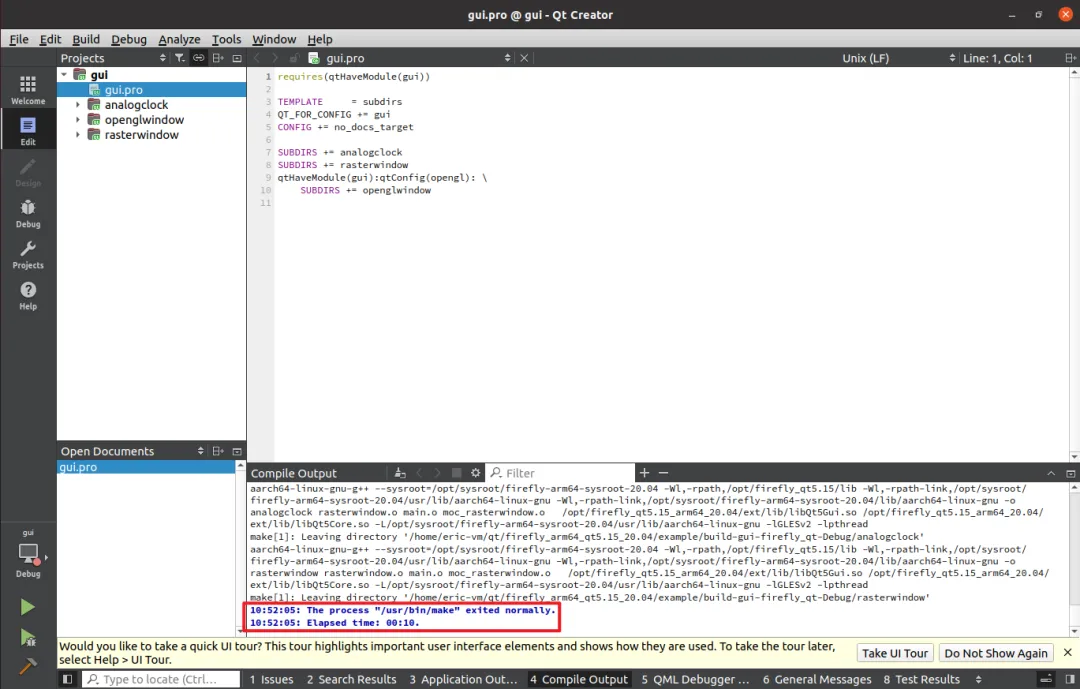
Finally, you can open a project, select the new Kit we added for compilation. If the compilation is successful, it indicates that our configuration is correct:
Ubuntu 22
The target device is running Ubuntu 22 and does not require cross-compilation, so simply install Qt Creator directly on the device.
Since the Qt environment was installed via apt, Qt Creator should be able to automatically detect the qmake location:
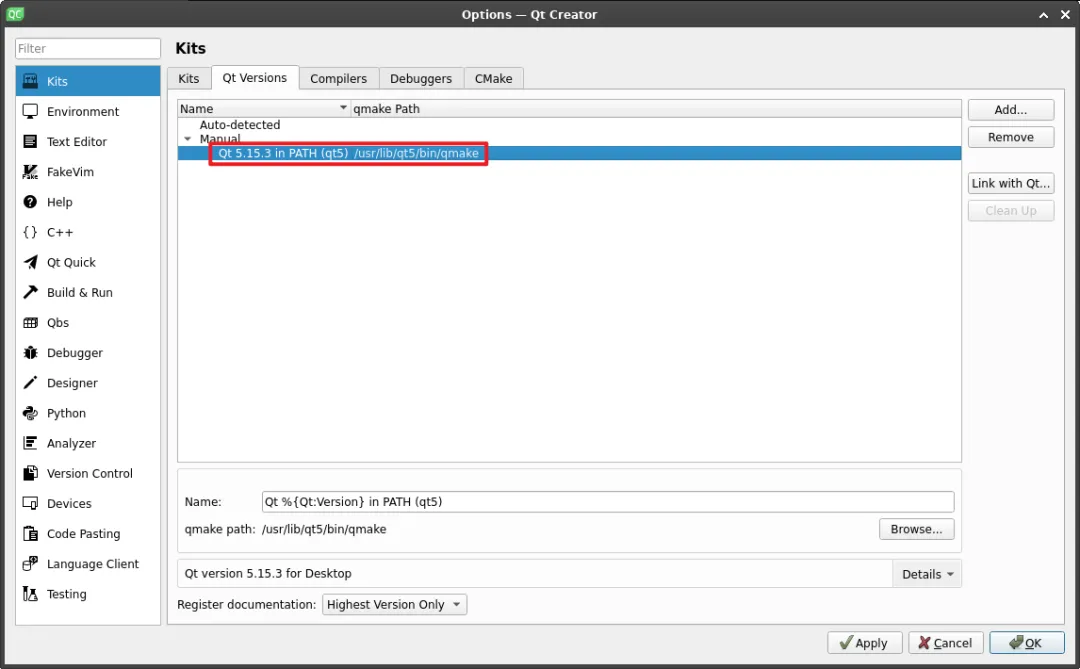
Qt Creator automatically detects the qmake path as /usr/lib/qt5/bin/qmake, so there is no need to manually add a Qt Version.
In the Kit configuration, since cross-compilation is not needed, Sysroot is not set. Also, select the automatically detected Qt Version for Qt version. The remaining configurations are the same as in the previous chapter.
FAQ
1. Extraction Failed
If you encounter this error when extracting the environment package:
tar: xxxxx: Directory renamed before its status could be extracted
tar: Exiting with failure status due to previous errors
You can add the -P parameter to tar and re-extract, for example:
tar -Pzxf firefly_arm64_qt5.15_20.04_20230415.tgz2. Qt Library Not Found
If you see an error that the Qt library cannot be found when running a Qt program:
./analogclock: error while loading shared libraries: libQt5Gui.so.5: cannot open shared object file: No such file or directoryPlease check if the environment variable file /etc/profile.d/target_qtEnv.sh exists? If it exists, has it taken effect? Has the Qt library path been placed in the specified location as required by the documentation?
3. Multi-version Qt Conflict
If you see an error saying there is an undefined symbol when running a Qt program:
./analogclock: symbol lookup error: ./analogclock: undefined symbol: _ZN9QGradientD1Ev, version Qt_5It means the Qt program found a Qt library that does not match its own version. This problem often occurs in systems with multiple Qt version environments. For example, we originally needed the environment under /opt/firefly_qt5.15, but the Qt program tried to use /lib/aarch64-linux-gnu/libQt5Gui.so.5 instead, causing the issue.
You can use the ldd command to see which libraries the program is trying to use:
root@firefly:~/analogclock# ldd analogclock | grep -i qt
        libQt5Gui.so.5 => /opt/firefly_qt5.15/lib/libQt5Gui.so.5 (0x0000007f8e0b2000)
        libQt5Core.so.5 => /opt/firefly_qt5.15/lib/libQt5Core.so.5 (0x0000007f8daf6000)
Solution 1:
Specify the library search path for the program before compiling by adding the following to the project's .pro file:
QMAKE_RPATHDIR += /opt/firefly_qt5.15/libSolution 2:
Specify LD_LIBRARY_PATH when running the program:
LD_LIBRARY_PATH=/opt/firefly_qt5.15/lib ./analogclock4. Display Not Found
If you see an error that it cannot connect to the display when running a Qt program:
qt.qpa.xcb: could not connect to display
qt.qpa.plugin: Could not load the Qt platform plugin "xcb" in "" even though it was found.
This application failed to start because no Qt platform plugin could be initialized. Reinstalling the application may fix this problem.

Available platform plugins are: eglfs, linuxfb, minimal, minimalegl, offscreen, vnc, wayland-egl, wayland, wayland-xcomposite-egl, webgl, xcb.

Aborted
This is most likely an environment variable issue. You need to specify the display, which is usually:
# For x11 environment:
export DISPLAY=:0

# For wayland environment:
export WAYLAND_DISPLAY=wayland-0